Learn how to build Alexa Skills with In-Skill Purchasing (ISP)
One of the greatest aspects of the Amazon Alexa platform is being able to earn money by offering purchases in our skills. With In-Skill Purchasing (ISP), we can create a variety of product types for our users to enjoy an enhanced experience.
Lets face facts: developing a quality skill that offers real value to our users is a time-consuming task. In the end, we cannot pay our bills or fund our projects with glowing reviews and positive feedback. We need to figure out a way to get users to pay us for the software that we put our blood, sweat, and tears into.
Overview
In this tutorial, I will show you from start to finish how to make money with Alexa by enabling ISP support. We will start with a freemium option for our users and coax them into upgrading their skill experience by making a one-time purchase for quality content. By the end of this tutorial, our skill should be ready to be certified, published, and making us money!
NOTE: This tutorial is for Alexa developers who are familiar with Skill development as well as the Alexa Developer Console. If this is your first time creating an Alexa Skill, you may have trouble following along. If that’s the case, you might be better off starting with a beginner tutorial and then returning here once you have the fundamentals locked down. Otherwise, ….
Let’s get started!
What you need to do before we begin making money with Alexa
Before we start the whole process of building an Alexa Skill and making products for our user to purchase, make sure to create an Amazon Developer account.
You should also be familiar with the process of creating, configuring, and testing a skill in the Alexa Developer Console. If not, check out our beginner tutorial for creating a random quotes Skill.
Is In-Skill Purchasing available in your country and region?
The Amazon Alexa team is working hard to expand ISP support to more regions. Check to see if you can use ISPs in your country and region by viewing this page: https://developer.amazon.com/en-US/docs/alexa/in-skill-purchase/isp-language-distribution-pricing.html
This tutorial focuses on the en/US language/country locale.
Tax information
There is a little bit of paperwork and form-filling that we need to address before we start writing any code (the fun part!).
Make sure your tax information is up-to-date. You can update this information in your Amazon Developer account. The process is very simple; just make sure to have all of your relevant tax information for your country available. For more complete steps on how to set this up, see this link: https://developer.amazon.com/en-US/docs/alexa/in-skill-purchase/setup-tax.html
NOTE: You should submit this as soon as possible. In fact, I suggest you get this step done as early as possible in case you have issues. Your skill cannot be certified and published to the Alexa Skills store until this is accomplished.
Review the official documentation
In-Skill Purchasing is one of the newer and significant features of the Alexa Platform. If you plan to make money with Alexa, make sure to consult the official Amazon Alexa documentation for an overview of what ISPs are.
There are many rules and restrictions on what you can and cannot do with your skill and products (i.e. price details for products), so make sure you’re up-to-date and compliant. Amazon values their customer base and they make sure that third-party vendors and developers treat those customers well.
Planning
The first step in any successful project is a great idea. The second and most important step is planning. As the old adage goes, “fail to plan, plan to fail.“
For the purposes of this Alexa ISP tutorial, we will keep it simple. Our plan is to generate revenue by offering premium content for a small price. We will be creating a simple random quote Skill similar to a previous tutorial posted here.
Free-tier (freemium) users will have access to a short list of random quotes, with the option to upgrade the quality of random quotes for better content. Once the user has completed the purchase, we will handle the response from Alexa and restart the session with the premium content.
With the planning and preparation taken care of, we can start building our Alexa skill.
Create a Skill in the Alexa Developer Console
We will begin by creating a new skill from scratch. Navigate to the Alexa Developer Console and click on the Create Skill button.
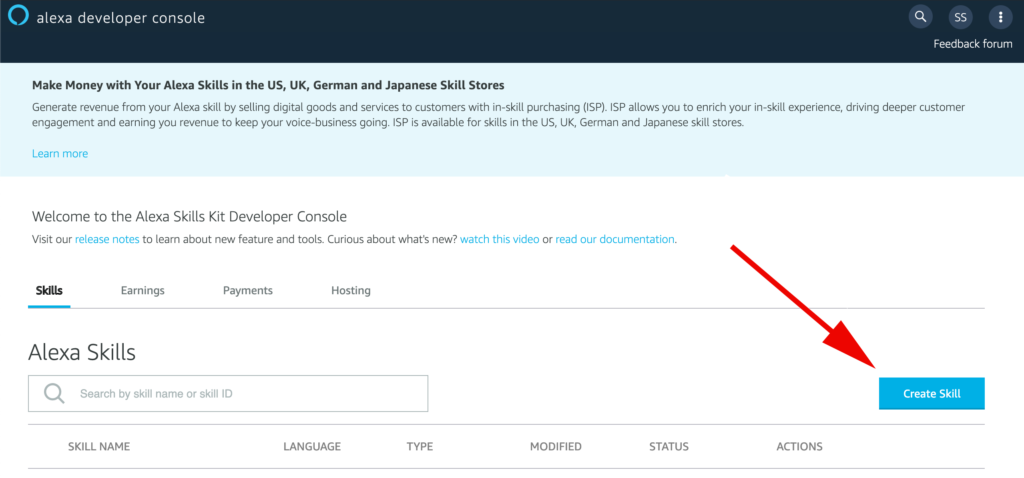
You will be directed to a screen that allows you to set a Skill Name, interaction model, and hosting for the skill code.
Name your skill something original. This tutorial will use “random quotes” as the Skill name to keep things simple.
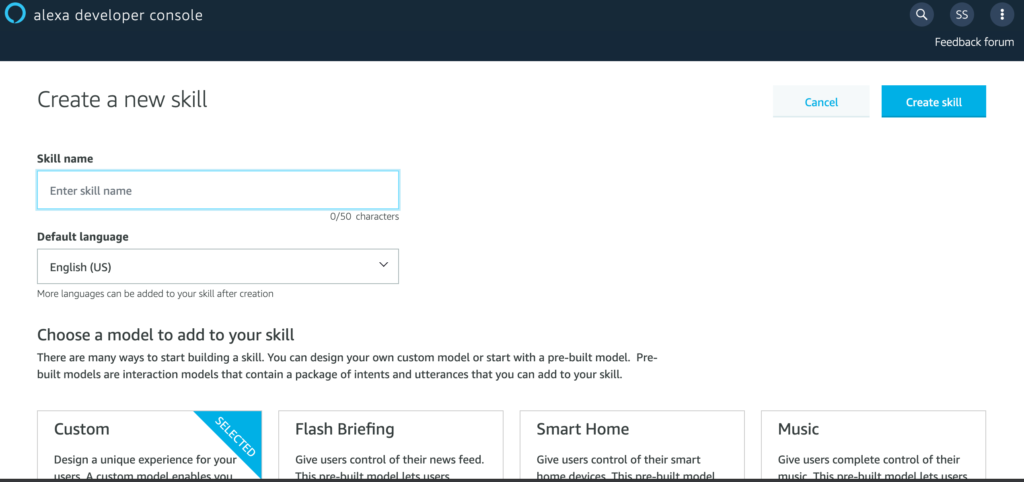
For the interaction model, make sure that Custom is selected.

Select Alexa-hosted (Node.js) for the skill’s backend resource.

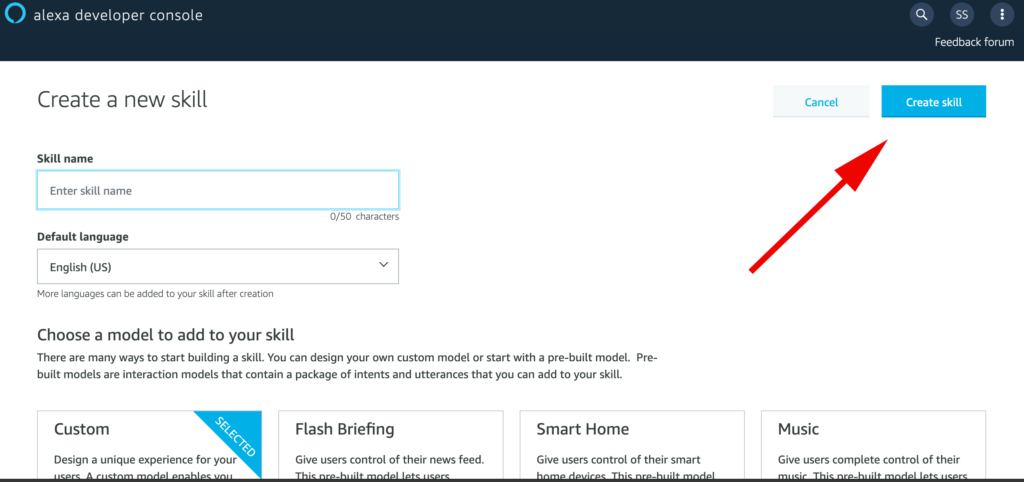
Scroll back to the top of the page and click the Create Skill button to create the skill.
This may take a moment, so take a quick break and wait until your resources are provisioned. Once it is done, you should be redirected to the Alexa Developer Console IDE for your skill.
At this point, you should test your skill on the Test tab of the Alexa Developer Console so that you know your skill is working as expected.
Creating the In-Skill Product
On the Build tab of the Alexa Developer Console, scroll down until you see the IN-SKILL PRODUCTS menu option on the left-hand side.
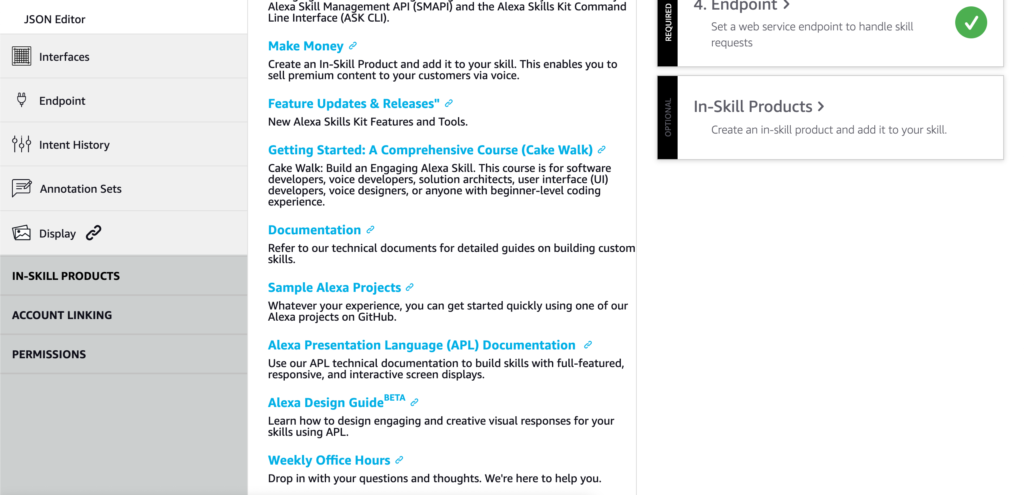
Click on it and you will be redirected to the In-Skill Products page.
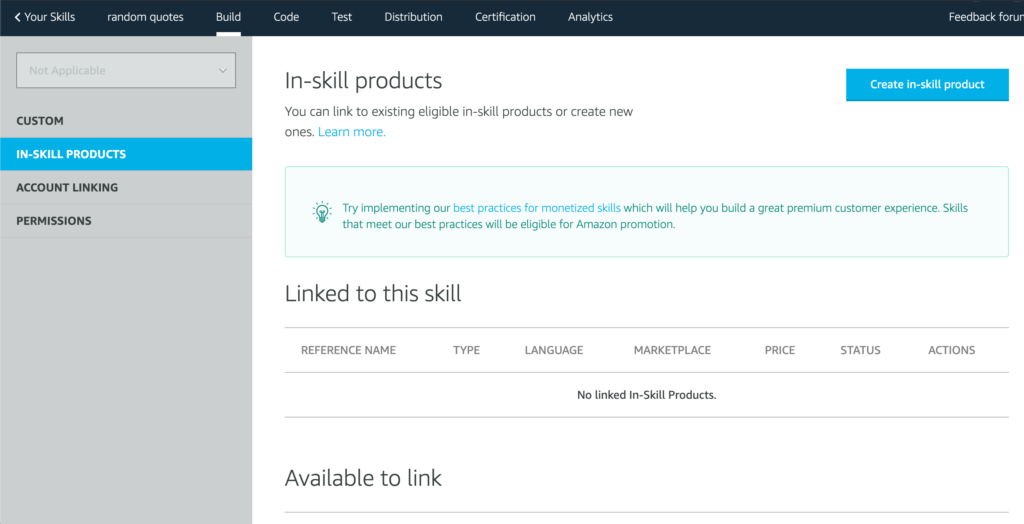
Click on the Create in-skill product button in the upper right corner of the main content screen. You will be redirected to a simple form that will define the product’s name and type.

Give your product a reference name with no spaces. This tutorial’s product will be called PremiumQuotes.
Below this are three options for the in-skill product type: One-Time Purchase, Subscription, and Consumable.
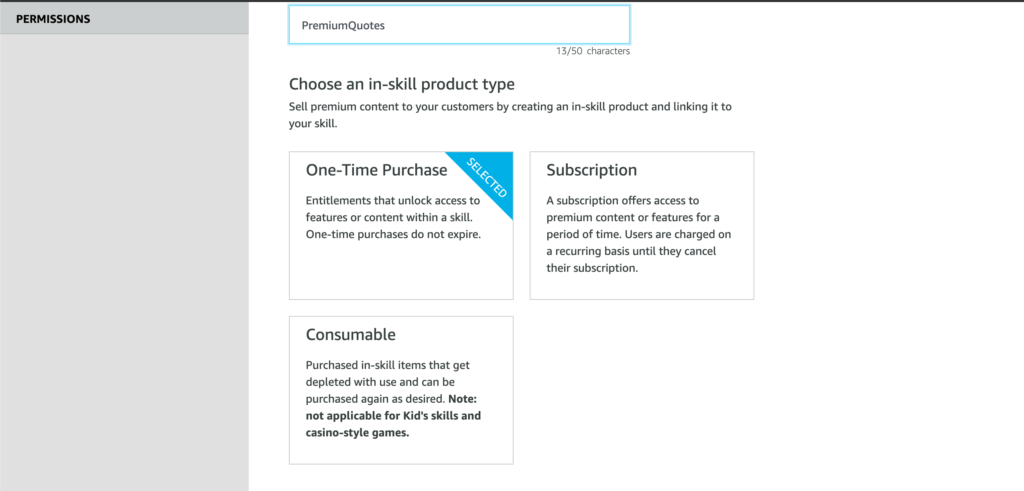
NOTE: For more information on these types of purchases and the rules regarding purchase and refund, start your research here: https://developer.amazon.com/en-US/docs/alexa/in-skill-purchase/isp-overview.html#create-isp
For this tutorial, our customers will purchase our PremiumQuotes product and never have to pay again for this digital product. Select One-Time Purchase.
Scroll back to the top of the screen and click on the Create in-skill product button in the upper right corner of the main content screen.
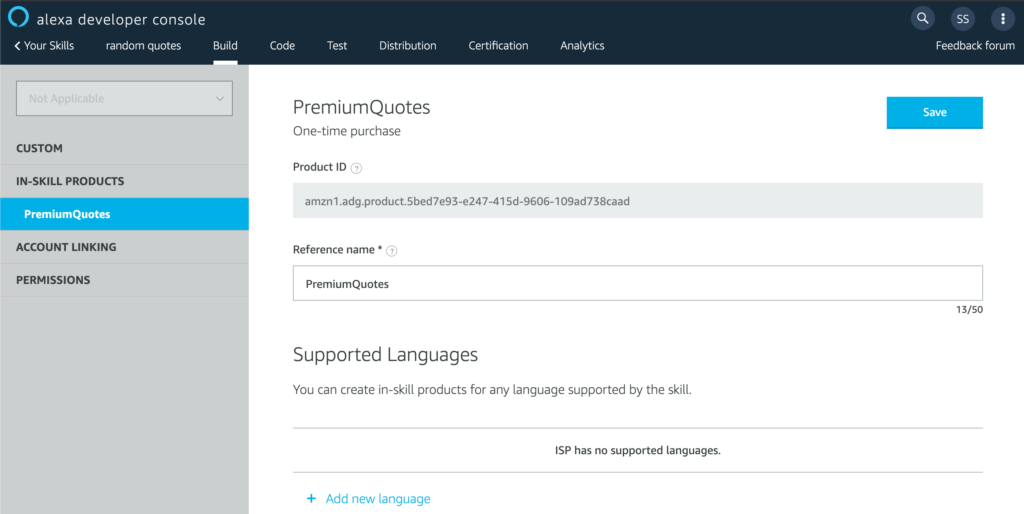
Our product has been created, but we aren’t done yet.
Configuring our In-Skill Product
We still need to set up our product, including details like supported languages, price, icon, testing instructions, etc. Let’s go through each of these options step-by-step to ensure we have a good understanding of what a products needs defined before it can be released to the public.
Supported Language

Click on the “+ Add new language” link to add a new language for this product. In its place, a menu will pop open to reveal what languages you can support. Because our tutorial skill is simple, we will only be able to select the English (US) option.

You will be redirected to page where you can start filling in details for the product.
Product details for the locale
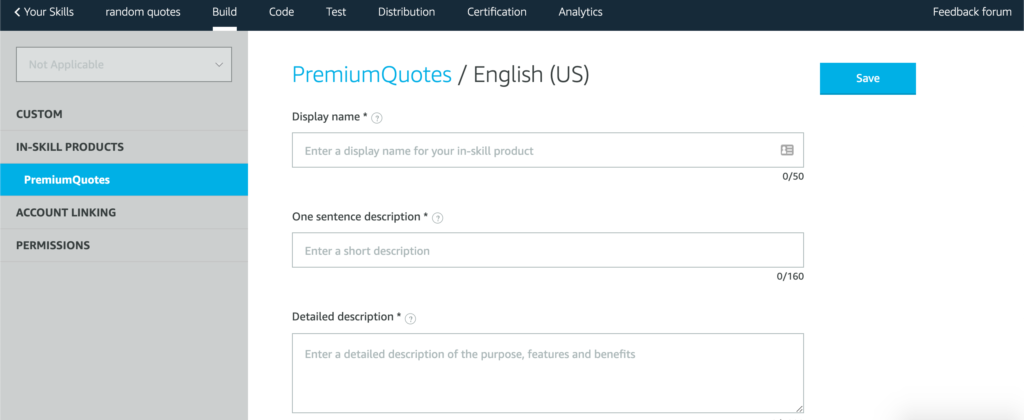
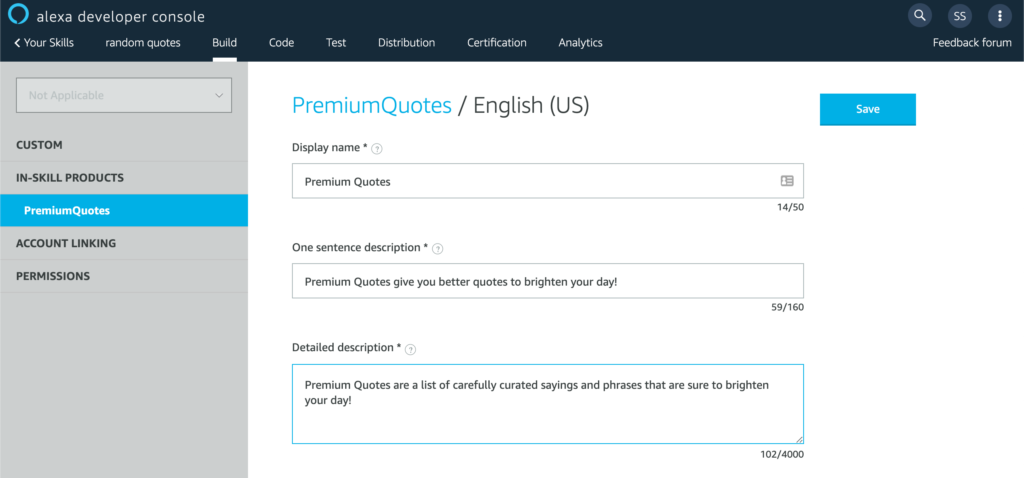
Before we start entering any more information, let’s go over the form fields and what they mean (note: content mostly pulled from info bubbles):
- Display name – The name for the product for this locale. This name is included in purchase confirmation prompts, Alexa app purchasing cards, and email receipts.
- One sentence description – A quick at-a-glance sentence that describes the product or what customers can do with it.
- Detailed description – A full description explaining the product’s functionality and any prerequisites to using it. This description is used in offer and purchase cards on screen devices.
- Small icon for this in-skill product – The image used for displaying the product.
- Large icon for this in-skill product – The image used for displaying the product.
- Purchase prompt description – The description of the product a customer hears when making a purchase.
- Purchase confirmation description – A description of the product that displays on the post-purchase confirmation card in the Alexa Companion app.
For a real product, these fields will be very important. You will want to test the purchase flows to ensure that your messaging is correct and suitable for your audience. For the purposes of this tutorial, we will be brief with the details and note the product details when they appear later on.
Fill in the details for the text fields to simple values. You can always come back and update them after the tutorial is finished.
In addition to the text fields, you will need to generate icons for your product. Use the Alexa Skill Icon Builder, a free tool that will be enough to get your through to the next steps of this tutorial
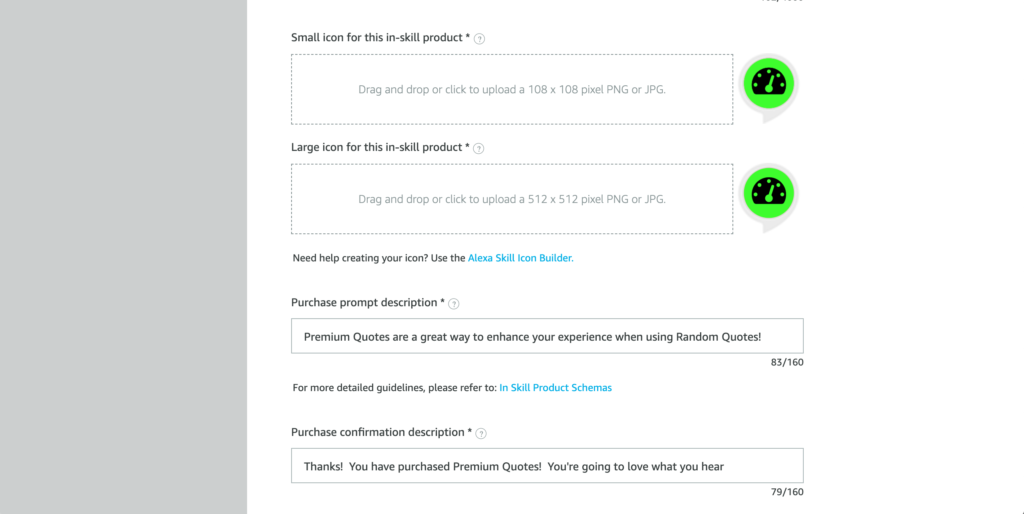
Once you are finished, scroll back to the top and click on the Save button to save your details. You will be redirected back to the PremiumQuotes main product page.
Product Pricing and Availability
Now that our digital product has been set up and configured, we can move on to the fun stuff: setting prices!
Scroll down to view the Pricing & Availability section.
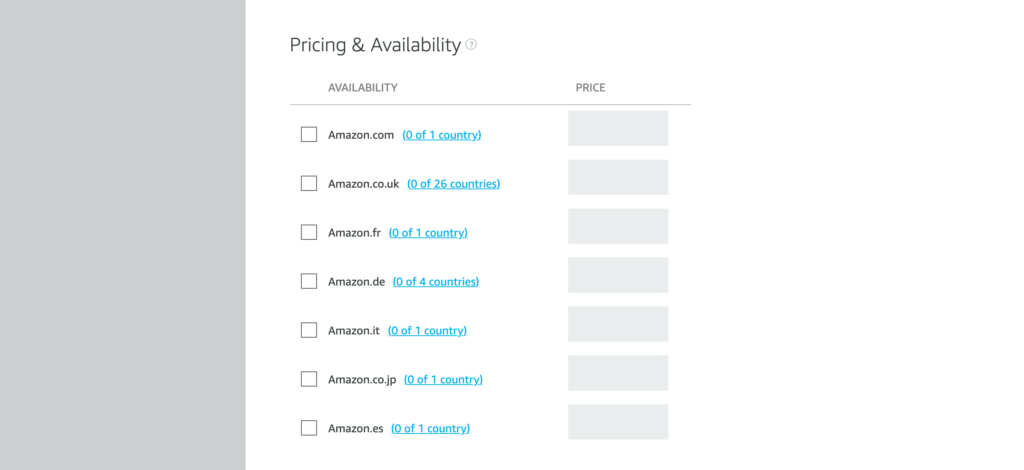
This is where we decide to distribute your in-skill product. The tutorial’s in-skill product will need to support the primary language for each of the specified countries/regions so that it is accessible by users in those countries/regions.
In the case of this tutorial’s skill, we will only enable two options, Amazon.com & Amazon.co.uk. Click on the checkboxes next to these options to enable them.

Once an option has been enabled, we can start setting the prices for our PremiumQuotes ISP. We will leave the default option set to $0.99 and £0.99 for each option.
Tax Category
Scrolling down further down the page, we will see the Tax Category option. You will need to select a category for your ISP. Select Software to complete this required step of the tutorial.
NOTE: I am no tax expert, nor do I claim to be one. You should consult an accountant or tax professional before you release your ISP-enabled Skill onto the marketplace. For more information, see this link: https://developer.amazon.com/en-US/docs/alexa/in-skill-purchase/create-isp-dev-console.html#tax-category
Testing
Scrolling down even further, you will see the final text area that you need to fill out, Testing Instructions.
In this field, you will need to provide instructions and information to Amazon’s certification team. At the very least, you should explain how to find the product in the skill (i.e. “What can I buy?” or “Tell me about the premium quotes upgrade.“), test account credentials (for example, if you are linking the skill user’s account to an external account), and any other details you see fit.
Because this tutorial skill is not going to be published, we will simply fill in some placeholder content and move on.
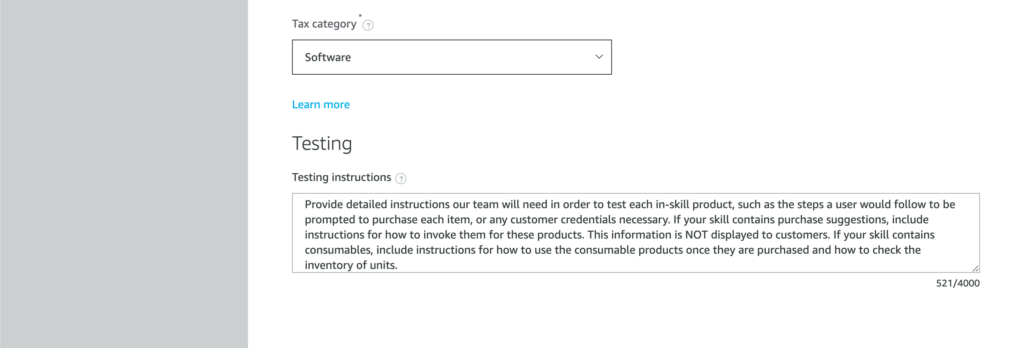
At this point, we are done editing the product details.
Scroll back to the top of the page and click the Save button. If this is the first time you’ve edited the product, you should see a popup similar to this:

Click Link to skill. You should be redirected to the main In-Skill Products page with the PremiumQuotes product listed in the table “Linked to this skill”.
NOTE: you can choose not to link this product at this point if you desire. When you return to the In-Skill Products main page, you will see your product located in the Available to link table. Scroll to the right and you should be able to link it with a link under the Actions column.

NOTE: The “Linked to this skill” table scrolls to the right to reveal more options. I didn’t notice this at first, so I give this information to you. There is a Status column as well as an Actions column where you can edit or unlink your skill.
Congrats! You now have a product defined and ready to integrate into our skill code.
Generate Random Quotes
Our next step in this tutorial is to build out the main concept of the skill. For freemium users, the skill will respond with a random quote from a list.
We will be using a list of short, publicly-available programming quotes found on the Internet. If you wish to follow along, you can use these as well:
A good programmer looks both ways before crossing a one-way street.
A computer program does what you tell it to do, not what you want it to do.
Only half of programming is coding. The other 90% is debugging.
The best thing about a boolean is even if you are wrong, you are only off by a bit.
There is nothing quite so permanent as a quick fix.
There’s no test like production.
Freemium Quotes
Navigate to the Code tab in your skill’s IDE. Create a file in the IDE called freemiumQuotes.js, then insert the following content into this file:
module.exports = [
  `A good programmer looks both ways before crossing a one-way street.`,
  `A computer program does what you tell it to do, not what you want it to do.`,
  `Only half of programming is coding. The other 90% is debugging`,
  `The best thing about a boolean is even if you are wrong, you are only off by a bit.`,
  `There is nothing quite so permanent as a quick fix.`,
  `There’s no test like production.`
];
Utility function to retrieve a random freemium quote
Now that we have this JavaScript module, we can import it into our skill code.
To keep our code clean and modular, we will create a file called utils.js. This file will export a module that we can use in our Intent Handlers to retrieve a random freemium quote. Here’s what that looks like in code:
const freemiumQuotes = require('./freemiumQuotes.js');

module.exports = {
    getRandomFreemiumQuote() {
        return freemiumQuotes[Math.floor(Math.random() * freemiumQuotes.length)];
    }
};
Open index.js and import the utils.js file. Then, update the HelloWorldIntentHandler with our new method, getRandomFreemiumQuote().
const Alexa = require('ask-sdk-core');
// add this import to bring in our newly created module.
const utils = require('./utils.js');

// ... more code

const HelloWorldIntentHandler = {
    canHandle(handlerInput) {
        return Alexa.getRequestType(handlerInput.requestEnvelope) === 'IntentRequest'
            && Alexa.getIntentName(handlerInput.requestEnvelope) === 'HelloWorldIntent';
    },
    handle(handlerInput) {
        // add this code here to retrieve a random quote
        const speakOutput = utils.getRandomFreemiumQuote();
        return handlerInput.responseBuilder
            .speak(speakOutput)
            .withShouldEndSession(false)
            .getResponse();
    }
};NOTE: you can delete the util.js file that comes with the custom skill template. This will avoid some confusion as we move forward with the development of the skill.
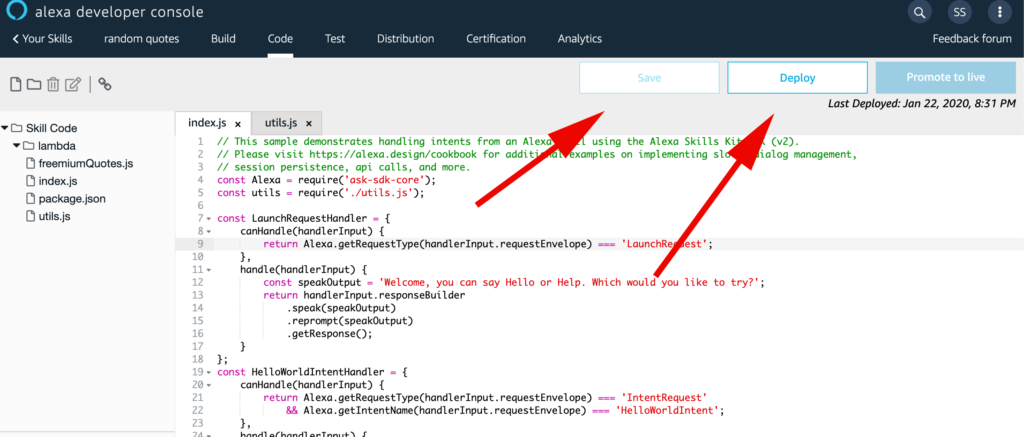
Make sure to save all of the files using the Save button (or CMD+s on Mac OS X), then click Deploy to upload your changes to the Alexa-hosted Node.js lambda function our skill runs on.
Test this skill to make sure the random quotes are working. Navigate to the Test tab of the Alexe Developer Console. Invoke the skill with “open random quotes“, then type in “hello“. You should receive one of the quotes from the list we created earlier. You can type in “hello” multiple times, which should yield more random programmer quotes.
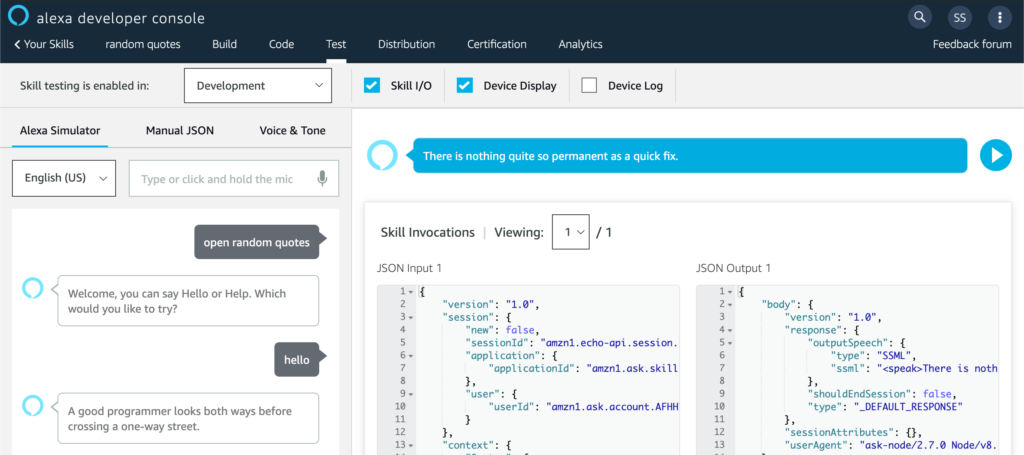
This is our freemium experience. It’s simple and bare, but it adds a little bit of value for our users. Our next step is to add in premium quotes.
Implementing premium quotes
Using the same pattern we utilized in the freemium random quotes, we will create a list of premium quotes. Again, this tutorial is mostly an example of how to make money with Alexa skills, so the details really don’t matter much.
Here’s the list of premium quotes we are going to add to our skill:
Always code as if the guy who ends up maintaining your code will be a violent psychopath who knows where you live
Talk is cheap. Show me the code.
Programming today is a race between software engineers striving to build bigger and better idiot-proof programs, and the Universe trying to produce bigger and better idiots. So far, the Universe is winning.
Any fool can write code that a computer can understand. Good programmers write code that humans can understand.
I'm not a great programmer; I'm just a good programmer with great habits.
Truth can only be found in one place: the code.
Everyone knows that debugging is twice as hard as writing a program in the first place. So if you're as clever as you can be when you write it, how will you ever debug it?
Walking on water and developing software from a specification are easy if both are frozen.
The computer programmer is a creator of universes for which he alone is the lawgiver. No playwright, no stage director, no emperor, however powerful, has ever exercised such absolute authority to arrange a stage or field of battle and to command such unswervingly dutiful actors or troops.
At forty, I was too old to work as a programmer myself anymore; writing code is a young person’s job.
Some of the best programming is done on paper, really. Putting it into the computer is just a minor detail.
Now that we have our quotes, it’s time to put them in a consumable module. Create a file called premiumQuotes.js and paste in the following contents:
module.exports = [
    `Always code as if the guy who ends up maintaining your code will be a violent psychopath who knows where you live`,
    `Talk is cheap. Show me the code.`,
    `Programming today is a race between software engineers striving to build bigger and better idiot-proof programs, and the Universe trying to produce bigger and better idiots. So far, the Universe is winning.`,
    `Any fool can write code that a computer can understand. Good programmers write code that humans can understand.`,
    `I'm not a great programmer; I'm just a good programmer with great habits.`,
    `Truth can only be found in one place: the code.`,
    `Everyone knows that debugging is twice as hard as writing a program in the first place. So if you're as clever as you can be when you write it, how will you ever debug it?`,
    `Walking on water and developing software from a specification are easy if both are frozen.`,
    `The computer programmer is a creator of universes for which he alone is the lawgiver. No playwright, no stage director, no emperor, however powerful, has ever exercised such absolute authority to arrange a stage or field of battle and to command such unswervingly dutiful actors or troops.`,
    `At forty, I was too old to work as a programmer myself anymore; writing code is a young person’s job.`,
    `Some of the best programming is done on paper, really. Putting it into the computer is just a minor detail.`
];
Next, let’s update the utils.js file with a method, getRandomPremiumQuote(), which will return a random quote from the premium list we just created in premiumQuotes.js:
const freemiumQuotes = require('./freemiumQuotes.js');
const premiumQuotes = require('./premiumQuotes.js');

module.exports = {
    getRandomFreemiumQuote() {
        return freemiumQuotes[Math.floor(Math.random() * freemiumQuotes.length)];
    },
    getRandomPremiumQuote() {
        return premiumQuotes[Math.floor(Math.random() * premiumQuotes.length)];
    }
};
Now that we have our new method, let’s test it out. We will insert a hard-coded boolean that will act as a switch once we integrate ISP support. Update index.js like so, altering HelloWorldIntentHandler:
const HelloWorldIntentHandler = {
    canHandle(handlerInput) {
        return Alexa.getRequestType(handlerInput.requestEnvelope) === 'IntentRequest'
            && Alexa.getIntentName(handlerInput.requestEnvelope) === 'HelloWorldIntent';
    },
    handle(handlerInput) {
        // this is our temporary boolean
        const hasPremiumQuotesEnabled = true;
        // we use the boolean to determine which set of quotes to receive a random quote from
        const speakOutput = (hasPremiumQuotesEnabled) ? utils.getRandomPremiumQuote() : utils.getRandomFreemiumQuote();
        return handlerInput.responseBuilder
            .speak(speakOutput)
            .withShouldEndSession(false)
            .getResponse();
    }
};
Next, test this skill to ensure that the random quotes returned are from the premium list, not freemium list.
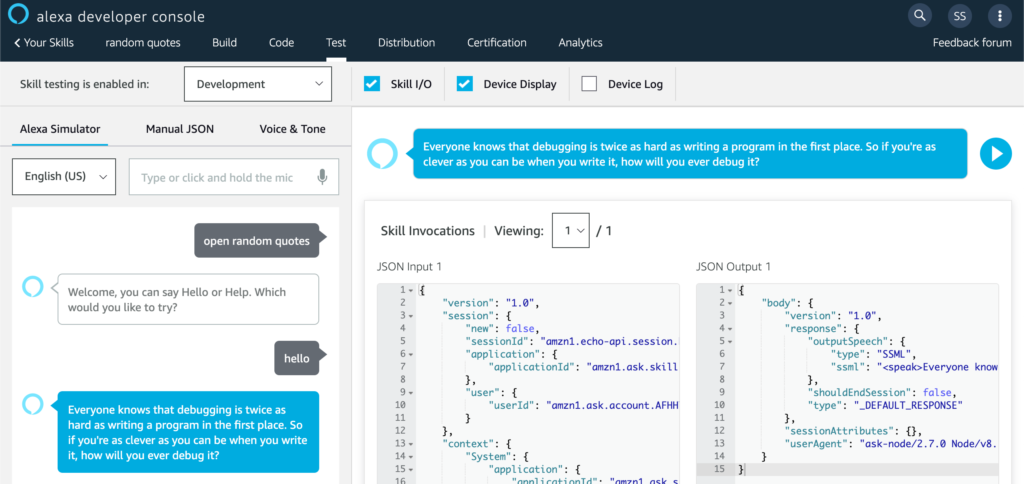
If you want, you can flip the hasPremiumQuotesEnabled boolean to false and test that only free quotes are responded to the user. Flip the hasPremiumQuotesEnabled boolean back to true and retest to make sure premium works.
We now have the basic functionality that we will need for our product. Our next step is to pull in our product list so that we can determine if a user has purchased our PremiumQuotes product.
Retrieving the In-Skill Products list
Our next step is to retrieve the list of In-Skill Products linked to our Skill. With a few modifications of our code, we will be able to determine what products are available and which products the user has already purchased.
Adding the default API client
Open index.js and add a line to the chained Skill builder object, like so:
exports.handler = Alexa.SkillBuilders.custom()
    .addRequestHandlers(
        LaunchRequestHandler,
        HelloWorldIntentHandler,
        HelpIntentHandler,
        CancelAndStopIntentHandler,
        SessionEndedRequestHandler,
        IntentReflectorHandler, // make sure IntentReflectorHandler is last so it doesn't override your custom intent handlers
    )
    .addErrorHandlers(
        ErrorHandler,
    )
    /* add this line */
    .withApiClient(new Alexa.DefaultApiClient())
    .lambda();
For more information on the DefaultApiClient that we just added, consult the official documentation here:
https://developer.amazon.com/en-US/docs/alexa/alexa-skills-kit-sdk-for-nodejs/call-alexa-service-apis.html#defaultapiclient
Query the Monetization Service Client
Next, we are going to further alter the index.js, updating the LaunchRequestHandler to log our In-Skill Product list.
const LaunchRequestHandler = {
    canHandle(handlerInput) {
        return Alexa.getRequestType(handlerInput.requestEnvelope) === 'LaunchRequest';
    },
    // add the async keyword to this function so we can make async requests to the ISP API
    async handle(handlerInput) {
        // add these two lines
        const locale = handlerInput.requestEnvelope.request.locale;
        const ms = handlerInput.serviceClientFactory.getMonetizationServiceClient();

        try {
            const inSkillProductsList = await ms.getInSkillProducts(locale);
            console.log(inSkillProductsList);
        } catch (err) {
            console.log('ERROR', err);
        }

        const speakOutput = 'Welcome, you can say Hello or Help. Which would you like to try?';
        return handlerInput.responseBuilder
            .speak(speakOutput)
            .reprompt(speakOutput)
            .getResponse();
    }
};
With the previous code additions, we can now query the In-Skill Purchase Service for product information.
Check logs for successful ISP query
Because we decided to create a Custom Skill with a Alexa-hosted Node.js backend Lambda, we are automatically granted integration with CloudWatch. CloudWatch will log whatever log using console.log().
Save and deploy your code, then head over to the Test tab. Invoke the skill to execute the handler we just modified.
Next, head over to the Code tab and click the link labeled “Logs: Amazon CloudWatch”. This should open another tab.

You should see something like this:
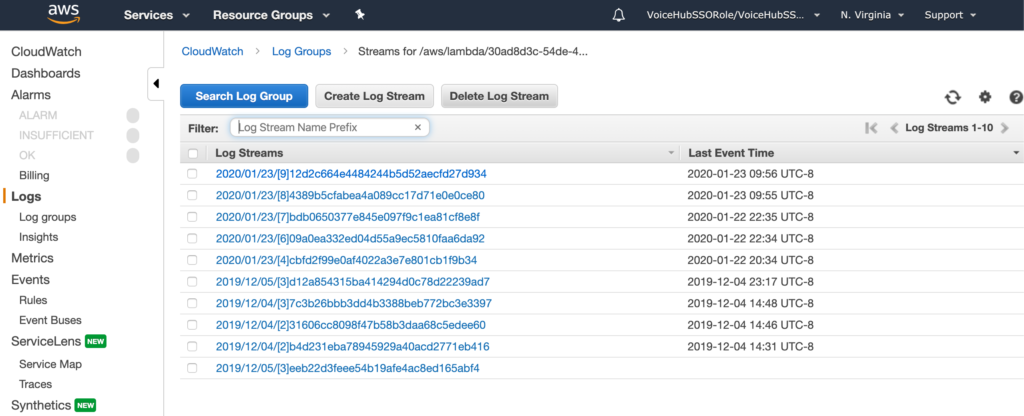
Click on the top-most link to see your most recent CloudWatch logs. The value for Last Event Time in the table should be very close to when you tested your skill code in the Test tab.
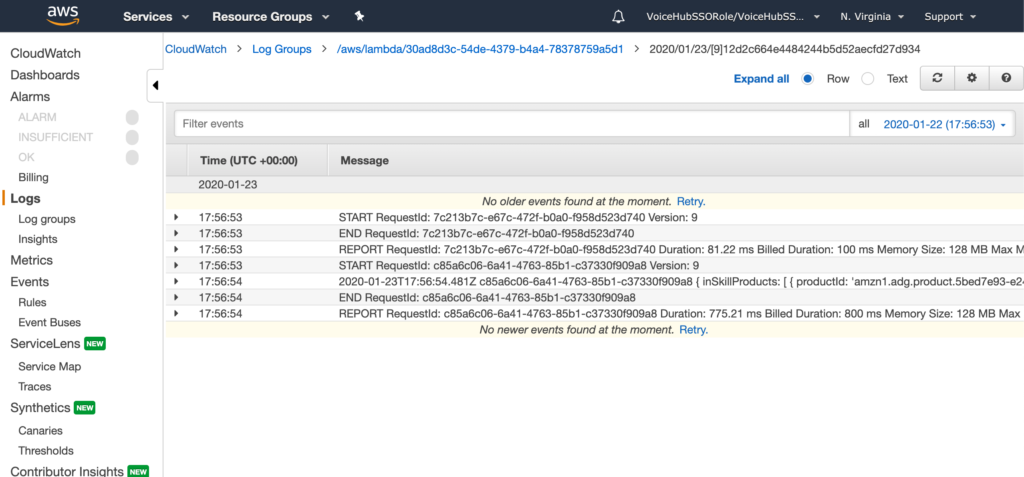
The log messages are collapsed by default, so you will need to click on the row to view details.

As you can see on the 5th row, there is a logged object. Here is what is logged for my skill:
{ inSkillProducts:
   [ { productId: 'amzn1.adg.product.5bed7e93-e247-415d-9606-109ad738caad',
       referenceName: 'PremiumQuotes',
       type: 'ENTITLEMENT',
       name: 'Premium Quotes',
       summary: 'Premium Quotes give you better quotes to brighten your day!',
       entitled: 'NOT_ENTITLED',
       entitlementReason: 'NOT_PURCHASED',
       purchasable: 'PURCHASABLE',
       activeEntitlementCount: 0,
       purchaseMode: 'TEST' } ],
  nextToken: null,
  truncated: false }
Does any of this data look familiar? Yup, this is from our PremiumQuotes In-Skill Product we designed earlier in this tutorial. Pay attention to object keys, especially the referenceName, name, and summary fields. These are values we can use in our code or edit later on if we choose to.
You will also notice the entitled property set to ‘NOT_ENTITLED‘ and the entitlementReason set to ‘NOT_PURCHASED‘. Later on in this tutorial, we will see these values changes as the user purchases the PremiumQuotes product.
Now that we have determined that our code is working as expected, let’s do something with our new data.
Utility Methods
Open utils.js. We will create new methods that we can use to filter and respond to the user with. We can use these as we incrementally update index.js to handle product purchase state for the user.
const freemiumQuotes = require('./freemiumQuotes.js');
const premiumQuotes = require('./premiumQuotes.js');

module.exports = {
    getRandomFreemiumQuote() {
        return freemiumQuotes[Math.floor(Math.random() * freemiumQuotes.length)];
    },
    getRandomPremiumQuote() {
        return premiumQuotes[Math.floor(Math.random() * premiumQuotes.length)];
    },
    // add this method
    getAllEntitledProducts(inSkillProductList) {
        return inSkillProductList.filter(record => record.entitled === 'ENTITLED');
    },
    // add this method, too
    // Helper function that returns a speakable list of product names from a list of entitled products.
    getSpeakableListOfProducts(entitleProductsList) {
        const productNameList = entitleProductsList.map(item => item.name);
        let productListSpeech = productNameList.join(', '); // Generate a single string with comma separated product names
        productListSpeech = productListSpeech.replace(/_([^_]*)$/, 'and $1'); // Replace last comma with an 'and '
        return productListSpeech;
    }
};NOTE: The previous methods were reworked from code samples available here: https://developer.amazon.com/en-US/docs/alexa/in-skill-purchase/add-isps-to-a-skill.html
Dealing with customer purchase state
With the previous code updates, we are ready to start building out our customer purchase flows as well as reporting on the status of product purchases. We need to deal with a couple of scenarios…
Scenario #1 – Customer has not purchased PremiumQuotes
If it’s the first time that a user has invoked our skill or the user has not purchased anything yet, we should let them know what we have available to purchase and how to learn more.
Open index.js and update the code as follows:
const LaunchRequestHandler = {
    canHandle(handlerInput) {
        return Alexa.getRequestType(handlerInput.requestEnvelope) === 'LaunchRequest';
    },
    // add the async keyword to this function so we can make async requests to the ISP API
    async handle(handlerInput) {
        // add these two lines
        const locale = handlerInput.requestEnvelope.request.locale;
        const ms = handlerInput.serviceClientFactory.getMonetizationServiceClient();

        // Bring speakOutput up here so we can build our response, add welcome message
        let speakOutput = 'Welcome to the Random Quotes skill. ';

        try {
            const inSkillProductsList = await ms.getInSkillProducts(locale);
            console.log(inSkillProductsList);

            // get a list of products that the user is entitled to
            const entitledProducts = utils.getAllEntitledProducts(inSkillProductsList.inSkillProducts);

            // Customer owns one or more products
            if (entitledProducts && entitledProducts.length > 0) {
                // TODO: add code to handle PremiumQuotes product enabled
            } else {
                // Customer does not own anything yet
                // Let the user know what's available for purchase
                speakOutput += 'You currently are using the free tier version of this skill.  Say, "What can I buy?", to hear about our premium upgrades.';
            }

        } catch (err) {
            console.log('ERROR', err);
        }

        speakOutput += `Say, "hello", to hear a random quote or say "help " to get help.`

        return handlerInput.responseBuilder
            .speak(speakOutput)
            .reprompt(speakOutput)
            .getResponse();
    }
};
Test this flow out to make sure we are getting the correct message.

Now that we direct the user to say “What can I buy?“, let’s set up an Intent to handle this.
Adding TellMeMoreIntent
In the Alexa Developer Console, click on the Build tab. Once this page loads, click on the “+ Add” button located on the left-hand menu next to Intents.

The Add Intent page will open with the “Create custom intent” option selected. In the text field, enter TellMeMoreIntent and then click the button labeled “Create custom intent“.

Next, enter a couple of sample utterances that a user might say to invoke this Intent.
(1) Enter “tell me more” into the text area, then click the plus sign at the end of the field to add the utterance. Do the same thing for “what can I buy“.
(2) Click on the “Save Model” button.
(3) Finally, click “Build Model” to build the model. This may take a minute to finish, so wait until this is finished and your intent will be ready for handling in the code.

Adding TellMeMoreIntentHandler
Now that our Skill’s model has been updated, we will write code to handle this intent. Then we will test it to ensure it is working as we expect.
Navigate to the Code section of the Alexa Developer Console IDE by clicking on the Code tab.
Open index.js and add an IntentHandler called TellMeMoreIntentHandler. Then, update the Skill builder object to include this handler.
// ... LaunchRequest code
const TellMeMoreIntentHandler = {
    canHandle(handlerInput) {
        return Alexa.getRequestType(handlerInput.requestEnvelope) === 'IntentRequest'
            && Alexa.getIntentName(handlerInput.requestEnvelope) === 'TellMeMoreIntent';
    },
    handle(handlerInput) {
       const speakOutput = 'You can buy a Premium Quote upgrade to get better quotes for this skill.  Say, "Buy", to purchase this product.';

        return handlerInput.responseBuilder
            .speak(speakOutput)
            .withShouldEndSession(false)
            .getResponse();
    }
};

// ... more intent handlers

exports.handler = Alexa.SkillBuilders.custom()
    .addRequestHandlers(
        LaunchRequestHandler,
        HelloWorldIntentHandler,
        // add this
        TellMeMoreIntentHandler,
        HelpIntentHandler,
        CancelAndStopIntentHandler,
        SessionEndedRequestHandler,
        IntentReflectorHandler
    )
    .addErrorHandlers(
        ErrorHandler,
    )
    .withApiClient(new Alexa.DefaultApiClient())
    .lambda();
Save and deploy the changes, then move to the Test tab in the IDE. Navigate your skill with utterance that will eventually trigger the TellMeMoreIntent.
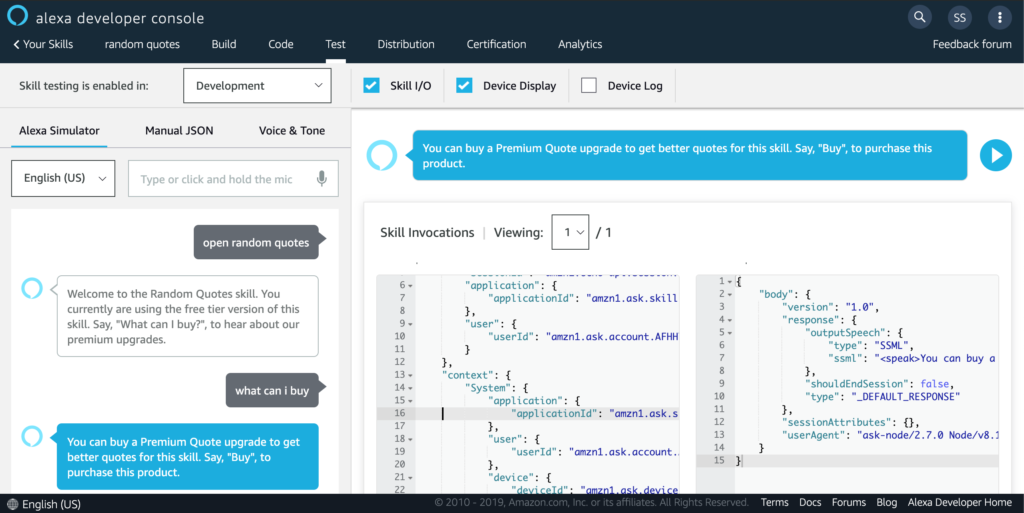
Now that we describe and offer the product to the user, we need to handle the “buy” utterance a user will say to purchase our In-Skill Product.
Adding the BuyIntent
We will add another intent, BuyIntent, just like we did for the TellMeMoreIntent. Navigate to the Build tab, click on the “+ Add” option next to the Intent list on the left-hand side. Add a couple of utterances, such as “buy“, “buy premium quotes“, and “buy upgrade“. Finally, click “Save Model” and then “Build Model“.

Adding the BuyIntentHandler
Following the same pattern as before for the TellMeMoreIntent, let’s add another Intent Handler, BuyIntentHandler, and add it to our registered handlers list.
However, we need to collect some information about our PremiumQuotes product. Navigate back to the Build tab, click on In-Skill Products link on the left-hand side. Once the ISP page loads, click on the PremiumQuotes product to view its details.
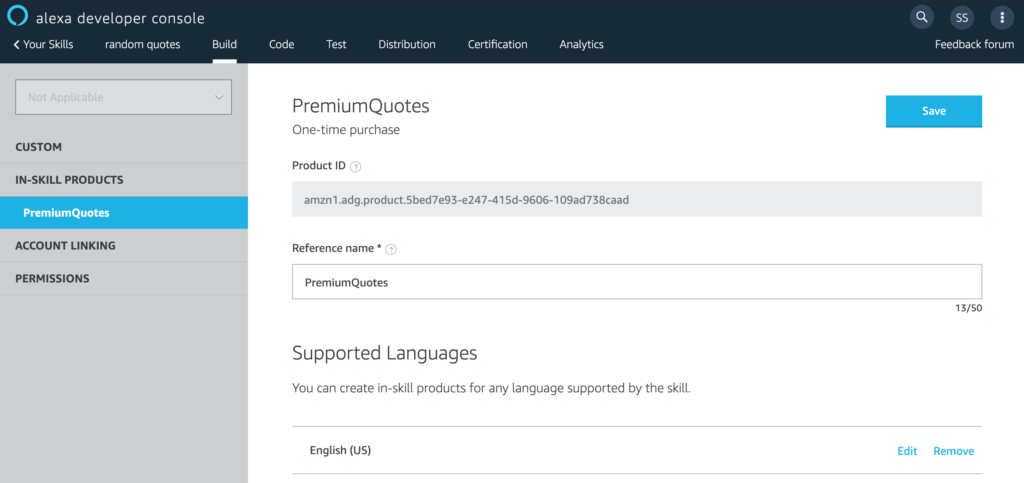
Copy that Product ID. We will need to add it to our code soon.
Navigate to the Code tab and open index.js. We will add a BuyIntentHandler and then add it to our Skill builder object. Here’s the code:
// ... other intent handlers

const BuyIntentHandler = {
    canHandle(handlerInput) {
        return Alexa.getRequestType(handlerInput.requestEnvelope) === 'IntentRequest'
            && Alexa.getIntentName(handlerInput.requestEnvelope) === 'BuyIntent';
    },
    handle(handlerInput) {
        Logger.info('BuyIntentHandler', handlerInput.requestEnvelope);

        return handlerInput.responseBuilder
            .addDirective({
                type: 'Connections.SendRequest',
                name: 'Upsell',
                payload: {
                    InSkillProduct: {
                        productId: 'amzn1.adg.product.5bed7e93-e247-415d-9606-109ad738caad'
                    },
                    upsellMessage: 'Premium Quotes will enhance your life...  Do you want to know more?'
                },
                token: new Date().getTime().toString()
            })
            .getResponse();
    }
};

// ... more intent handlers

exports.handler = Alexa.SkillBuilders.custom()
    .addRequestHandlers(
        LaunchRequestHandler,
        HelloWorldIntentHandler,
        TellMeMoreIntentHandler,
        // add this
        BuyIntentHandler,
        HelpIntentHandler,
        CancelAndStopIntentHandler,
        SessionEndedRequestHandler,
        IntentReflectorHandler
    )
    .addErrorHandlers(
        ErrorHandler,
    )
    .withApiClient(new Alexa.DefaultApiClient())
    .lambda();
Wow, that’s a lot of new code to wrap our heads around! Let’s break it down.
addDirective() to delegate control to Alexa
Instead of the usual handlerInput.responseBuilder.speak().reprompt().getResponse() that we use to manually handle our response, the new BuyIntentHandler’s handle() method returns handlerInput.responseBuilder.addDirective(directiveObj). What does this actually do?
When we add a directive to our response, we delegate control of our skill to Alexa. In our case, Alexa will handle the continuing interaction of the ISP purchase, then return control to our skill by relaunching the skill with a new session. The purchase result will be supplied to the skill, which you will need to handle (more on this later in this tutorial).
NOTE: If you need more in-depth information, familiarize yourself with the official documentation’s explanation of what is going on: https://developer.amazon.com/en-US/docs/alexa/in-skill-purchase/add-isps-to-a-skill.html#send-a-directive-to-start-the-purchase-suggestion
So, now that we are aware of what a directive is and how it relates to our skill, let’s unpack the directive object we pass to addDirective().
{
    type: 'Connections.SendRequest',
    name: 'Upsell',
    payload: {
        InSkillProduct: {
            productId: 'amzn1.adg.product.5bed7e93-e247-415d-9606-109ad738caad'
        },
        upsellMessage: 'Premium Quotes will enhance your life...  Do you want to know more?'
    },
    token: new Date().getTime().toString()
}- type – (required) – The type of directive we wish to send. It should always be set to ‘Connections.SendRequest‘ for a purchase.
- name – (required) – Indicates the target for the
SendRequestmessage. Always useUpsellfor a purchase suggestion. - payload – (required) – Object containing details for the specified action. For a purchase request, this includes the
InSkillProductproperty with a product ID. TheupsellMessagewill be responded to the user during the purchase flow delegated to Alexa. - token – (required) – A developer-generated string used to identify the purchase message exchange. It is not used by Alexa, but is returned in the resulting
Connections.Response. You have total control over what this token should be.
Now that we are familiar with the directive we use to send users to Alexa for purchasing our product, we can start testing it!
Testing the purchase flow
This is getting exciting! Let’s test our purchase flow to see if a test user can purchase a product.
Navigate to the Test tab and see if you can purchase something. Your dialog results should look similar to the image below:

Wait, did something go wrong? In the second-to-last speech output bubble from Alexa, it said that we’ve successfully purchased the product. However, Alexa then responds with, “Sorry, I had trouble doing what you asked. Please try again.”
That message is only responded to the user when there is an error. ErrorHandler handles this response, and it luckily also logs the error.
// Generic error handling to capture any syntax or routing errors. If you receive an error
// stating the request handler chain is not found, you have not implemented a handler for
// the intent being invoked or included it in the skill builder below.
const ErrorHandler = {
    canHandle() {
        return true;
    },
    handle(handlerInput, error) {
        console.log(`~~~~ Error handled: ${error.stack}`);
        const speakOutput = `Sorry, I had trouble doing what you asked. Please try again.`;

        return handlerInput.responseBuilder
            .speak(speakOutput)
            .reprompt(speakOutput)
            .getResponse();
    }
};
Let’s go to CloudWatch (via the link on the Code section of our skill) and see what happened…
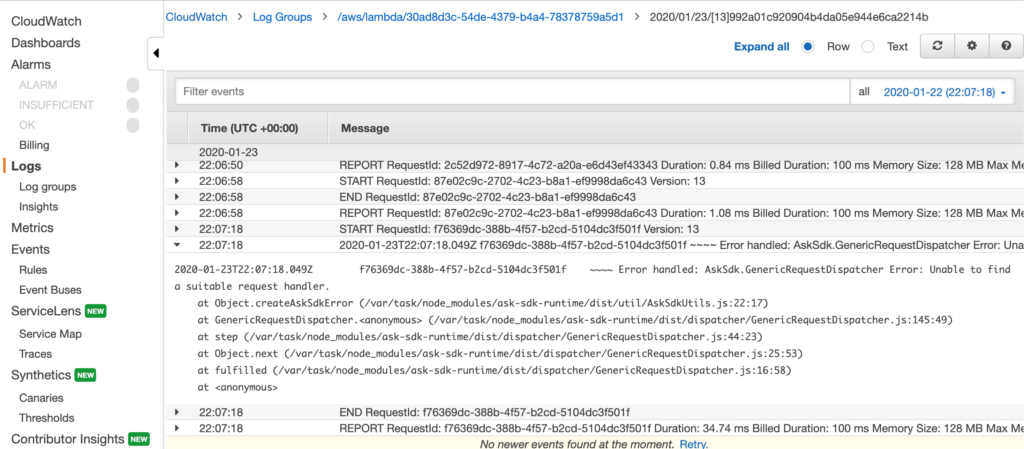
Aha! “AskSdk.GenericRequestDispatcher Error: Unable to find a suitable request handler.” It looks like we didn’t handle the response from the purchase delegation! Let’s fix that!
Creating the BuyResponseHandler
When we delegate the conversation flow to Alexa to complete our purchase, we also need to handle the response from this action. How do we do this? We create a BuyResponseHandler object and create code to route our application flow based on response parameters. BuyResponseHandler will have to take into account successful purchases as well as failed requests, cancellations, already purchased, and network/system errors.
Navigate back to the Code tab and open index.js. Add the BuyResponseHandler like so:
// ... other intent handlers

const BuyResponseHandler = {
    canHandle(handlerInput) {
        return Alexa.getRequestType(handlerInput.requestEnvelope) === 'Connections.Response' &&
            (handlerInput.requestEnvelope.request.name === 'Upsell' || handlerInput.requestEnvelope.request.name === 'Buy');
    },
    handle(handlerInput) {
const BuyResponseHandler = {
    canHandle(handlerInput) {
        return Alexa.getRequestType(handlerInput.requestEnvelope) === 'Connections.Response' &&
            (handlerInput.requestEnvelope.request.name === 'Upsell' || handlerInput.requestEnvelope.request.name === 'Buy');
    },
    handle(handlerInput) {
        const {attributesManager} = handlerInput;
        // get current session attributes
        const sessionAttributes = attributesManager.getSessionAttributes();

        const requestPayload = handlerInput.requestEnvelope.request.payload;
        let speakOutput = '';

        // route control of skill flow based on purchase result
        switch (requestPayload.purchaseResult) {
            // successful purchase
            case 'ACCEPTED':
                // update session attributes with property we can check in other intent handlers
                attributesManager.setSessionAttributes(Object.assign({}, sessionAttributes, {
                    'hasPremiumQuotesEnabled': true
                }));
                speakOutput += 'Thanks for your purchase of Premium Quotes!';
                break;
            // user has already purchased the PremiumQuotes product
            case 'ALREADY_PURCHASED':
                speakOutput += 'You\'ve already purchased Premium Quotes.  Thanks!';
                break;
            // user did not purchase product
            case 'DECLINED':
                speakOutput += 'Maybe next time!';
                break;
            // there was an error in the response
            case 'ERROR':
                speakOutput += 'Sorry, something went wrong with your purchase.  Try again later!';
                break;
            default:
                speakOutput += 'Sorry, we\'re not sure what went wrong but we are looking into it.  Try again later!';
                break;
        }

        // after determining the response result, pause for two seconds then guide user to normal skill flow (i.e. ask for another random quote)
        speakOutput += '<break time="2s" />  Say, "hello" to hear a random quote.';

        return handlerInput.responseBuilder
            .speak(speakOutput)
            .reprompt(speakOutput)
            .getResponse();
    }
};

// ... other intent handlers

exports.handler = Alexa.SkillBuilders.custom()
    .addRequestHandlers(
        LaunchRequestHandler,
        HelloWorldIntentHandler,
        TellMeMoreIntentHandler,
        BuyIntentHandler,
        // add this
        BuyResponseHandler,
        HelpIntentHandler,
        CancelAndStopIntentHandler,
        SessionEndedRequestHandler,
        IntentReflectorHandler
    )
    .addErrorHandlers(
        ErrorHandler,
    )
    .withApiClient(new Alexa.DefaultApiClient())
    .lambda();
Re-test Purchase Flow
Now, let’s re-test our product purchase dialog flow. Let’s start by resetting the purchase. Remember, our last test was actually a successful purchase but an unhandled error killed our session.
Navigate to the Build tab, then click In-Skill Products menu item.
Under the PremiumQuotes product, there is a link to reset test purchases.
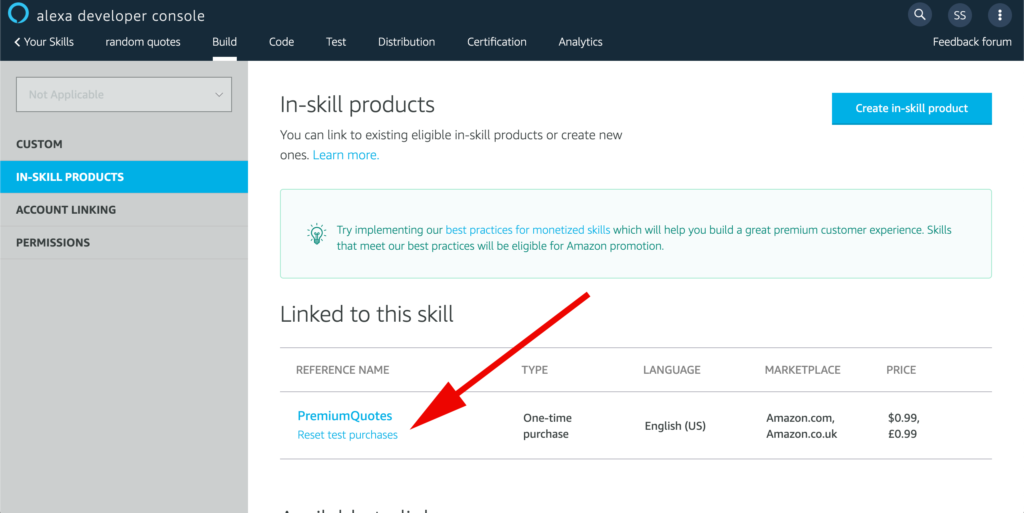
Click this link and a modal dialog should appear.

Click reset and you should see a green banner confirming that your purchase has been reset.
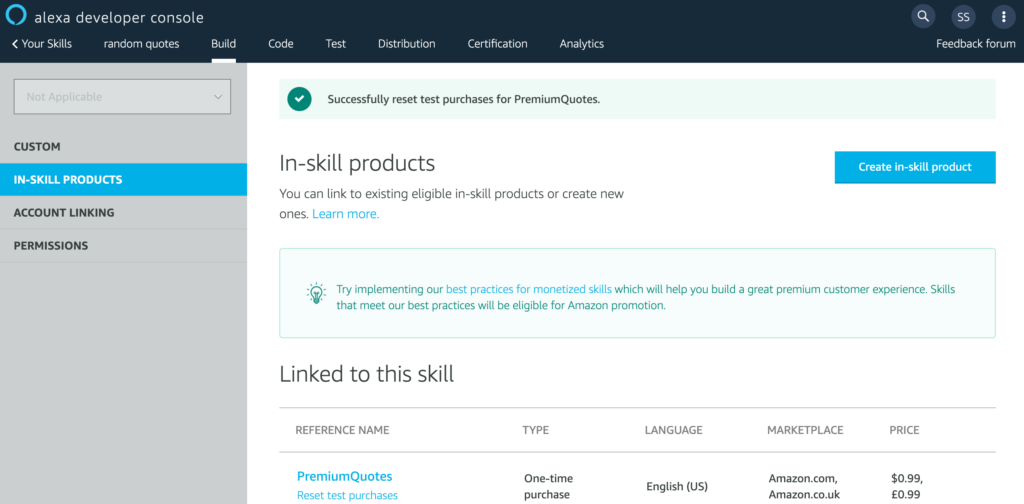
Now that are test purchase is reset, we can re-test the dialog flow we tried earlier. Navigate to the Test tab and retry the purchase flow. You should end up with a result like this:

Awesome! We have now successfully completed the In-Skill Purchasing flow! Now we need to refactor our code to handle our new purchase.
Scenario #2 – Customer has purchased PremiumQuotes
It’s been a long tutorial to get to the second scenario, but we’re getting close to being done. Let’s refactor our Alexa skill so that we take into account users that have already upgraded by purchasing our PremiumQuotes product.
Refactor LaunchRequestHandler
Open index.js and update the LaunchRequestHandler. This time, we are going to check for the product purchase and update our user’s session attributes if it has been purchased.
const LaunchRequestHandler = {
    canHandle(handlerInput) {
        return Alexa.getRequestType(handlerInput.requestEnvelope) === 'LaunchRequest';
    },

    async handle(handlerInput) {
        // add this to get access to the attributesManager, a property of the handlerInput
        const { attributesManager } = handlerInput;

        const locale = handlerInput.requestEnvelope.request.locale;
        const ms = handlerInput.serviceClientFactory.getMonetizationServiceClient();

        let speakOutput = 'Welcome to the Random Quotes skill. ';

        try {
            const inSkillProductsList = await ms.getInSkillProducts(locale);
            console.log(inSkillProductsList);

            // get a list of products that the user is entitled to
            const entitledProducts = utils.getAllEntitledProducts(inSkillProductsList.inSkillProducts);

            // Customer owns one or more products
            if (entitledProducts && entitledProducts.length > 0) {
                // add this block of code
                // update session attributes so that they can be checked in the HelloWorldIntentHandler
                const sessionAttributes = attributesManager.getSessionAttributes();
                attributesManager.setSessionAttributes(Object.assign({}, sessionAttributes, {
                    'hasPremiumQuotesEnabled': true
                }));

                speakOutput += 'You have purchased the Premium Quotes, so you are going to receive the best Random Quotes experience! ';
                // end block
            } else {
                // Customer does not own anything yet
                // Let the user know what's available for purchase
                speakOutput += 'You currently are using the free tier version of this skill.  Say, "What can I buy?", to hear about our premium upgrades. ';
            }

        } catch (err) {
            console.log('ERROR', err);
        }

        speakOutput += `Say, "hello", to hear a random quote or say "help " to get help.`

        return handlerInput.responseBuilder
            .speak(speakOutput)
            .reprompt(speakOutput)
            .getResponse();
    }
};
If you test this out in the Test tab, you will see that it will detect you have purchased a product:

You can also check CloudWatch to view the inSkillProducts list to see the difference after a user has purchased a product:

NOTE: this tutorial is very simple and leaves out a lot of extra parsing of the inSkillProducts list. We are working off the assumption that if a user is entitled to products, they must have purchased the PremiumQuotes product.
Our next step is to substitute a previously hardcoded boolean in HelloWorldIntentHandler to the session attribute we saved in the LaunchRequestHandler.
Refactor HelloWorldIntentHandler
Re-open index.js and update HelloWorldIntentHandler:
const HelloWorldIntentHandler = {
    canHandle(handlerInput) {
        return Alexa.getRequestType(handlerInput.requestEnvelope) === 'IntentRequest'
            && Alexa.getIntentName(handlerInput.requestEnvelope) === 'HelloWorldIntent';
    },
    handle(handlerInput) {
        const { attributesManager } = handlerInput;
        const sessionAttributes = attributesManager.getSessionAttributes();

        // we replace our temporary boolean with session attributes
        const hasPremiumQuotesEnabled = (sessionAttributes['hasPremiumQuotesEnabled']) ? true : false;
        // we use the boolean to determine which set of quotes to receive a random quote from
        const speakOutput = (hasPremiumQuotesEnabled) ? utils.getRandomPremiumQuote() : utils.getRandomFreemiumQuote();
        return handlerInput.responseBuilder
            .speak(speakOutput)
            .withShouldEndSession(false)
            .getResponse();
    }
};
Alright! Now test the skill out!
First, reset the test purchase, then invoke the skill and ask for a random quote. You should receive a freemium quote. Then, purchase the PremiumQuotes product.
Second, relaunch the skill and ask for a random quote. You should receive a premium quote. That’s it!
Now, you have most of the testing done.
Scenario #3: Request for ISP data has failed.
If, while handling the LaunchRequest, the ISP request fails, you should handle this gracefully. You can approach this in a number of ways, such as retrying the ISP list request or responding with an error message and keep chugging along. At the very least, you should console.log the error.
I have not seen this error in production-deployed Skills, so I don’t believe it happens that often. However, your customers will be quite irritated if this happens. You might want to look into persistence like DynamoDB so that you don’t need to depend on this API call.
Refunds
For the majority of this tutorial, we have been focusing on getting a user to purchase our In-Skill Product. Getting to this point has been a long and detailed tutorial, but we still need to tackle one more required aspect of Alexa ISPs: refunds.
That’s right, you read that correctly: refunds. Alexa requires Skill developers to handle refunds for their users. The rules around refunds are unclear and murky, which is a little unsettling for those of us who are trying to build a business off of Alexa. However, if you want the chance to make a fortune on the Alexa Skill Store, you are going to have to implement handlers for refunds.
Luckily, the refund flow is a lot simpler than the purchase flow, although they share similar characteristics. We will keep it simple for brevity.
Creating the RefundPurchaseIntent
Go to the Build tab for your Skill, create an Intent named RefundPurchaseIntent. Add the following utterances: “refund“, “refund purchase“, “I want a refund“. Next, click “Save Model” and then “Build Model“. Your refund intent is now ready to be handled in code.
Creating the RefundPurchaseIntentHandler and RefundPurchaseResponseHandler
Open index.js and add two handlers like so:
// ... more intent handlers
const RefundPurchaseIntentHandler = {
    canHandle(handlerInput) {
        return Alexa.getRequestType(handlerInput.requestEnvelope) === 'IntentRequest'
            && Alexa.getIntentName(handlerInput.requestEnvelope) === 'RefundPurchaseIntent';
    },
    handle(handlerInput) {
        return handlerInput.responseBuilder
            .addDirective({
                type: 'Connections.SendRequest',
                name: 'Cancel',
                payload: {
                    InSkillProduct: {
                        productId: 'amzn1.adg.product.5bed7e93-e247-415d-9606-109ad738caad'
                    }
                },
                token: new Date().getTime().toString()
            })
            .getResponse();
    }
};


const RefundPurchaseResponseHandler = {
    canHandle(handlerInput) {
        return Alexa.getRequestType(handlerInput.requestEnvelope) === 'Connections.Response' &&
            handlerInput.requestEnvelope.request.name === 'Cancel';
    },
    handle(handlerInput) {
        const {attributesManager} = handlerInput;
        const sessionAttributes = attributesManager.getSessionAttributes();

        // reset session attribute to disable premium quotes in HelloWorldIntentHandler
        attributesManager.setSessionAttributes(Object.assign({}, sessionAttributes, {
                    'hasPremiumQuotesEnabled': false
        }));
        const speakOutput = 'Say "hello" to hear a random quote.'

        return handlerInput.responseBuilder
            .speak(speakOutput)
            .reprompt(speakOutput)
            .getResponse();
    }
};

// ... more intent handlers

exports.handler = Alexa.SkillBuilders.custom()
    .addRequestHandlers(
        LaunchRequestHandler,
        HelloWorldIntentHandler,
        TellMeMoreIntentHandler,
        BuyIntentHandler,
        BuyResponseHandler,
        // add these two
        RefundPurchaseIntentHandler,
        RefundPurchaseResponseHandler,
        HelpIntentHandler,
        CancelAndStopIntentHandler,
        SessionEndedRequestHandler,
        IntentReflectorHandler
    )
    .addErrorHandlers(
        ErrorHandler,
    )
    .withApiClient(new Alexa.DefaultApiClient())
    .lambda();
Test refund
Using the same dialog flow as before, purchase the PremiumQuotes product. After purchase, respond with “refund purchase“. Once you’ve been successfully refunded, say “hello” and ensure that you are only receiving freemium quotes.
Conclusion
Congratulations on finishing this tutorial!
I hope you learned some new skills and can now see the potential of the Alexa Skills marketplace. Developing skills is a difficult process even for ones that aren’t designed to make money. If you want to give your users an amazing experience and make money with Alexa, you must absolutely understand and master in-skill purchasing. Knowing how to get a little extra coin for your efforts is extremely empowering. I hope we all make a lot of money with In-Skill Purchasing in our Alexa Skills!
Further Exploration
As mentioned many times in this tutorial, we kept things simple to show concepts. The code is ugly, HelloWorldIntent is still named HelloWorldIntent, and a lot of better practices were ignored. Feel free to take this tutorial as a starting point in your Alexa ISP adventures. You can also try and get your own unique skill certified and published.
If you’re interested in high-quality Alexa Skills code and techniques, take a look at some of our other high-quality articles:
- https://alexaskillstutorials.com/2019/11/26/how-to-unit-test-intenthandlers/
- https://alexaskillstutorials.com/2019/12/04/how-to-make-a-random-quotes-alexa-skill/
- https://alexaskillstutorials.com/2019/12/11/using-ask-cli-dialog-command/
- https://alexaskillstutorials.com/2019/11/22/you-just-triggered-mycoolintent/
Until next time, cheers and happy hacking!
NOTE: Find anything off, out-of-date, or missing from this tutorial? Add a comment, criticism, rant, etc., below!
