Custom Alexa skills make it really easy to get started and publish a low-effort skill on the Alexa Skill store. However, once a project gets large enough (i.e. multiple conditional statements, asynchronous requests, complex response speech), it pays off to know how to unit test IntentHandlers.
In this tutorial, I will show you how to break apart this boilerplate code provided by Amazon and make it bulletproof. We will tune the example lambda function and IntentHandlers into durable code that is testable, flexible for future development, and gives us confidence that our hard work is as bug-free as possible.
Creating a basic project
Let’s start by creating a simple custom skill that we can play around with. Go to the Alexa Developer Console in your browser and create a new skill. Make sure that you select the Custom model:

Next, ensure that you are using the Alexa-hosted (Node.js) backend resources for your skill. Using your own Lambda functions is outside the scope of this Alexa tutorial, but we will be addressing that in later posts.

Navigate to the top of the page and click the Create skill button. The Alexa Developer Console will open a modal announcing that it is provisioning resources for your skill and setting everything up. This should only take a minute or so. Once ready, we will be directed to our new skill’s hosted IDE (integrated development environment).
The Boilerplate
Once your skill has been created, navigate to the Code section of the Alexa IDE and select index.js. You should have code that looks like this:
// This sample demonstrates handling intents from an Alexa skill using the Alexa Skills Kit SDK (v2).
// Please visit https://alexa.design/cookbook for additional examples on implementing slots, dialog management,
// session persistence, api calls, and more.
const Alexa = require('ask-sdk-core');

const LaunchRequestHandler = {
    canHandle(handlerInput) {
        return Alexa.getRequestType(handlerInput.requestEnvelope) === 'LaunchRequest';
    },
    handle(handlerInput) {
        const speakOutput = 'Welcome, you can say Hello or Help. Which would you like to try?';
        return handlerInput.responseBuilder
            .speak(speakOutput)
            .reprompt(speakOutput)
            .getResponse();
    }
};
const HelloWorldIntentHandler = {
    canHandle(handlerInput) {
        return Alexa.getRequestType(handlerInput.requestEnvelope) === 'IntentRequest'
            && Alexa.getIntentName(handlerInput.requestEnvelope) === 'HelloWorldIntent';
    },
    handle(handlerInput) {
        const speakOutput = 'Hello World!';
        return handlerInput.responseBuilder
            .speak(speakOutput)
            //.reprompt('add a reprompt if you want to keep the session open for the user to respond')
            .getResponse();
    }
};
const HelpIntentHandler = {
    canHandle(handlerInput) {
        return Alexa.getRequestType(handlerInput.requestEnvelope) === 'IntentRequest'
            && Alexa.getIntentName(handlerInput.requestEnvelope) === 'AMAZON.HelpIntent';
    },
    handle(handlerInput) {
        const speakOutput = 'You can say hello to me! How can I help?';

        return handlerInput.responseBuilder
            .speak(speakOutput)
            .reprompt(speakOutput)
            .getResponse();
    }
};
const CancelAndStopIntentHandler = {
    canHandle(handlerInput) {
        return Alexa.getRequestType(handlerInput.requestEnvelope) === 'IntentRequest'
            && (Alexa.getIntentName(handlerInput.requestEnvelope) === 'AMAZON.CancelIntent'
                || Alexa.getIntentName(handlerInput.requestEnvelope) === 'AMAZON.StopIntent');
    },
    handle(handlerInput) {
        const speakOutput = 'Goodbye!';
        return handlerInput.responseBuilder
            .speak(speakOutput)
            .getResponse();
    }
};
const SessionEndedRequestHandler = {
    canHandle(handlerInput) {
        return Alexa.getRequestType(handlerInput.requestEnvelope) === 'SessionEndedRequest';
    },
    handle(handlerInput) {
        // Any cleanup logic goes here.
        return handlerInput.responseBuilder.getResponse();
    }
};

// The intent reflector is used for interaction model testing and debugging.
// It will simply repeat the intent the user said. You can create custom handlers
// for your intents by defining them above, then also adding them to the request
// handler chain below.
const IntentReflectorHandler = {
    canHandle(handlerInput) {
        return Alexa.getRequestType(handlerInput.requestEnvelope) === 'IntentRequest';
    },
    handle(handlerInput) {
        const intentName = Alexa.getIntentName(handlerInput.requestEnvelope);
        const speakOutput = `You just triggered ${intentName}`;

        return handlerInput.responseBuilder
            .speak(speakOutput)
            //.reprompt('add a reprompt if you want to keep the session open for the user to respond')
            .getResponse();
    }
};

// Generic error handling to capture any syntax or routing errors. If you receive an error
// stating the request handler chain is not found, you have not implemented a handler for
// the intent being invoked or included it in the skill builder below.
const ErrorHandler = {
    canHandle() {
        return true;
    },
    handle(handlerInput, error) {
        console.log(`~~~~ Error handled: ${error.stack}`);
        const speakOutput = `Sorry, I had trouble doing what you asked. Please try again.`;

        return handlerInput.responseBuilder
            .speak(speakOutput)
            .reprompt(speakOutput)
            .getResponse();
    }
};

// The SkillBuilder acts as the entry point for your skill, routing all request and response
// payloads to the handlers above. Make sure any new handlers or interceptors you've
// defined are included below. The order matters - they're processed top to bottom.
exports.handler = Alexa.SkillBuilders.custom()
    .addRequestHandlers(
        LaunchRequestHandler,
        HelloWorldIntentHandler,
        HelpIntentHandler,
        CancelAndStopIntentHandler,
        SessionEndedRequestHandler,
        IntentReflectorHandler, // make sure IntentReflectorHandler is last so it doesn't override your custom intent handlers
    )
    .addErrorHandlers(
        ErrorHandler,
    )
    .lambda();
That’s a pretty generic Alexa Skill lambda function containing a bunch of request handlers.
With a few simple edits of the speakOutput variables already defined in this file, you will have a very low-complexity skill ready to publish. Nothing too impressive right now, and it could be argued that we don’t need any tests for this.
However, once we start introducing features and components that deal with things like asynchronous requests or calculations, we need to have some way of knowing that our code works. This is where automated testing comes into play…
Unit testing
How do you know your code works the way that you expect it to? You could open the Test tab in the Alexa Developer Console and manually test each case that your code will handle. This could take hours of laboriously launching the skill and sending it utterances to get a particular piece of code to execute. There’s an easier way: unit testing!
For those of you that are unaware of unit testing, you are missing out on one of the biggest confidence-boosting aspects of software development. Unit tests validate small portions of code (a “unit”) work as we intend them to. With enough unit tests, we can safely assume that our code’s logic will work as we expect it will given inputs and expected outputs. For more information on the what and why of unit testing, check out this page for more information.
Here’s a quick example of unit testing a simple JavaScript function with a test framework called Jest. We have a method named addTogether that simple adds the two parameters, first and second, and returns the result:
// file: utils.js

module.exports = {
    addTogether(first, second) {
        return first + second;
    }
};

// file: utils.test.js

const utils = require('util.js');

describe('utils.js', () => {

    describe('addTogether', () => {
        it('should add two numbers correctly', () => {
            expect(utils.addTogether(1, 2)).toEqual(3);
        });

        it('should concatenate two strings', () => {
            expect(utils.addTogether('Hello', 'World')).toEqual('HelloWorld');
        });

        it('should concatenate a string and a number and return a string', () => {
            expect(utils.addTogether('1', 2)).toEqual('12');
            expect(typeof utils.addTogether('1', 2)).toEqual('string');
        })
    });

});
The addTogether function is a simple method, but we have three tests that cover a variety of inputs that the function could presumably be used with. Pay attention to the third test above to see the value of unit testing. With a dynamically typed language such as JavaScript, errors and unintended behavior could result from shoddy coding.
Cloning the code to your machine with the ask-cli
The Alexa Developer Console is very robust and feature-filled. I’m actually surprised how functional it is, especially the Intellisense and syntax error checking. However, the code editor provided is very bare-bones, a little clunky when moving files around, and it can’t run our unit tests for us. So, we need to bring this code onto our local machine.
The Amazon Alexa team has provided a seriously useful command line utility for Node.js developers. For in-depth information on how to start using the ASK CLI and its other features, check out this page. I will assume for this tutorial that you have installed the package via npm and have configured it properly.
Clone your Alexa skill to your local machine by executing ask clone on your Terminal or other CLI, then using the up/down arrow keys to select your skill. Press enter and the project will be pulled from Amazon’s repositories :

Open the newly created directory as a project in your favorite IDE (I prefer IntelliJ/WebStorm, but VS Code is also a great option).
Making the code testable
Our first task is to split the code out into individual files that will be imported into the main index.js file.
Create a directory inside the /lambda/ directory called /handlers/, then create a file for each of the IntentHandlers: LaunchRequestHandler.js, HelloWorldIntentHandler.js, HelpIntentHandler.js, CancelAndStopIntentHandler.js, SessionEndedIntentHandler.js, IntentReflectorHandler.js, and ErrorHandler.js.
For each of these files, we will strip out the IntentHandler for each respective file, paste the IntentHandler and its dependencies into the file, and export it. Then, in index.js, we will import these broken-out IntentHandlers in.
For example, here is what HelloWorldIntentHandler.js will look like:
const Alexa = require('ask-sdk-core');

const HelloWorldIntentHandler = {
    canHandle(handlerInput) {
        return Alexa.getRequestType(handlerInput.requestEnvelope) === 'IntentRequest'
            && Alexa.getIntentName(handlerInput.requestEnvelope) === 'HelloWorldIntent';
    },
    handle(handlerInput) {
        const speakOutput = 'Hello World!';
        return handlerInput.responseBuilder
            .speak(speakOutput)
            //.reprompt('add a reprompt if you want to keep the session open for the user to respond')
            .getResponse();
    }
};

module.exports = HelloWorldIntentHandler;
Repeat this process for each of the IntentHandlers, making sure to add the ask-sdk-core dependency everywhere that the Alexa object is being used (mostly found in the canHandle methods). Once we have each IntentHandler separated into separate modules, our index.js file will look like this, but still function the same as before:
const Alexa = require('ask-sdk-core');
const LaunchRequestHandler = require('./handlers/LaunchRequestHandler.js');
const HelloWorldIntentHandler = require('./handlers/HelloWorldIntentHandler.js');
const HelpIntentHandler = require('./handlers/HelpIntentHandler.js');
const CancelAndStopIntentHandler = require('./handlers/CancelAndStopIntentHandler.js');
const SessionEndedRequestHandler = require('./handlers/SessionEndedRequestHandler.js');
const IntentReflectorHandler = require('./handlers/IntentReflectorHandler.js');
const ErrorHandler = require('./handlers/ErrorHandler.js');

exports.handler = Alexa.SkillBuilders.custom()
    .addRequestHandlers(
        LaunchRequestHandler,
        HelloWorldIntentHandler,
        HelpIntentHandler,
        CancelAndStopIntentHandler,
        SessionEndedRequestHandler,
        IntentReflectorHandler
    )
    .addErrorHandlers(
        ErrorHandler
    )
    .lambda();
At this point, you may want to save your changes and push them to the Alexa-hosted repository. For the sake of brevity for this tutorial, I will assume that you have done this step on your own. If not, we will eventually push our code once our testing is complete.
Installing a test framework
Now that our project is broken out into separate modules for each IntentHandler, we can start the setup for our testing. I prefer Jest as it is very easy to set up and can test both Node.js and front-end JavaScript code.
Start by navigating to the /lambda/ folder via the command line. Run npm install to pull down /node_modules/ your project will use initially.
Next, install Jest as a devDependency using the following command: npm install --save-dev jest. You should see this added to the package.json file in your project.
Open the package.json file and replace the scripts.test value with node_modules/.bin/jest --coverage:
{
  "name": "hello-world",
  "version": "1.1.0",
  "description": "alexa utility for quickly building skills",
  "main": "index.js",
  "scripts": {
    "test": "node_modules/.bin/jest --coverage"
  },
  "author": "Amazon Alexa",
  "license": "ISC",
  "dependencies": {
    "ask-sdk-core": "^2.6.0",
    "ask-sdk-model": "^1.18.0",
    "aws-sdk": "^2.326.0"
  },
  "devDependencies": {
    "jest": "^24.9.0"
  }
}
Run npm test and the Jest test runner should report back to you something similar to this: No tests found, exiting with code 1.
Writing our first test
Our first test will be a simple test to make sure Jest is configured properly. Create a directory named /test/ and create a file called example.test.js. Inside this file, paste in the following code.
describe('example test', () => {
    it('should fail spectacularly', () => {
        expect(true).toBe(false)
    });
});
Run npm test and the Jest test runner should now detect your new test and tell you it failed with some red lettering!

Great! Now, let’s make this test pass by updating the test:
describe('example test', () => {
    it('should pass spectacularly', () => {
        expect(true).toBe(true)
    });
});
Now, re-run npm test and you should receive output that the test passed:

Congratulations! We have successfully wrote our first unit test of the project and confirmed that Jest works as expected. You can choose to delete this file now or keep it around to confirm Jest is still working.
Writing an IntentHandler test
OK, now we’re going to start the real work and learn how to unit test IntentHandlers. We are going to write a few tests for one intent handler, the HelloWorldIntentHandler. Once you get the hang of unit testing Alexa intents, it becomes very easy to iterate on new features!
Inside the /test/ directory, create a directory called /handlers/ with a file called HelloWorldIntentHandler.test.js. Inside the file, add some Jest boilerplate along with a test that we know will fail:
const HelloWorldIntentHandler = require('./handlers/HelloWorldIntentHandler.js');

describe('HelloWorldIntentHandler', () => {

    it('should be able to handle requests', () => {
        expect(HelloWorldIntentHandler.canHandle()).toEqual(true);
    });

});
Run the tests with npm test and observe the failed test output:

Note that the test failed not due to an assertion but a TypeError. This is the point in the tutorial where stuff gets real: we will start using test objects that appear similar to what our code expects but really focus on the unit of work that these methods actually accomplish.
Let’s make this test pass by passing a handlerInput object that the canHandle method expects:
const HelloWorldIntentHandler = require('../../handlers/HelloWorldIntentHandler.js');

describe('HelloWorldIntentHandler', () => {

    let handlerInput = {
        requestEnvelope: {
            request: {
                type: 'IntentRequest',
                intent: {
                    name: 'HelloWorldIntent'
                }
            }
        }
    };

    it('should be able to handle requests', () => {
        expect(HelloWorldIntentHandler.canHandle(handlerInput)).toEqual(true);
    });

});
Code coverage
Do you notice that ASCII-coded table at the bottom of our test results? In a previous step, we added a test command to the package.json file. The option flag --coverage generates a convenient coverage report that shows what parts of our code were executed.
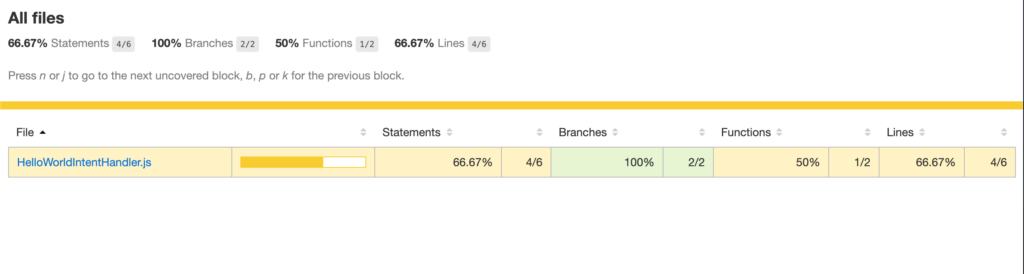
If you look in your project’s files, you should see a directory named /coverage/. Inside this directory should be another directory named /lcov-report/. Inside that directory is a file named index.html. Open index.html in a web browser. You should see something like this:
Click on the HelloWorldIntentHandler.js link in the table. You will see your source code highlighted with yellow, red, and green colors:
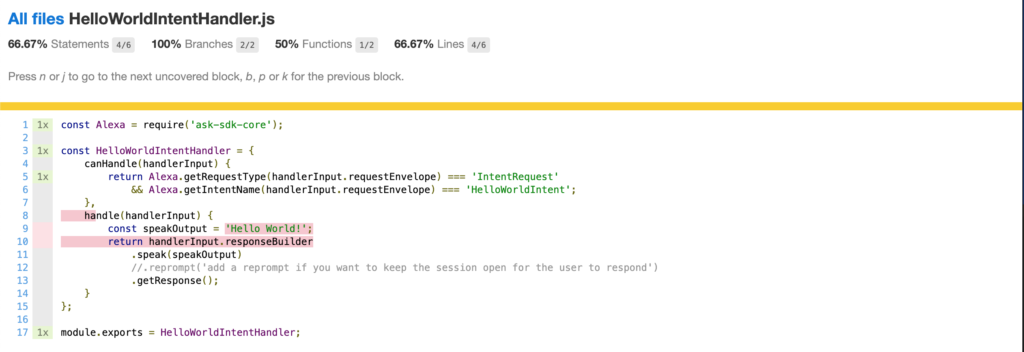
While interpreting this information is outside the scope of this tutorial, I can tell you that we have full code coverage (via our unit tests) of the canHandle method. For more information, check out this page to learn more about Istanbul instrumenting and reporting.
NOTE: As you write more and more code, you will want to keep code coverage high. Having high code coverage means that you have tests that exercise code paths (i.e. conditionals) and external dependencies. When we are learning how to unit test intent handlers, it helps to have a visual representation of what is not covered.
Advanced unit testing
The previous test confirmed that our IntentHandler was capable of handling requests. However, it was a simple test of canHandle() and there wasn’t much going on. Let’s test the handle() method and see how advanced we can get.
Again, we are going to start off writing a test that should fail. Then, we are going to fix the test, then refactor. This is a common approach in Test-Driven Development referred to as red-green-refactor, which can be very beneficial when you are working on a complex feature.
const HelloWorldIntentHandler = require('../../handlers/HelloWorldIntentHandler.js');

describe('HelloWorldIntentHandler', () => {

    let handlerInput = {
        requestEnvelope: {
            request: {
                type: 'IntentRequest',
                intent: {
                    name: 'HelloWorldIntent'
                }
            }
        }
    };

    it('should be able to handle requests', () => {
        expect(HelloWorldIntentHandler.canHandle(handlerInput)).toEqual(true);
    });

    it('should greet the user with a message', () => {
        HelloWorldIntentHandler.handle(handlerInput);
    });

});
Another TypeError! This time around, we will have to use some mock functions to get this test ready.
First off, we aren’t asserting anything yet. Let’s fix the error with some mock functionality:
const HelloWorldIntentHandler = require('../../handlers/HelloWorldIntentHandler.js');

describe('HelloWorldIntentHandler', () => {

    let speakMock = jest.fn(() => handlerInput.responseBuilder);
    let getResponseMock = jest.fn(() => handlerInput.responseBuilder);

    let handlerInput = {
        responseBuilder: {
            speak: speakMock,
            getResponse: getResponseMock
        },
        requestEnvelope: {
            request: {
                type: 'IntentRequest',
                intent: {
                    name: 'HelloWorldIntent'
                }
            }
        }
    };

    it('should be able to handle requests', () => {
        expect(HelloWorldIntentHandler.canHandle(handlerInput)).toEqual(true);
    });

    it('should greet the user with a message', () => {
        HelloWorldIntentHandler.handle(handlerInput);
    });

});
What we are doing with speakMock and getResponseMock on the handlerInput.responseBuilder object is mocking out the functions and returning a reference back to the original handlerInput.responseBuilder object. The responseBuilder utilizes a builder pattern, which requires a reference back to itself (the correct this reference) for chaining:

Ok, now that the tests passed due to the fact we haven’t asserted anything, how do we make the test fail again? Simple, now we assert on the expected message we want Alexa to respond with: “Hello World!”
Update the code as follows:
const HelloWorldIntentHandler = require('../../handlers/HelloWorldIntentHandler.js');

describe('HelloWorldIntentHandler', () => {

    let speakMock = jest.fn(() => handlerInput.responseBuilder);
    let getResponseMock = jest.fn(() => handlerInput.responseBuilder);

    let handlerInput = {
        responseBuilder: {
            speak: speakMock,
            getResponse: getResponseMock
        },
        requestEnvelope: {
            request: {
                type: 'IntentRequest',
                intent: {
                    name: 'HelloWorldIntent'
                }
            }
        }
    };

    it('should be able to handle requests', () => {
        expect(HelloWorldIntentHandler.canHandle(handlerInput)).toEqual(true);
    });

    it('should greet the user with a message', () => {
        HelloWorldIntentHandler.handle(handlerInput);
        expect(handlerInput.responseBuilder.speak).toHaveBeenCalledWith('Some random message!');
    });

});
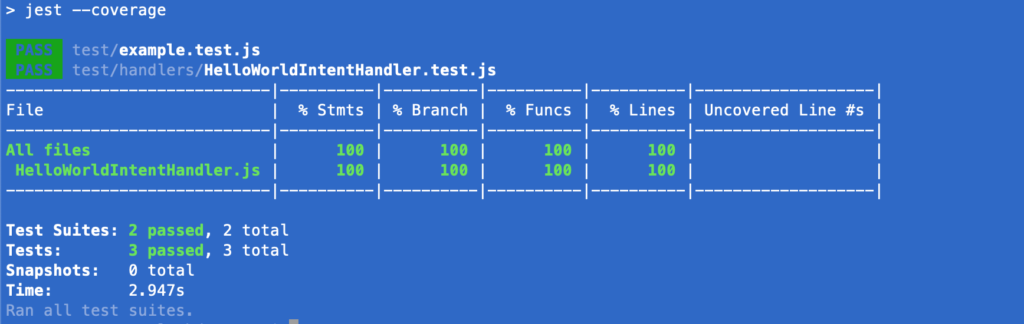
Notice anything? That’s right, our test now fails on an assertion. We also now have 100% code coverage!!!
To fix this test, change the assertion from “Some random message!’ to “Hello World!”. Re-run the test and bask in your success:

Pushing the code to Alexa-hosted repository
To push the code back to the Alexa-hosted repository, execute the following commands:
cd <root directory of the project>git add .git commit -m 'refactoring intents, added unit tests for HelloWorldIntentHandler'git pushask deploy
If all goes well, you should be able to see your refactored code in the Alexa Developer Console for your new skill!

Conclusion
We’re done, congratulations! As you change your code, your tests will fail and you will need to refactor your tests to accommodate the new code paths. This type of work takes time to adapt to, but the benefits are worth the extra work!
For a coding challenge, uncomment the reprompt() method and figure out how to make a test for it!
Thanks for taking the opportunity to learn how to unit test IntentHandlers on the Alexa platform. Happy coding!