
Hello fellow Alexa Skill Builders! In today’s tutorial, I will show you how to use the ASK CLI dialog command to run some automation against your skill code. We will be able to set up scripts to test our code with prepared user dialogs using Replay files. Let’s get started!
Setup
First off, make sure that you have the ASK CLI installed on your local machine. See the instructions listed on the official Alexa docs here: https://developer.amazon.com/en-US/docs/alexa/smapi/quick-start-alexa-skills-kit-command-line-interface.html.
You should also take a look at our post here, https://alexaskillstutorials.com/2019/12/11/alexa-hosted-skills-and-the-ask-cli/, with a great video tutorial from Dabble Lab. You will learn how version control works with Alexa-hosted skills and be proficient in creating skills from the command line using the ASK CLI.
For the purposes of this tutorial, create a skill either using the ask new command on your local machine then use ask deploy to deploy it. Otherwise, use the Alexa Developer Console to create a skill and then use ask clone to clone the repository to your local machine to access the files containing your Lambda code and skill configuration.

What is the ASK CLI Dialog Command?
The ASK CLI is a great companion for testing your skills. It contains a variety of commands that we can execute on a command line that can do all sorts of things, like create and deploy a skill, validate it, and interact with and Alexa API endpoints. For the purposes of this tutorial, we are going to focus on the ask dialog command.
The ask dialog command opens a conversational-style prompt where you can interact with your deployed (this is important) skill via text similar to the Test tab in the Alexa Developer Console. No audio is played, but you can see the text that Alexa would send to the user.
There are many parameters that you can use with the ask dialog command that make it extremely useful.
A simple dialog with Alexa
Let’s start talking to our skill! Open a command prompt (I use Terminal on Mac OS X) and change directories into the skill directory: cd demo_skill.
Next, execute ask dialog. You should get an error:
steves-computer:demo_skill steve$ ask dialog
[Error]: Please specify device locale via any of the approaches below:
 - command line parameter "--locale"
 - environment variable "ASK_DEFAULT_DEVICE_LOCALE"
Alexa Skills can be developed and deployed into a variety of languages and locales, so we will need to specify one when using the ask dialog command.
Since I am based in the United States and using English as my language for the Alexa Skill, I will set my locale to en-US.
Re-run the command, this time with the locale parameter set: ask dialog --locale en-US
After a short delay, you should see something similar to this:

NOTE: you could also set the environment variable ASK_DEFAULT_DEVICE_LOCALE and set its value to en-US. This can be useful for simplifying commands or for use in scripts.
Now that our prompt is open, let’s start a dialog! Type open hello world and press Enter. You should be warmly greeted with the LaunchRequest speech output, Welcome, you can say Hello or Help. Which would you like to try?.
Next, ask for help by typing help and pressing Enter. You should receive your skill’s HelpIntent message. In my case, as I cloned the Hello World template, I received You can say hello to me! How can I help?.
The session is still open, so we can send Alexa hello as our command and receive back Hello World!. The session ends at this point in my skill, so no further interaction is possible.
Finally, we will use the special command !quit to exit the ASK CLI dialog prompt. You can also use the key combination CTRL+C to skill the session.

The Dialog Command and its Parameters
Now that you’re all set up with the ASK CLI and a skill you want to test, let’s review the documentation before we begin diving into how we can customize our interaction: https://developer.amazon.com/en-US/docs/alexa/smapi/ask-cli-command-reference.html#dialog-command
The command format
ask dialog [-s|--skill-id <skill-id>] [-l|--locale <locale>] [-g|--stage <stage>] [-r|--replay <file-path>] [-o|--output <file-path>]
Parameters
Let’s go through each of the parameters so we can better understand the possibilities.
NOTE: Replay files will contain much of these parameters, so you may not need to use these if you go down that route.
--skill-id, -s– (Optional) – The skill ID of your skill. This parameter should be in the formatamzn1.ask.skill.12345678-1234-1234-123456789123. If not set and we are not using a Replay file (--replayor-roption), you will need to run the ask dialog command from the repository’s root directory.
This option is especially useful for running tests on servers where the skill code is not available (i.e. a Jenkins or TeamCity job).--locale, -l– The locale that you wish to interact with during your dialog session. The value will be the hyphenated language and region where the code will be deployed to ( i.e.en-US,en-GB,en-CA,en-AU,en-IN,de-DE,ja-JP, etc.). Alternatively, you could set theASK_DEFAULT_DEVICE_LOCALEenvironment variable.
This parameter will be specified in a Replay file, so you will not need to set it if you use one. Otherwise it is required.--stage, -g– (Optional) – Specify which version of your deployed code that you want to create a dialog with. Valid values areliveanddevelopment.
This parameter will come in handy when running regression tests against your production and development codebases.--replay, -r– (Optional) – The file path to a JSON-formatted file that will contain text utterances you can use for automating dialogs.
For more information on Replay files and formatting, see this link: https://developer.amazon.com/en-US/docs/alexa/smapi/ask-cli-command-reference.html#replay-file-format. You can also scroll down on this page to learn more about this really useful feature.--profile, -p– (Optional) – If not set, it will use thedefaultprofile.
Learn more about profiles, check out this official page describing profiles and their use cases:https://developer.amazon.com/en-US/docs/alexa/smapi/manage-credentials-with-ask-cli.html
NOTE: If you’re curious about ASK profiles, runask init --list-profiles.--debug– (Optional) – According to the Alexa docs, it “appends a debug message to the standard error.”
Add this parameter to your command and be ready to see VERY detailed output about yourask dialogsession.--output, -o– (Optional) – The file path of an output file that will log all utterances, skill responses, and the associated JSON elements to a file.
Similar to the--debugparameter, you will receive a lot of information about the skill session. This data may be useful if you’re trying to figure out a failure or bug in your skill or its external dependencies.
Getting help
You can also use the ask dialog --help command to see the latest updates for your version of ASK CLI. Here’s what the output looks like for version 1.7.17:
Usage: dialog [-s|--skill-id <skill-id>] [-l|--locale <locale>] [-r|--replay <file-path>] [-o|--output <file-name>] [-p|--profile <profile>] [--debug]

simulate your skill via interactive dialog with Alexa

Options:
  -s, --skill-id <skill-id>  skill-id for the skill
  -l, --locale <locale>      locale for the utterance text
  -o, --output <file-path>   log the interactive session into a file
  -r, --replay <file-path>   input file that contains a recorded session
  -g, --stage <stage>        stage for the skill
  -p, --profile <profile>    ask cli profile
  --debug                    ask cli debug mode
  -h, --help                 output usage information

  Special Commands:

    !record    record the user transcript
    !quit      quit interactive mode
Special commands
As you can see above in the ask dialog --help command’s output, there are two special commands that you can use in your dialog session with Alexa.
!quit, as demonstrated previously in this tutorial, will kill the session and return control back to your command prompt. Amazon Alexa docs say that you shouldn’t include this in your Replay files, but it is necessary if you want to make sure the session is killed. Check out this GitHub issue for more information
!record will take all of the user interactions thus far in the skill session and record them to a Replay file that you specify. Here’s an example of a skill session that is recorded to a JSON file:

Replay files
As you can see in the previous section, Replay files really aren’t that complicated. They contain 4 keys: skillId, locale, type, and userInput.
skillId is your targeted skill’s ID in the format similar to amzn1.ask.skill.12345678-1234-1234-123456789123. If you’re running this Replay file on a remote server without the lambda code, you will be able to interact with the skill.
locale is the region and language that you want to target, i.e. en-US. This is useful is you want to test across the various region-language pairs that Alexa offers.
type always has the value of text. I’m sure that the Amazon Alexa team has a lot of plans for the future of this, but right now it must be specified and set to text.
userInput is by far the most interesting part of the Replay file. It is a JSON array that contains a sequence of user utterances in text format that will simulate a skill session.
userInput
Your first command in the userInput array should be the invocation of the skill. If your skill session stays open, you can add more user utterances to navigate through your skill.
{
  "skillId": "amzn1.ask.skill.12345678-1234-1234-123456789123",
  "locale": "en-US",
  "type": "text",
  "userInput": [
    "open hello world",
    "help",
    "hello"
  ]
}
If, for instance, your skill determines your intent from one utterance and then closes the session, you can simply keep the userInput array simple like so:
{
  "skillId": "amzn1.ask.skill.12345678-1234-1234-123456789123",
  "locale": "en-US",
  "type": "text",
  "userInput": [
    "ask hello world to say hello"
  ]
}
This is exactly the same as manually doing this:
steves-computer:demo_skill steve$ ask dialog --locale en-US
  User  >  ask hello world to say hello
  Alexa >  Hello World!
  User  >  !quit
Using our Replay files
Using a Replay file is really simple. Earlier in this tutorial, I created a Replay file earlier by using the !record special command during the ask dialog prompt session. It output a file called happyPath.json.
Now, I will use this file to recreate the interaction I recorded previously using the ask dialog command’s --replay parameter. If you followed along to this point, execute ask dialog --replay happyPath.json and you should see something like this:

Once the command has completed iterating over all of the userInput utterances, control is restored back to the user. You can continue interacting with your skill (if the skill session is still open) or manually enter more commands.
However, returning control back to the user is problematic if we are using our Replay files anywhere other than on our own local machines.
Hanging scripts like this are the bane of automation developers, as you often have no idea why your scripts are failing until you remotely connect and see a hanging console session. Yikes!
Automation with Replay File Scripts
So, we previously saw that using replay files only seems to be useful on our local machines. I can see the intention of the Alexa ASK CLI developers who made this tool: get the skill to a desired state, then return control to the user for further testing. But, like I mentioned before, this can cause issues on a Jenkins server that doesn’t timeout correctly.
However, there is a hacky solution that we can use to close our solution: the !quit special command. Add this as the last element in our Replay file’s userInput array, like so:
{
  "skillId": "amzn1.ask.skill.12345678-1234-1234-123456789123",
  "locale": "en-US",
  "type": "text",
  "userInput": [
    "open hello world",
    "help",
    "hello",
    "!quit"
  ]
}
Re-execute the ask dialog command with this update: ask dialog --replay happyPathAndQuit.json.
Here’s what the output should look like:
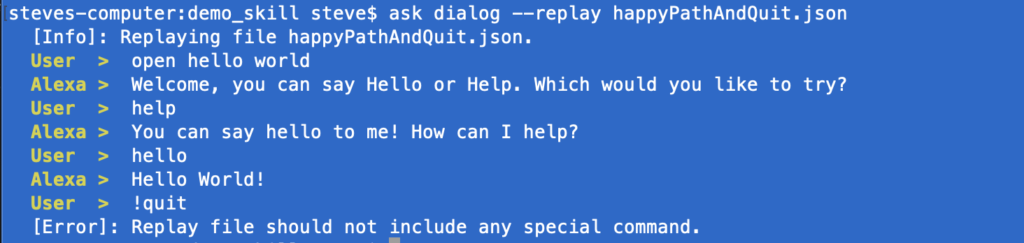
While this solution is not ideal, it is a known issue that hopefully gets some traction as the Alexa developer community gains more traction.
Conclusion
Thanks for following along with this tutorial! The ASK CLI has a number of great features and functionality that can help make our development lives better. Using ask dialog opens up a whole new door of possibilities that will only get better as the Alexa team releases new updates.
Until next time, happy coding!