I’m not sure how useful these parameters are for most Skill development, but it’s nice to know what is available for your Alexa-hosted Skill.
If you’re interested, simply add console.log(process.env) in your LaunchRequestHandler’s handle() method. Then, test your skill with the Test tab of the Alexa Developer Console or by using the dialog command of the Alexa ASK CLI. Head over to CloudWatch and see what you get!
Here’s what I see (some results are obfuscated with the X character for security):
The AWS_XRAY_* variables are also interesting. For more information on Amazon X-Ray, check it out here: https://aws.amazon.com/xray/. I wonder what is being analyzed…
Learn how to build Alexa Skills with In-Skill Purchasing (ISP)
One of the greatest aspects of the Amazon Alexa platform is being able to earn money by offering purchases in our skills. With In-Skill Purchasing (ISP), we can create a variety of product types for our users to enjoy an enhanced experience.
Lets face facts: developing a quality skill that offers real value to our users is a time-consuming task. In the end, we cannot pay our bills or fund our projects with glowing reviews and positive feedback. We need to figure out a way to get users to pay us for the software that we put our blood, sweat, and tears into.
Overview
In this tutorial, I will show you from start to finish how to make money with Alexa by enabling ISP support. We will start with a freemium option for our users and coax them into upgrading their skill experience by making a one-time purchase for quality content. By the end of this tutorial, our skill should be ready to be certified, published, and making us money!
NOTE: This tutorial is for Alexa developers who are familiar with Skill development as well as the Alexa Developer Console. If this is your first time creating an Alexa Skill, you may have trouble following along. If that’s the case, you might be better off starting with a beginner tutorial and then returning here once you have the fundamentals locked down. Otherwise, ….
Let’s get started!
What you need to do before we begin making money with Alexa
Before we start the whole process of building an Alexa Skill and making products for our user to purchase, make sure to create an Amazon Developer account.
NOTE: You should submit this as soon as possible. In fact, I suggest you get this step done as early as possible in case you have issues. Your skill cannot be certified and published to the Alexa Skills store until this is accomplished.
Review the official documentation
In-Skill Purchasing is one of the newer and significant features of the Alexa Platform. If you plan to make money with Alexa, make sure to consult the official Amazon Alexa documentation for an overview of what ISPs are.
There are many rules and restrictions on what you can and cannot do with your skill and products (i.e. price details for products), so make sure you’re up-to-date and compliant. Amazon values their customer base and they make sure that third-party vendors and developers treat those customers well.
Planning
The first step in any successful project is a great idea. The second and most important step is planning. As the old adage goes, “fail to plan, plan to fail.“
For the purposes of this Alexa ISP tutorial, we will keep it simple. Our plan is to generate revenue by offering premium content for a small price. We will be creating a simple random quote Skill similar to a previous tutorial posted here.
Free-tier (freemium) users will have access to a short list of random quotes, with the option to upgrade the quality of random quotes for better content. Once the user has completed the purchase, we will handle the response from Alexa and restart the session with the premium content.
With the planning and preparation taken care of, we can start building our Alexa skill.
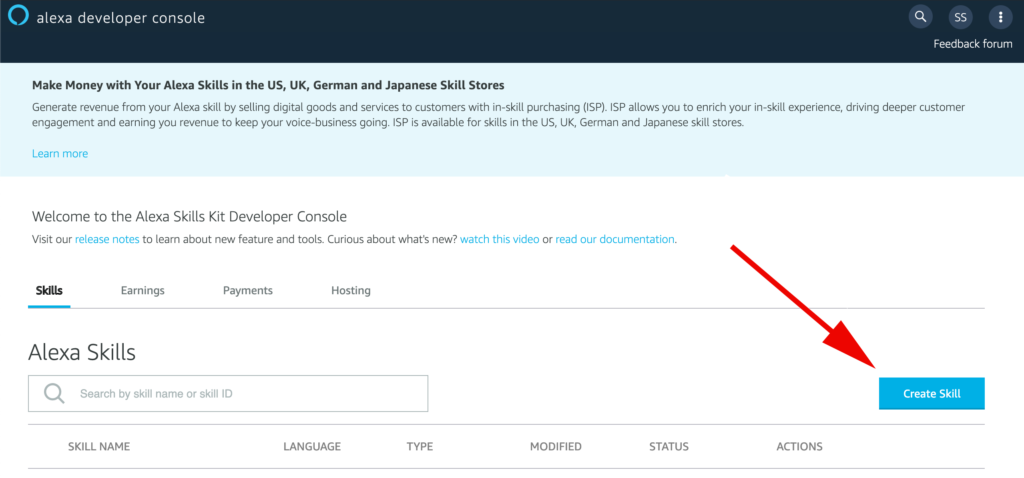
Create a Skill in the Alexa Developer Console
We will begin by creating a new skill from scratch. Navigate to the Alexa Developer Console and click on the Create Skill button.
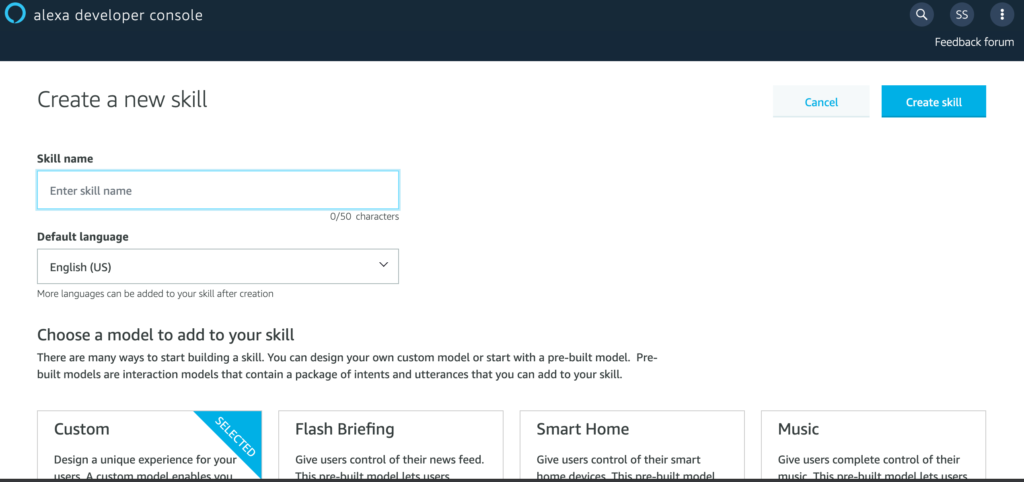
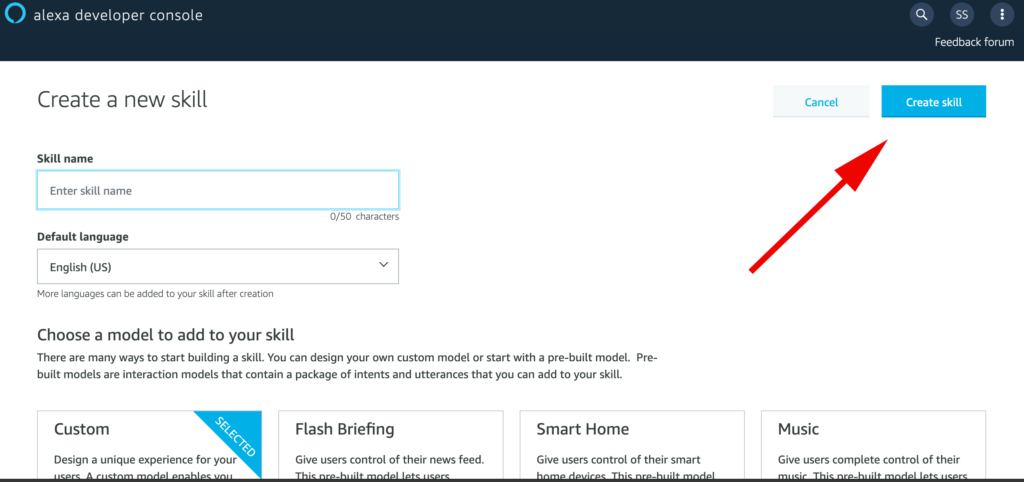
You will be directed to a screen that allows you to set a Skill Name, interaction model, and hosting for the skill code.
Name your skill something original. This tutorial will use “random quotes” as the Skill name to keep things simple.
For the interaction model, make sure that Custom is selected.
Select Alexa-hosted (Node.js) for the skill’s backend resource.
Scroll back to the top of the page and click the Create Skill button to create the skill.
This may take a moment, so take a quick break and wait until your resources are provisioned. Once it is done, you should be redirected to the Alexa Developer Console IDE for your skill.
At this point, you should test your skill on the Test tab of the Alexa Developer Console so that you know your skill is working as expected.
Creating the In-Skill Product
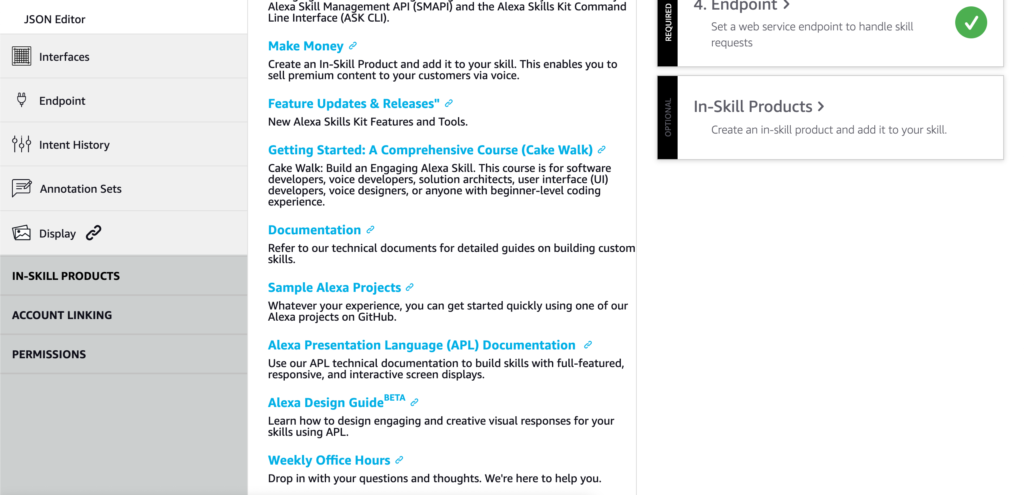
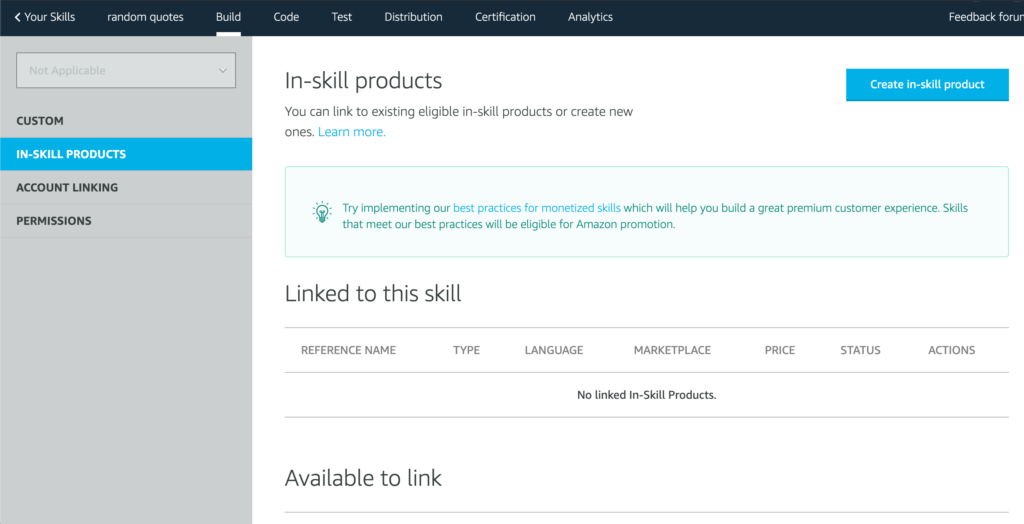
On the Build tab of the Alexa Developer Console, scroll down until you see the IN-SKILL PRODUCTS menu option on the left-hand side.
Click on it and you will be redirected to the In-Skill Products page.
Click on the Create in-skill product button in the upper right corner of the main content screen. You will be redirected to a simple form that will define the product’s name and type.
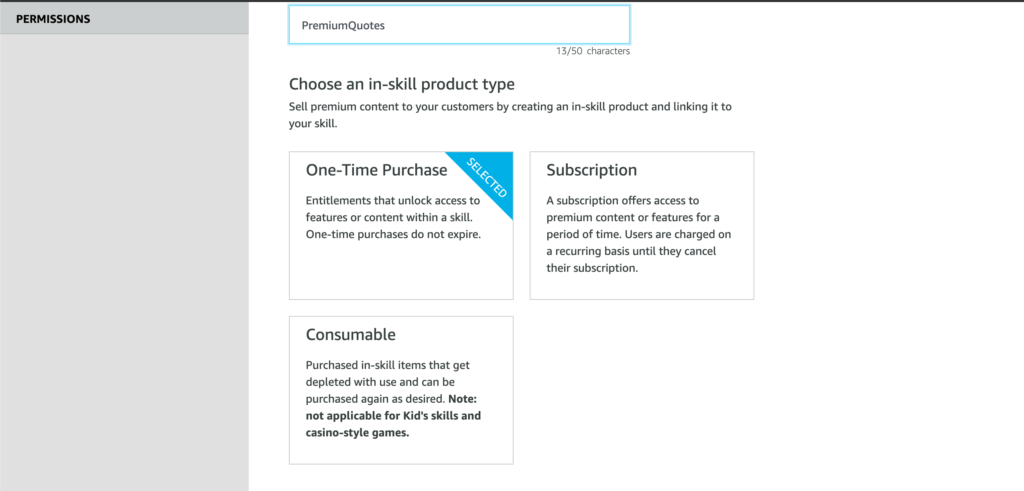
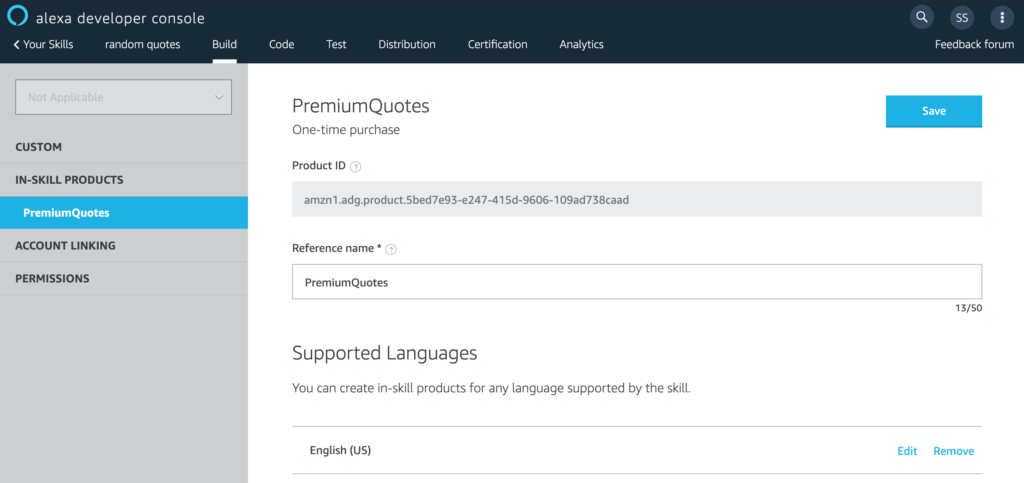
Give your product a reference name with no spaces. This tutorial’s product will be called PremiumQuotes.
Below this are three options for the in-skill product type: One-Time Purchase, Subscription, and Consumable.
For this tutorial, our customers will purchase our PremiumQuotes product and never have to pay again for this digital product. Select One-Time Purchase.
Scroll back to the top of the screen and click on the Create in-skill product button in the upper right corner of the main content screen.
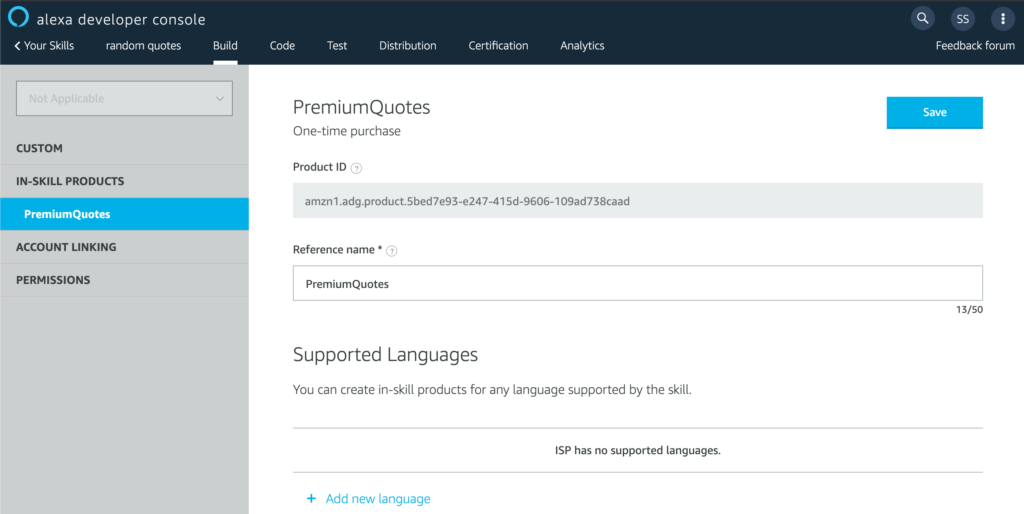
Our product has been created, but we aren’t done yet.
Configuring our In-Skill Product
We still need to set up our product, including details like supported languages, price, icon, testing instructions, etc. Let’s go through each of these options step-by-step to ensure we have a good understanding of what a products needs defined before it can be released to the public.
Supported Language
Click on the “+ Add new language” link to add a new language for this product. In its place, a menu will pop open to reveal what languages you can support. Because our tutorial skill is simple, we will only be able to select the English (US) option.
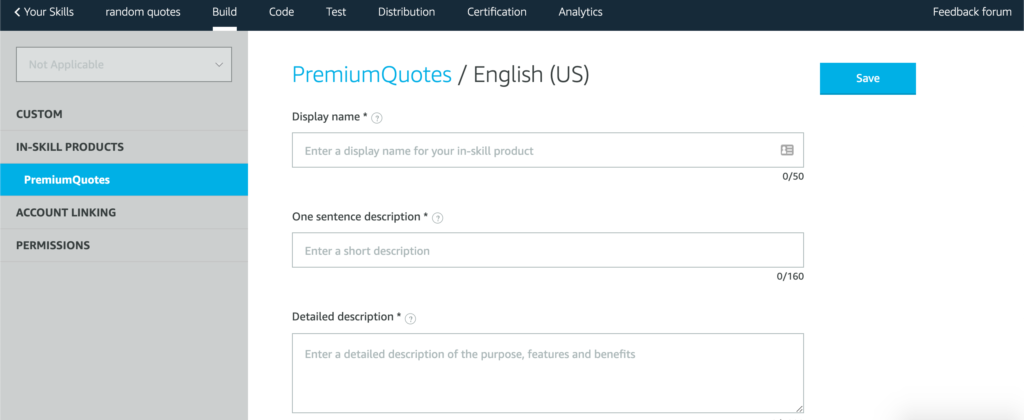
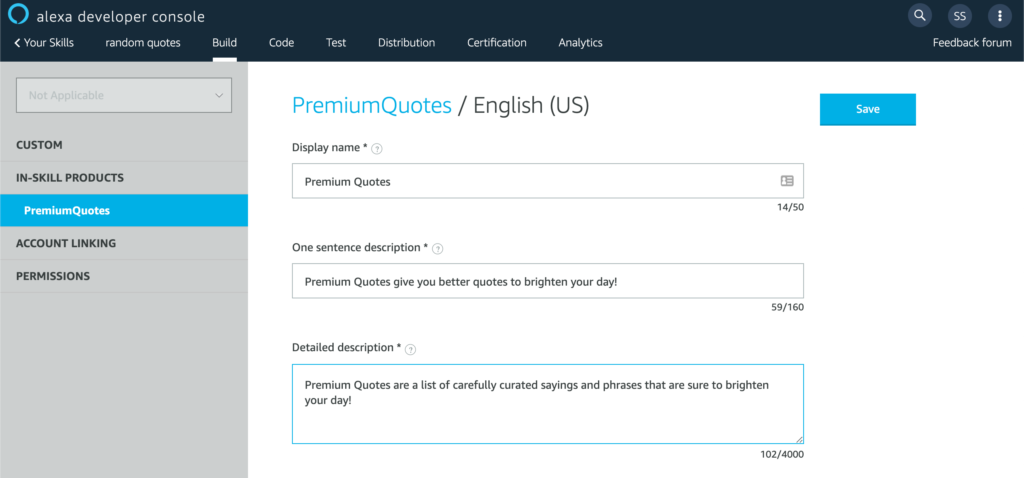
You will be redirected to page where you can start filling in details for the product.
Product details for the locale
Before we start entering any more information, let’s go over the form fields and what they mean (note: content mostly pulled from info bubbles):
Display name – The name for the product for this locale. This name is included in purchase confirmation prompts, Alexa app purchasing cards, and email receipts.
One sentence description – A quick at-a-glance sentence that describes the product or what customers can do with it.
Detailed description – A full description explaining the product’s functionality and any prerequisites to using it. This description is used in offer and purchase cards on screen devices.
Small icon for this in-skill product – The image used for displaying the product.
Large icon for this in-skill product – The image used for displaying the product.
Purchase prompt description – The description of the product a customer hears when making a purchase.
Purchase confirmation description – A description of the product that displays on the post-purchase confirmation card in the Alexa Companion app.
For a real product, these fields will be very important. You will want to test the purchase flows to ensure that your messaging is correct and suitable for your audience. For the purposes of this tutorial, we will be brief with the details and note the product details when they appear later on.
Fill in the details for the text fields to simple values. You can always come back and update them after the tutorial is finished.
In addition to the text fields, you will need to generate icons for your product. Use the Alexa Skill Icon Builder, a free tool that will be enough to get your through to the next steps of this tutorial
Once you are finished, scroll back to the top and click on the Save button to save your details. You will be redirected back to the PremiumQuotes main product page.
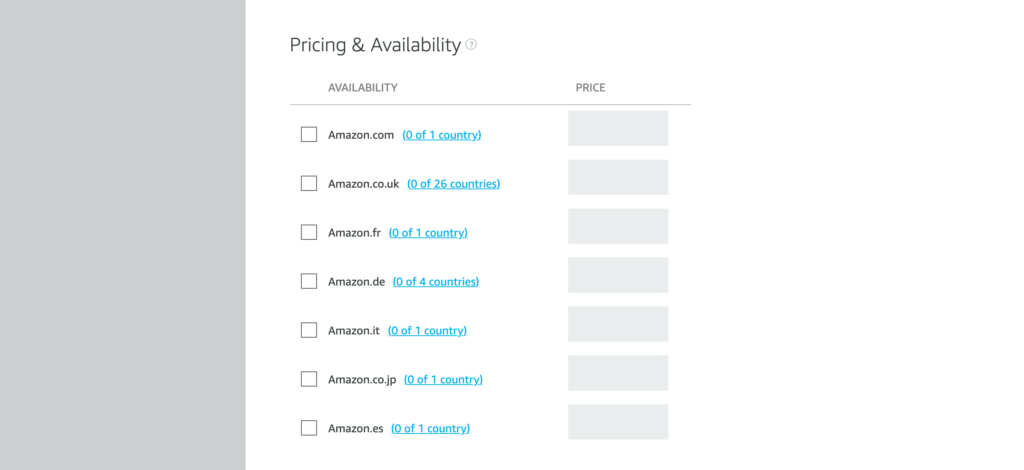
Product Pricing and Availability
Now that our digital product has been set up and configured, we can move on to the fun stuff: setting prices!
Scroll down to view the Pricing & Availability section.
This is where we decide to distribute your in-skill product. The tutorial’s in-skill product will need to support the primary language for each of the specified countries/regions so that it is accessible by users in those countries/regions.
In the case of this tutorial’s skill, we will only enable two options, Amazon.com & Amazon.co.uk. Click on the checkboxes next to these options to enable them.
Once an option has been enabled, we can start setting the prices for our PremiumQuotes ISP. We will leave the default option set to $0.99 and £0.99 for each option.
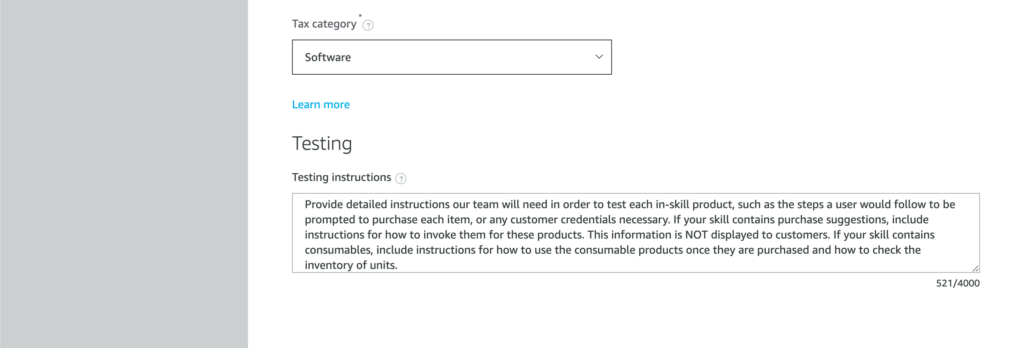
Tax Category
Scrolling down further down the page, we will see the Tax Category option. You will need to select a category for your ISP. Select Software to complete this required step of the tutorial.
Scrolling down even further, you will see the final text area that you need to fill out, Testing Instructions.
In this field, you will need to provide instructions and information to Amazon’s certification team. At the very least, you should explain how to find the product in the skill (i.e. “What can I buy?” or “Tell me about the premium quotes upgrade.“), test account credentials (for example, if you are linking the skill user’s account to an external account), and any other details you see fit.
Because this tutorial skill is not going to be published, we will simply fill in some placeholder content and move on.
At this point, we are done editing the product details.
Scroll back to the top of the page and click the Save button. If this is the first time you’ve edited the product, you should see a popup similar to this:
Click Link to skill. You should be redirected to the main In-Skill Products page with the PremiumQuotes product listed in the table “Linked to this skill”.
NOTE: you can choose not to link this product at this point if you desire. When you return to the In-Skill Products main page, you will see your product located in the Available to link table. Scroll to the right and you should be able to link it with a link under the Actions column.
NOTE: The “Linked to this skill” table scrolls to the right to reveal more options. I didn’t notice this at first, so I give this information to you. There is a Status column as well as an Actions column where you can edit or unlink your skill.
Congrats! You now have a product defined and ready to integrate into our skill code.
Generate Random Quotes
Our next step in this tutorial is to build out the main concept of the skill. For freemium users, the skill will respond with a random quote from a list.
We will be using a list of short, publicly-available programming quotes found on the Internet. If you wish to follow along, you can use these as well:
A good programmer looks both ways before crossing a one-way street.
A computer program does what you tell it to do, not what you want it to do.
Only half of programming is coding. The other 90% is debugging.
The best thing about a boolean is even if you are wrong, you are only off by a bit.
There is nothing quite so permanent as a quick fix.
There’s no test like production.
Freemium Quotes
Navigate to the Code tab in your skill’s IDE. Create a file in the IDE called freemiumQuotes.js, then insert the following content into this file:
module.exports = [
  `A good programmer looks both ways before crossing a one-way street.`,
  `A computer program does what you tell it to do, not what you want it to do.`,
  `Only half of programming is coding. The other 90% is debugging`,
  `The best thing about a boolean is even if you are wrong, you are only off by a bit.`,
  `There is nothing quite so permanent as a quick fix.`,
  `There’s no test like production.`
];
Utility function to retrieve a random freemium quote
Now that we have this JavaScript module, we can import it into our skill code.
To keep our code clean and modular, we will create a file called utils.js. This file will export a module that we can use in our Intent Handlers to retrieve a random freemium quote. Here’s what that looks like in code:
Open index.js and import the utils.js file. Then, update the HelloWorldIntentHandler with our new method, getRandomFreemiumQuote().
const Alexa = require('ask-sdk-core');
// add this import to bring in our newly created module.
const utils = require('./utils.js');

// ... more code

const HelloWorldIntentHandler = {
    canHandle(handlerInput) {
        return Alexa.getRequestType(handlerInput.requestEnvelope) === 'IntentRequest'
            && Alexa.getIntentName(handlerInput.requestEnvelope) === 'HelloWorldIntent';
    },
    handle(handlerInput) {
        // add this code here to retrieve a random quote
        const speakOutput = utils.getRandomFreemiumQuote();
        return handlerInput.responseBuilder
            .speak(speakOutput)
            .withShouldEndSession(false)
            .getResponse();
    }
};
NOTE: you can delete the util.js file that comes with the custom skill template. This will avoid some confusion as we move forward with the development of the skill.
Make sure to save all of the files using the Save button (or CMD+s on Mac OS X), then click Deploy to upload your changes to the Alexa-hosted Node.js lambda function our skill runs on.
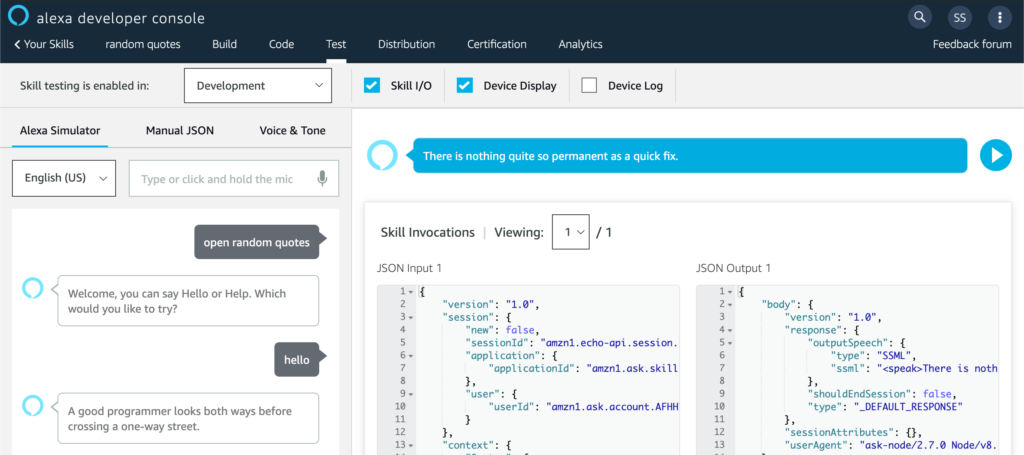
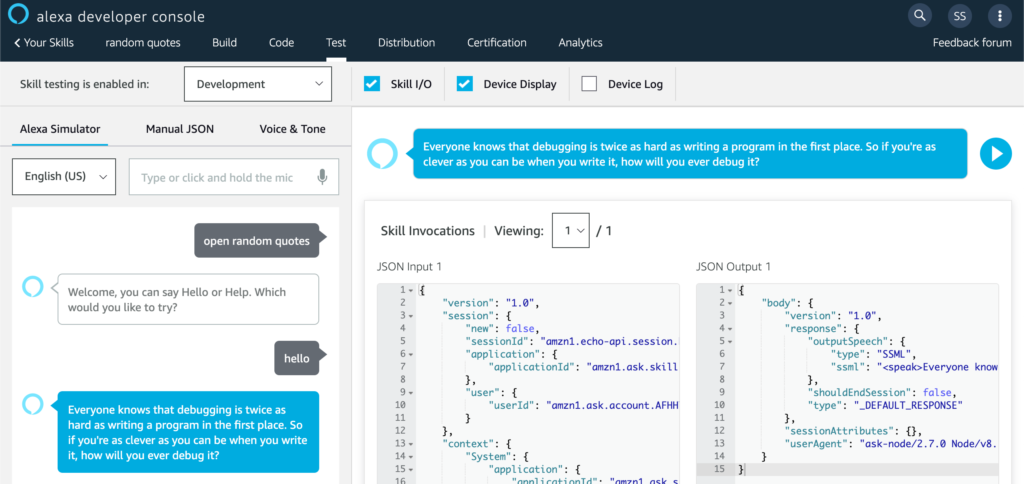
Test this skill to make sure the random quotes are working. Navigate to the Test tab of the Alexe Developer Console. Invoke the skill with “open random quotes“, then type in “hello“. You should receive one of the quotes from the list we created earlier. You can type in “hello” multiple times, which should yield more random programmer quotes.
This is our freemium experience. It’s simple and bare, but it adds a little bit of value for our users. Our next step is to add in premium quotes.
Implementing premium quotes
Using the same pattern we utilized in the freemium random quotes, we will create a list of premium quotes. Again, this tutorial is mostly an example of how to make money with Alexa skills, so the details really don’t matter much.
Here’s the list of premium quotes we are going to add to our skill:
Always code as if the guy who ends up maintaining your code will be a violent psychopath who knows where you live
Talk is cheap. Show me the code.
Programming today is a race between software engineers striving to build bigger and better idiot-proof programs, and the Universe trying to produce bigger and better idiots. So far, the Universe is winning.
Any fool can write code that a computer can understand. Good programmers write code that humans can understand.
I'm not a great programmer; I'm just a good programmer with great habits.
Truth can only be found in one place: the code.
Everyone knows that debugging is twice as hard as writing a program in the first place. So if you're as clever as you can be when you write it, how will you ever debug it?
Walking on water and developing software from a specification are easy if both are frozen.
The computer programmer is a creator of universes for which he alone is the lawgiver. No playwright, no stage director, no emperor, however powerful, has ever exercised such absolute authority to arrange a stage or field of battle and to command such unswervingly dutiful actors or troops.
At forty, I was too old to work as a programmer myself anymore; writing code is a young person’s job.
Some of the best programming is done on paper, really. Putting it into the computer is just a minor detail.
Now that we have our quotes, it’s time to put them in a consumable module. Create a file called premiumQuotes.js and paste in the following contents:
module.exports = [
    `Always code as if the guy who ends up maintaining your code will be a violent psychopath who knows where you live`,
    `Talk is cheap. Show me the code.`,
    `Programming today is a race between software engineers striving to build bigger and better idiot-proof programs, and the Universe trying to produce bigger and better idiots. So far, the Universe is winning.`,
    `Any fool can write code that a computer can understand. Good programmers write code that humans can understand.`,
    `I'm not a great programmer; I'm just a good programmer with great habits.`,
    `Truth can only be found in one place: the code.`,
    `Everyone knows that debugging is twice as hard as writing a program in the first place. So if you're as clever as you can be when you write it, how will you ever debug it?`,
    `Walking on water and developing software from a specification are easy if both are frozen.`,
    `The computer programmer is a creator of universes for which he alone is the lawgiver. No playwright, no stage director, no emperor, however powerful, has ever exercised such absolute authority to arrange a stage or field of battle and to command such unswervingly dutiful actors or troops.`,
    `At forty, I was too old to work as a programmer myself anymore; writing code is a young person’s job.`,
    `Some of the best programming is done on paper, really. Putting it into the computer is just a minor detail.`
];
Next, let’s update the utils.js file with a method,getRandomPremiumQuote(), which will return a random quote from the premium list we just created in premiumQuotes.js:
Now that we have our new method, let’s test it out. We will insert a hard-coded boolean that will act as a switch once we integrate ISP support. Update index.js like so, altering HelloWorldIntentHandler:
const HelloWorldIntentHandler = {
    canHandle(handlerInput) {
        return Alexa.getRequestType(handlerInput.requestEnvelope) === 'IntentRequest'
            && Alexa.getIntentName(handlerInput.requestEnvelope) === 'HelloWorldIntent';
    },
    handle(handlerInput) {
        // this is our temporary boolean
        const hasPremiumQuotesEnabled = true;
        // we use the boolean to determine which set of quotes to receive a random quote from
        const speakOutput = (hasPremiumQuotesEnabled) ? utils.getRandomPremiumQuote() : utils.getRandomFreemiumQuote();
        return handlerInput.responseBuilder
            .speak(speakOutput)
            .withShouldEndSession(false)
            .getResponse();
    }
};
Next, test this skill to ensure that the random quotes returned are from the premium list, not freemium list.
If you want, you can flip the hasPremiumQuotesEnabled boolean to false and test that only free quotes are responded to the user. Flip the hasPremiumQuotesEnabled boolean back to true and retest to make sure premium works.
We now have the basic functionality that we will need for our product. Our next step is to pull in our product list so that we can determine if a user has purchased our PremiumQuotes product.
Retrieving the In-Skill Products list
Our next step is to retrieve the list of In-Skill Products linked to our Skill. With a few modifications of our code, we will be able to determine what products are available and which products the user has already purchased.
Adding the default API client
Open index.js and add a line to the chained Skill builder object, like so:
exports.handler = Alexa.SkillBuilders.custom()
    .addRequestHandlers(
        LaunchRequestHandler,
        HelloWorldIntentHandler,
        HelpIntentHandler,
        CancelAndStopIntentHandler,
        SessionEndedRequestHandler,
        IntentReflectorHandler, // make sure IntentReflectorHandler is last so it doesn't override your custom intent handlers
    )
    .addErrorHandlers(
        ErrorHandler,
    )
    /* add this line */
    .withApiClient(new Alexa.DefaultApiClient())
    .lambda();
Next, we are going to further alter the index.js, updating the LaunchRequestHandler to log our In-Skill Product list.
const LaunchRequestHandler = {
    canHandle(handlerInput) {
        return Alexa.getRequestType(handlerInput.requestEnvelope) === 'LaunchRequest';
    },
    // add the async keyword to this function so we can make async requests to the ISP API
    async handle(handlerInput) {
        // add these two lines
        const locale = handlerInput.requestEnvelope.request.locale;
        const ms = handlerInput.serviceClientFactory.getMonetizationServiceClient();

        try {
            const inSkillProductsList = await ms.getInSkillProducts(locale);
            console.log(inSkillProductsList);
        } catch (err) {
            console.log('ERROR', err);
        }

        const speakOutput = 'Welcome, you can say Hello or Help. Which would you like to try?';
        return handlerInput.responseBuilder
            .speak(speakOutput)
            .reprompt(speakOutput)
            .getResponse();
    }
};
With the previous code additions, we can now query the In-Skill Purchase Service for product information.
Check logs for successful ISP query
Because we decided to create a Custom Skill with a Alexa-hosted Node.js backend Lambda, we are automatically granted integration with CloudWatch. CloudWatch will log whatever log using console.log().
Save and deploy your code, then head over to the Test tab. Invoke the skill to execute the handler we just modified.
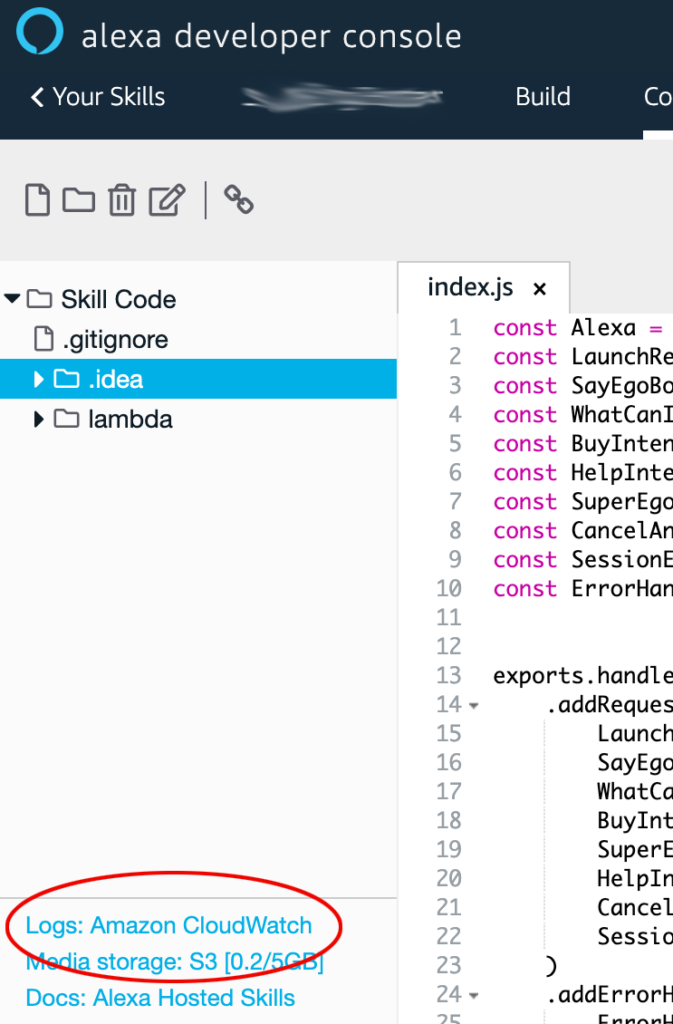
Next, head over to the Code tab and click the link labeled “Logs: Amazon CloudWatch”. This should open another tab.
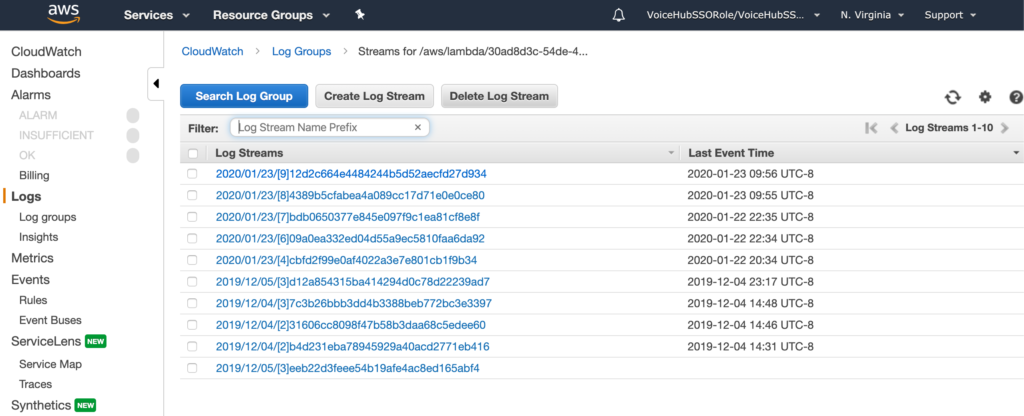
You should see something like this:
Click on the top-most link to see your most recent CloudWatch logs. The value for Last Event Time in the table should be very close to when you tested your skill code in the Test tab.
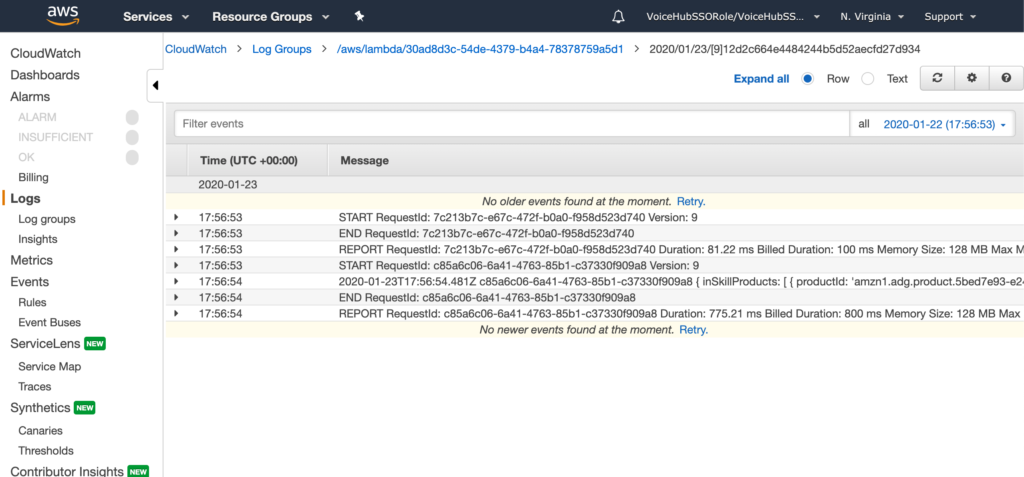
The log messages are collapsed by default, so you will need to click on the row to view details.
As you can see on the 5th row, there is a logged object. Here is what is logged for my skill:
Does any of this data look familiar? Yup, this is from our PremiumQuotes In-Skill Product we designed earlier in this tutorial. Pay attention to object keys, especially the referenceName, name, and summary fields. These are values we can use in our code or edit later on if we choose to.
You will also notice the entitled property set to ‘NOT_ENTITLED‘ and the entitlementReason set to ‘NOT_PURCHASED‘. Later on in this tutorial, we will see these values changes as the user purchases the PremiumQuotes product.
Now that we have determined that our code is working as expected, let’s do something with our new data.
Utility Methods
Open utils.js. We will create new methods that we can use to filter and respond to the user with. We can use these as we incrementally update index.js to handle product purchase state for the user.
const freemiumQuotes = require('./freemiumQuotes.js');
const premiumQuotes = require('./premiumQuotes.js');

module.exports = {
    getRandomFreemiumQuote() {
        return freemiumQuotes[Math.floor(Math.random() * freemiumQuotes.length)];
    },
    getRandomPremiumQuote() {
        return premiumQuotes[Math.floor(Math.random() * premiumQuotes.length)];
    },
    // add this method
    getAllEntitledProducts(inSkillProductList) {
        return inSkillProductList.filter(record => record.entitled === 'ENTITLED');
    },
    // add this method, too
    // Helper function that returns a speakable list of product names from a list of entitled products.
    getSpeakableListOfProducts(entitleProductsList) {
        const productNameList = entitleProductsList.map(item => item.name);
        let productListSpeech = productNameList.join(', '); // Generate a single string with comma separated product names
        productListSpeech = productListSpeech.replace(/_([^_]*)$/, 'and $1'); // Replace last comma with an 'and '
        return productListSpeech;
    }
};
With the previous code updates, we are ready to start building out our customer purchase flows as well as reporting on the status of product purchases. We need to deal with a couple of scenarios…
Scenario #1 – Customer has not purchased PremiumQuotes
If it’s the first time that a user has invoked our skill or the user has not purchased anything yet, we should let them know what we have available to purchase and how to learn more.
Open index.js and update the code as follows:
const LaunchRequestHandler = {
canHandle(handlerInput) {
return Alexa.getRequestType(handlerInput.requestEnvelope) === 'LaunchRequest';
},
// add the async keyword to this function so we can make async requests to the ISP API
async handle(handlerInput) {
// add these two lines
const locale = handlerInput.requestEnvelope.request.locale;
const ms = handlerInput.serviceClientFactory.getMonetizationServiceClient();
// Bring speakOutput up here so we can build our response, add welcome message
let speakOutput = 'Welcome to the Random Quotes skill. ';
try {
const inSkillProductsList = await ms.getInSkillProducts(locale);
console.log(inSkillProductsList);
// get a list of products that the user is entitled to
const entitledProducts = utils.getAllEntitledProducts(inSkillProductsList.inSkillProducts);
// Customer owns one or more products
if (entitledProducts && entitledProducts.length > 0) {
// TODO: add code to handle PremiumQuotes product enabled
} else {
// Customer does not own anything yet
// Let the user know what's available for purchase
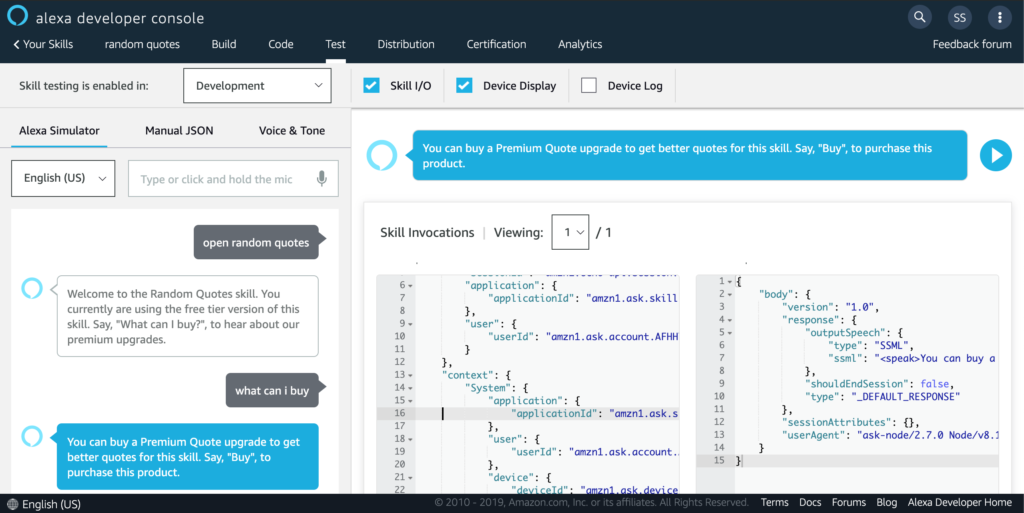
speakOutput += 'You currently are using the free tier version of this skill. Say, "What can I buy?", to hear about our premium upgrades.';
}
} catch (err) {
console.log('ERROR', err);
}
speakOutput += `Say, "hello", to hear a random quote or say "help " to get help.`
return handlerInput.responseBuilder
.speak(speakOutput)
.reprompt(speakOutput)
.getResponse();
}
};
Test this flow out to make sure we are getting the correct message.
Now that we direct the user to say “What can I buy?“, let’s set up an Intent to handle this.
Adding TellMeMoreIntent
In the Alexa Developer Console, click on the Build tab. Once this page loads, click on the “+ Add” button located on the left-hand menu next to Intents.
The Add Intent page will open with the “Create custom intent” option selected. In the text field, enter TellMeMoreIntent and then click the button labeled “Create custom intent“.
Next, enter a couple of sample utterances that a user might say to invoke this Intent.
(1) Enter “tell me more” into the text area, then click the plus sign at the end of the field to add the utterance. Do the same thing for “what can I buy“.
(2) Click on the “Save Model” button.
(3) Finally, click “Build Model” to build the model. This may take a minute to finish, so wait until this is finished and your intent will be ready for handling in the code.
Adding TellMeMoreIntentHandler
Now that our Skill’s model has been updated, we will write code to handle this intent. Then we will test it to ensure it is working as we expect.
Navigate to the Code section of the Alexa Developer Console IDE by clicking on the Code tab.
Open index.js and add an IntentHandler called TellMeMoreIntentHandler. Then, update the Skill builder object to include this handler.
// ... LaunchRequest code
const TellMeMoreIntentHandler = {
    canHandle(handlerInput) {
        return Alexa.getRequestType(handlerInput.requestEnvelope) === 'IntentRequest'
            && Alexa.getIntentName(handlerInput.requestEnvelope) === 'TellMeMoreIntent';
    },
    handle(handlerInput) {
       const speakOutput = 'You can buy a Premium Quote upgrade to get better quotes for this skill.  Say, "Buy", to purchase this product.';

        return handlerInput.responseBuilder
            .speak(speakOutput)
            .withShouldEndSession(false)
            .getResponse();
    }
};

// ... more intent handlers

exports.handler = Alexa.SkillBuilders.custom()
    .addRequestHandlers(
        LaunchRequestHandler,
        HelloWorldIntentHandler,
        // add this
        TellMeMoreIntentHandler,
        HelpIntentHandler,
        CancelAndStopIntentHandler,
        SessionEndedRequestHandler,
        IntentReflectorHandler
    )
    .addErrorHandlers(
        ErrorHandler,
    )
    .withApiClient(new Alexa.DefaultApiClient())
    .lambda();
Save and deploy the changes, then move to the Test tab in the IDE. Navigate your skill with utterance that will eventually trigger the TellMeMoreIntent.
Now that we describe and offer the product to the user, we need to handle the “buy” utterance a user will say to purchase our In-Skill Product.
Adding the BuyIntent
We will add another intent, BuyIntent, just like we did for the TellMeMoreIntent. Navigate to the Build tab, click on the “+ Add” option next to the Intent list on the left-hand side. Add a couple of utterances, such as “buy“, “buy premium quotes“, and “buy upgrade“. Finally, click “Save Model” and then “Build Model“.
Adding the BuyIntentHandler
Following the same pattern as before for the TellMeMoreIntent, let’s add another Intent Handler, BuyIntentHandler, and add it to our registered handlers list.
However, we need to collect some information about our PremiumQuotes product. Navigate back to the Build tab, click on In-Skill Products link on the left-hand side. Once the ISP page loads, click on the PremiumQuotes product to view its details.
Copy that Product ID. We will need to add it to our code soon.
Navigate to the Code tab and open index.js. We will add a BuyIntentHandler and then add it to our Skill builder object. Here’s the code:
// ... other intent handlers

const BuyIntentHandler = {
    canHandle(handlerInput) {
        return Alexa.getRequestType(handlerInput.requestEnvelope) === 'IntentRequest'
            && Alexa.getIntentName(handlerInput.requestEnvelope) === 'BuyIntent';
    },
    handle(handlerInput) {
        Logger.info('BuyIntentHandler', handlerInput.requestEnvelope);

        return handlerInput.responseBuilder
            .addDirective({
                type: 'Connections.SendRequest',
                name: 'Upsell',
                payload: {
                    InSkillProduct: {
                        productId: 'amzn1.adg.product.5bed7e93-e247-415d-9606-109ad738caad'
                    },
                    upsellMessage: 'Premium Quotes will enhance your life...  Do you want to know more?'
                },
                token: new Date().getTime().toString()
            })
            .getResponse();
    }
};

// ... more intent handlers

exports.handler = Alexa.SkillBuilders.custom()
    .addRequestHandlers(
        LaunchRequestHandler,
        HelloWorldIntentHandler,
        TellMeMoreIntentHandler,
        // add this
        BuyIntentHandler,
        HelpIntentHandler,
        CancelAndStopIntentHandler,
        SessionEndedRequestHandler,
        IntentReflectorHandler
    )
    .addErrorHandlers(
        ErrorHandler,
    )
    .withApiClient(new Alexa.DefaultApiClient())
    .lambda();
Wow, that’s a lot of new code to wrap our heads around! Let’s break it down.
addDirective() to delegate control to Alexa
Instead of the usual handlerInput.responseBuilder.speak().reprompt().getResponse() that we use to manually handle our response, the new BuyIntentHandler’s handle() method returns handlerInput.responseBuilder.addDirective(directiveObj). What does this actually do?
When we add a directive to our response, we delegate control of our skill to Alexa. In our case, Alexa will handle the continuing interaction of the ISP purchase, then return control to our skill by relaunching the skill with a new session. The purchase result will be supplied to the skill, which you will need to handle (more on this later in this tutorial).
So, now that we are aware of what a directive is and how it relates to our skill, let’s unpack the directive object we pass to addDirective().
{
    type: 'Connections.SendRequest',
    name: 'Upsell',
    payload: {
        InSkillProduct: {
            productId: 'amzn1.adg.product.5bed7e93-e247-415d-9606-109ad738caad'
        },
        upsellMessage: 'Premium Quotes will enhance your life...  Do you want to know more?'
    },
    token: new Date().getTime().toString()
}
type – (required) – The type of directive we wish to send. It should always be set to ‘Connections.SendRequest‘ for a purchase.
name – (required) – Indicates the target for the SendRequest message. Always use Upsell for a purchase suggestion.
payload – (required) – Object containing details for the specified action. For a purchase request, this includes the InSkillProduct property with a product ID. The upsellMessage will be responded to the user during the purchase flow delegated to Alexa.
token – (required) – A developer-generated string used to identify the purchase message exchange. It is not used by Alexa, but is returned in the resulting Connections.Response. You have total control over what this token should be.
Now that we are familiar with the directive we use to send users to Alexa for purchasing our product, we can start testing it!
Testing the purchase flow
This is getting exciting! Let’s test our purchase flow to see if a test user can purchase a product.
Navigate to the Test tab and see if you can purchase something. Your dialog results should look similar to the image below:
Wait, did something go wrong? In the second-to-last speech output bubble from Alexa, it said that we’ve successfully purchased the product. However, Alexa then responds with, “Sorry, I had trouble doing what you asked. Please try again.”
That message is only responded to the user when there is an error. ErrorHandler handles this response, and it luckily also logs the error.
// Generic error handling to capture any syntax or routing errors. If you receive an error
// stating the request handler chain is not found, you have not implemented a handler for
// the intent being invoked or included it in the skill builder below.
const ErrorHandler = {
    canHandle() {
        return true;
    },
    handle(handlerInput, error) {
        console.log(`~~~~ Error handled: ${error.stack}`);
        const speakOutput = `Sorry, I had trouble doing what you asked. Please try again.`;

        return handlerInput.responseBuilder
            .speak(speakOutput)
            .reprompt(speakOutput)
            .getResponse();
    }
};
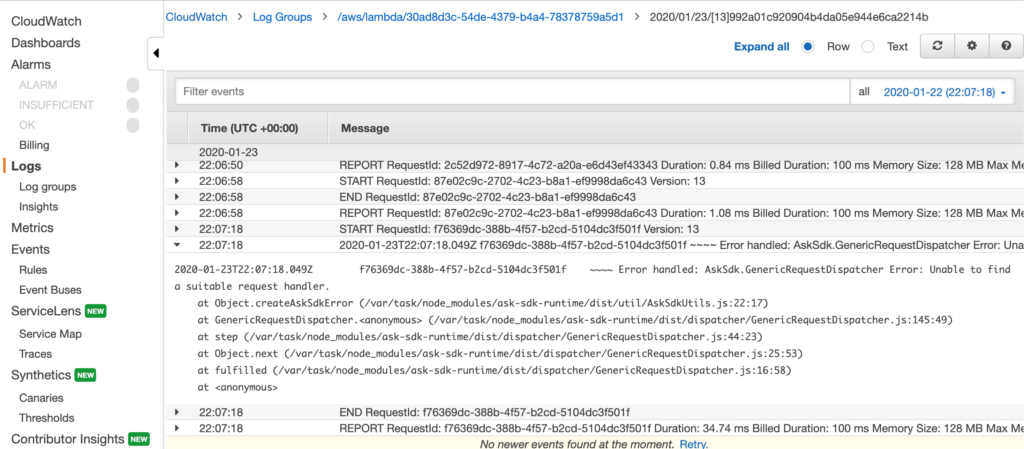
Let’s go to CloudWatch (via the link on the Code section of our skill) and see what happened…
Aha! “AskSdk.GenericRequestDispatcher Error: Unable to find a suitable request handler.” It looks like we didn’t handle the response from the purchase delegation! Let’s fix that!
Creating the BuyResponseHandler
When we delegate the conversation flow to Alexa to complete our purchase, we also need to handle the response from this action. How do we do this? We create a BuyResponseHandler object and create code to route our application flow based on response parameters. BuyResponseHandler will have to take into account successful purchases as well as failed requests, cancellations, already purchased, and network/system errors.
Navigate back to the Code tab and open index.js. Add the BuyResponseHandler like so:
// ... other intent handlers

const BuyResponseHandler = {
    canHandle(handlerInput) {
        return Alexa.getRequestType(handlerInput.requestEnvelope) === 'Connections.Response' &&
            (handlerInput.requestEnvelope.request.name === 'Upsell' || handlerInput.requestEnvelope.request.name === 'Buy');
    },
    handle(handlerInput) {
        const {attributesManager} = handlerInput;
        // get current session attributes
        const sessionAttributes = attributesManager.getSessionAttributes();

        const requestPayload = handlerInput.requestEnvelope.request.payload;
        let speakOutput = '';

        // route control of skill flow based on purchase result
        switch (requestPayload.purchaseResult) {
            // successful purchase
            case 'ACCEPTED':
                // update session attributes with property we can check in other intent handlers
                attributesManager.setSessionAttributes(Object.assign({}, sessionAttributes, {
                    'hasPremiumQuotesEnabled': true
                }));
                speakOutput += 'Thanks for your purchase of Premium Quotes!';
                break;
            // user has already purchased the PremiumQuotes product
            case 'ALREADY_PURCHASED':
                speakOutput += 'You\'ve already purchased Premium Quotes.  Thanks!';
                break;
            // user did not purchase product
            case 'DECLINED':
                speakOutput += 'Maybe next time!';
                break;
            // there was an error in the response
            case 'ERROR':
                speakOutput += 'Sorry, something went wrong with your purchase.  Try again later!';
                break;
            default:
                speakOutput += 'Sorry, we\'re not sure what went wrong but we are looking into it.  Try again later!';
                break;
        }

        // after determining the response result, pause for two seconds then guide user to normal skill flow (i.e. ask for another random quote)
        speakOutput += '<break time="2s" />  Say, "hello" to hear a random quote.';

        return handlerInput.responseBuilder
            .speak(speakOutput)
            .reprompt(speakOutput)
            .getResponse();
    }
};

// ... other intent handlers

exports.handler = Alexa.SkillBuilders.custom()
    .addRequestHandlers(
        LaunchRequestHandler,
        HelloWorldIntentHandler,
        TellMeMoreIntentHandler,
        BuyIntentHandler,
        // add this
        BuyResponseHandler,
        HelpIntentHandler,
        CancelAndStopIntentHandler,
        SessionEndedRequestHandler,
        IntentReflectorHandler
    )
    .addErrorHandlers(
        ErrorHandler,
    )
    .withApiClient(new Alexa.DefaultApiClient())
    .lambda();
Re-test Purchase Flow
Now, let’s re-test our product purchase dialog flow. Let’s start by resetting the purchase. Remember, our last test was actually a successful purchase but an unhandled error killed our session.
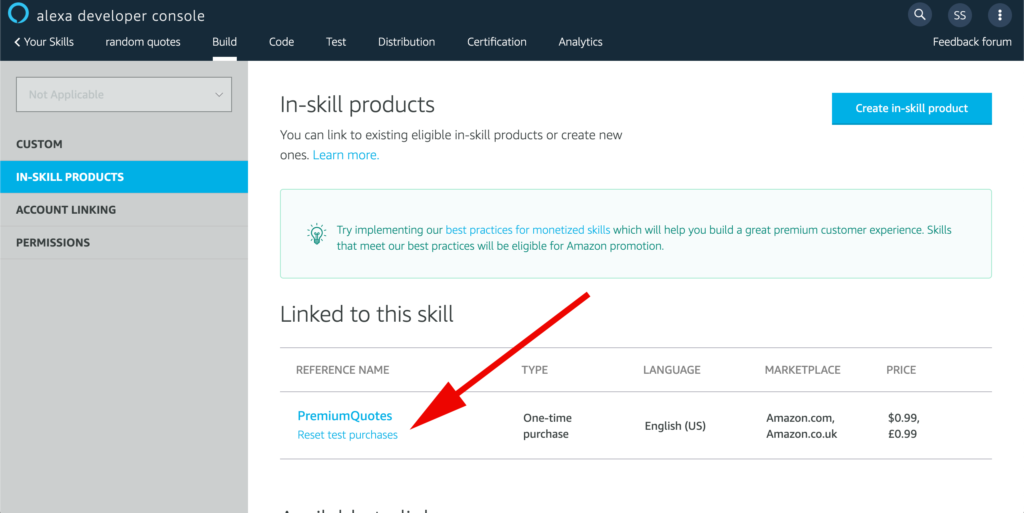
Navigate to the Build tab, then click In-Skill Products menu item.
Under the PremiumQuotes product, there is a link to reset test purchases.
Click this link and a modal dialog should appear.
Click reset and you should see a green banner confirming that your purchase has been reset.
Now that are test purchase is reset, we can re-test the dialog flow we tried earlier. Navigate to the Test tab and retry the purchase flow. You should end up with a result like this:
Awesome! We have now successfully completed the In-Skill Purchasing flow! Now we need to refactor our code to handle our new purchase.
Scenario #2 – Customer has purchased PremiumQuotes
It’s been a long tutorial to get to the second scenario, but we’re getting close to being done. Let’s refactor our Alexa skill so that we take into account users that have already upgraded by purchasing our PremiumQuotes product.
Refactor LaunchRequestHandler
Open index.js and update the LaunchRequestHandler. This time, we are going to check for the product purchase and update our user’s session attributes if it has been purchased.
const LaunchRequestHandler = {
    canHandle(handlerInput) {
        return Alexa.getRequestType(handlerInput.requestEnvelope) === 'LaunchRequest';
    },

    async handle(handlerInput) {
        // add this to get access to the attributesManager, a property of the handlerInput
        const { attributesManager } = handlerInput;

        const locale = handlerInput.requestEnvelope.request.locale;
        const ms = handlerInput.serviceClientFactory.getMonetizationServiceClient();

        let speakOutput = 'Welcome to the Random Quotes skill. ';

        try {
            const inSkillProductsList = await ms.getInSkillProducts(locale);
            console.log(inSkillProductsList);

            // get a list of products that the user is entitled to
            const entitledProducts = utils.getAllEntitledProducts(inSkillProductsList.inSkillProducts);

            // Customer owns one or more products
            if (entitledProducts && entitledProducts.length > 0) {
                // add this block of code
                // update session attributes so that they can be checked in the HelloWorldIntentHandler
                const sessionAttributes = attributesManager.getSessionAttributes();
                attributesManager.setSessionAttributes(Object.assign({}, sessionAttributes, {
                    'hasPremiumQuotesEnabled': true
                }));

                speakOutput += 'You have purchased the Premium Quotes, so you are going to receive the best Random Quotes experience! ';
                // end block
            } else {
                // Customer does not own anything yet
                // Let the user know what's available for purchase
                speakOutput += 'You currently are using the free tier version of this skill.  Say, "What can I buy?", to hear about our premium upgrades. ';
            }

        } catch (err) {
            console.log('ERROR', err);
        }

        speakOutput += `Say, "hello", to hear a random quote or say "help " to get help.`

        return handlerInput.responseBuilder
            .speak(speakOutput)
            .reprompt(speakOutput)
            .getResponse();
    }
};
If you test this out in the Test tab, you will see that it will detect you have purchased a product:
You can also check CloudWatch to view the inSkillProducts list to see the difference after a user has purchased a product:
NOTE: this tutorial is very simple and leaves out a lot of extra parsing of the inSkillProducts list. We are working off the assumption that if a user is entitled to products, they must have purchased the PremiumQuotes product.
Our next step is to substitute a previously hardcoded boolean in HelloWorldIntentHandler to the session attribute we saved in the LaunchRequestHandler.
Refactor HelloWorldIntentHandler
Re-open index.js and update HelloWorldIntentHandler:
const HelloWorldIntentHandler = {
    canHandle(handlerInput) {
        return Alexa.getRequestType(handlerInput.requestEnvelope) === 'IntentRequest'
            && Alexa.getIntentName(handlerInput.requestEnvelope) === 'HelloWorldIntent';
    },
    handle(handlerInput) {
        const { attributesManager } = handlerInput;
        const sessionAttributes = attributesManager.getSessionAttributes();

        // we replace our temporary boolean with session attributes
        const hasPremiumQuotesEnabled = (sessionAttributes['hasPremiumQuotesEnabled']) ? true : false;
        // we use the boolean to determine which set of quotes to receive a random quote from
        const speakOutput = (hasPremiumQuotesEnabled) ? utils.getRandomPremiumQuote() : utils.getRandomFreemiumQuote();
        return handlerInput.responseBuilder
            .speak(speakOutput)
            .withShouldEndSession(false)
            .getResponse();
    }
};
Alright! Now test the skill out!
First, reset the test purchase, then invoke the skill and ask for a random quote. You should receive a freemium quote. Then, purchase the PremiumQuotes product.
Second, relaunch the skill and ask for a random quote. You should receive a premium quote. That’s it!
Now, you have most of the testing done.
Scenario #3: Request for ISP data has failed.
If, while handling the LaunchRequest, the ISP request fails, you should handle this gracefully. You can approach this in a number of ways, such as retrying the ISP list request or responding with an error message and keep chugging along. At the very least, you should console.log the error.
I have not seen this error in production-deployed Skills, so I don’t believe it happens that often. However, your customers will be quite irritated if this happens. You might want to look into persistence like DynamoDB so that you don’t need to depend on this API call.
Refunds
For the majority of this tutorial, we have been focusing on getting a user to purchase our In-Skill Product. Getting to this point has been a long and detailed tutorial, but we still need to tackle one more required aspect of Alexa ISPs: refunds.
That’s right, you read that correctly: refunds. Alexa requires Skill developers to handle refunds for their users. The rules around refunds are unclear and murky, which is a little unsettling for those of us who are trying to build a business off of Alexa. However, if you want the chance to make a fortune on the Alexa Skill Store, you are going to have to implement handlers for refunds.
Luckily, the refund flow is a lot simpler than the purchase flow, although they share similar characteristics. We will keep it simple for brevity.
Creating the RefundPurchaseIntent
Go to the Build tab for your Skill, create an Intent named RefundPurchaseIntent. Add the following utterances: “refund“, “refund purchase“, “I want a refund“. Next, click “Save Model” and then “Build Model“. Your refund intent is now ready to be handled in code.
Creating the RefundPurchaseIntentHandler and RefundPurchaseResponseHandler
Using the same dialog flow as before, purchase the PremiumQuotes product. After purchase, respond with “refund purchase“. Once you’ve been successfully refunded, say “hello” and ensure that you are only receiving freemium quotes.
Conclusion
Congratulations on finishing this tutorial!
I hope you learned some new skills and can now see the potential of the Alexa Skills marketplace. Developing skills is a difficult process even for ones that aren’t designed to make money. If you want to give your users an amazing experience and make money with Alexa, you must absolutely understand and master in-skill purchasing. Knowing how to get a little extra coin for your efforts is extremely empowering. I hope we all make a lot of money with In-Skill Purchasing in our Alexa Skills!
Further Exploration
As mentioned many times in this tutorial, we kept things simple to show concepts. The code is ugly, HelloWorldIntent is still named HelloWorldIntent, and a lot of better practices were ignored. Feel free to take this tutorial as a starting point in your Alexa ISP adventures. You can also try and get your own unique skill certified and published.
If you’re interested in high-quality Alexa Skills code and techniques, take a look at some of our other high-quality articles:
When you’re looking to personalize your skills and create engaging experiences for the Alexa platform, you really need to use SSML in your skills. The standard text output gets old quick and your carefully crafted responses can be misinterpreted, resulting in output other than what you intended.
There’s a whole world of possibilities outside the regular Alexa responses. In this tutorial, you will find a lot of examples of useful SSML elements for your Alexa Skills.
Add custom audio to your skill by including an <audio> element to your speech output. Simply set the src attribute to your file’s URL and you should be able to hear your audio in the skill.
Ideally, you should upload your own mp3 files to S3 (and maybe distribute via CDN with CloudFront). Otherwise, there are a few rules that you need to follow in order for this file to be used with Alexa. See the reference link for the most up-to-date information regarding mp3 files requirements.
NOTE: as of this article’s publication, you can only include 5 audio elements in a single Alexa response. These audio files cannot exceed 240 seconds combined, so make sure to account for this before recording long audio sessions These rules change as Amazon sees fit, so check the reference link to be sure.
The ASK Sound Library has a large variety of stock sounds that you can use to enhance your skill experience for users. The list is long and vast, so check it out before you decide to handle uploading your own properly encoded audio files to S3.
Here are some examples:
<!-- Output: Sci-Fi Laser shooting sounds -->
<audio src="soundbank://soundlibrary/scifi/amzn_sfx_scifi_laser_gun_fires_04"/>
<!-- Output: long cat screech -->
<audio src="soundbank://soundlibrary/animals/amzn_sfx_cat_angry_screech_1x_01"/>
<!-- Output: small dog bark -->
<audio src="soundbank://soundlibrary/animals/amzn_sfx_dog_small_bark_2x_01"/>
Sometimes, you want to add a pause in your responses to add a more conversational style. Pausing can also be useful to add between audio files, especially if there should be a natural pause between them.
Here are some examples of how you pause:
<!-- a 3000 millisecond pause-->
<break time="3000ms" />
 <!-- a 3 second pause-->
<break time="3s" />
NOTE: There is a strength attribute that you can add to the <break /> element. However, I find its functionality to not work as expected. You’re better off with normal punctuation in your text responses, other SSML tags, and simple <break time=""/> pauses for more granular control.
This SSML tag will alter how Alexa reads the speech. You should try out the following example to hear the results, as the responses will differ slightly.
<speak>
    <p>
        <amazon:domain name="news">
        On their fourth album, Marigold, the indie-folk band Pinegrove still possess their signature warmth, but the charm of their heartfelt confessionals has dimmed.
        </amazon:domain>
    </p>
    <p>
        <amazon:domain name="music">
        On their fourth album, Marigold, the indie-folk band Pinegrove still possess their signature warmth, but the charm of their heartfelt confessionals has dimmed.
        </amazon:domain>
    </p>
    <p>On their fourth album, Marigold, the indie-folk band Pinegrove still possess their signature warmth, but the charm of their heartfelt confessionals has dimmed.
    </p>
</speak>
The default Alexa speech response can be surprising when we start introducing things like numbers and dates to our Skill output. As developers, we need to instruct Alexa to interpret these data strings into something a human can recognize.
The <say-as> SSML element gives us a lot of flexibility to customize our voice experiences.
Spelling out a word
Using the attribute interpret-as with the value spell-out (for example,<say-as interpret-as="">spellitout</say-as>), we can tell Alexa to spell out a word.
<!-- Simple US phone number without area code -->
<say-as interpret-as="telephone">8675309</say-as>
<!-- Simple US phone number with area code -->
<say-as interpret-as="telephone">2128675309</say-as>
<!-- Phone number with extension -->
<!-- Alexa will say the word "Extension" at the "x" character -->
<say-as interpret-as="telephone">2128675309x1234</say-as>
Dates
Dates are an important type of data that we can respond to our user with. Using the <say-as interpret-as="date"> element, we can get a human-understandable date uttered back to our users.
Note: The Amazon Alexa SSML docs left out an important detail when using the format attribute: you must use a separator between calendar units when specifying a date format other than YYYYMMDD. Use either the dash character (“-“) or the forward slash (“/”) .
If you are designing a scoreboard or leader place, you might find ordinal numbers to be useful. Ordinal numbers are formatted like so: <say-as interpret-as="ordinal">#</say-as>, where # is a valid integer greater than 0.
<!-- Output: "James is in first place." -->
James is in <say-as interpret-as="ordinal">1</say-as> place.
<!-- Output: "Bill is in second place." -->
Bill is in <say-as interpret-as="ordinal">2</say-as> place.
<!-- Output: "Raj is in third place." -->
Raj is in <say-as interpret-as="ordinal">3</say-as> place.
Expletives, Curse Words, and Bleeping
Make your skill friendlier to sensitive ears by adding in a say-as element. The content surrounded by this word will be bleeped out. The length of the beep is controlled by the length of the word enclosed by the XML tag.
Taylor is a <say-as interpret-as="expletive">fudging</say-as> liar.
Your favorite word is <say-as interpret-as="expletive">supercalifragilisticexpialidocious</say-as>, right?
Units and fractions
This one is absolutely a game changer for skills that deal with recipes, scientific equations, construction projects, and other uses that deal with fractions and units like feet, meter, yard, inches, etc.
If you find that your skill uses formatted time data (for instance, from a race result), you might find the time value for the interpret-as attribute valuable:
<!-- Output: "One minute and twenty-one seconds"-->
<say-as interpret-as="time">1'21"</say-as>
Digits
If you want your a number uttered digit by digit, use the digits value to get your numeric value read correctly:
<!-- Output: "three point one four one five nine two" etc. -->
<say-as interpret-as="digits">3.14159265358979323846 2643383279502884197169399375105820974944</say-as>
Addresses
Addresses are fairly common, but hard to get to sound right if you’re using standard text. Luckily, the Alexa developers have you covered!
<!-- Output: "Sixteen Hundred Pennsylvania Avenue Northwest, Washington, D, C, two zero five zero zero" -->
<say-as interpret-as="address">1600 Pennsylvania Ave NW, Washington, DC 20500</say-as>
Interjections
Alexa has a number of speechcons that it supports for use with your Skill’s locale. For examples, here’s the English (US) list.
<!-- You can hear the difference when played sequentially -->
<s>Wow</s>
<say-as interpret-as="interjection">Wow</say-as>
NOTE: You really should avoid using interjects with anything other than the listed speechcons unless you want the speech to sound extremely stilted and unnatural.
Voices
Amazon offers a wide variety of voices other than the standard Alexa voice for the en-US locale. Simply wrap your text with the <voice> tag with the name attribute specified.
<!-- en-US locale voices -->
<voice name="Ivy">Hi, my name is Ivy.</voice>
<voice name="Joanna">Hi, my name is Joanna. This is what my voice sounds like.</voice>
<voice name="Joey">Hi, my name is Joey. This is what my voice sounds like.</voice>
<voice name="Justin">Hi, my name is Justin. This is what my voice sounds like.</voice>
<voice name="Kendra">Hi, my name is Kendra. This is what my voice sounds like.</voice>
<voice name="Kimberly">Hi, my name is Kimberly. This is what my voice sounds like..</voice>
<voice name="Matthew">Hi, my name is Matthew. This is what my voice sounds like.</voice>
<voice name="Salli">Hi, my name is Salli. This is what my voice sounds like.</voice>
You can also use voices from other regions, just add an inner tag to wrap your content with the <lang> tag set with the appropriate locale set. See the following examples for more information.
<!-- en-AU locale voices -->
<voice name="Nicole"><lang xml:lang="en-AU">Hi, my name is Nicole. This is what my voice sounds like.</lang></voice>
<voice name="Russell"><lang xml:lang="en-AU">Hi, my name is Russell. This is what my voice sounds like.</lang></voice>

<!-- de-DE locale voices -->
<voice name="Hans"><lang xml:lang="de-DE">Hi, my name is Hans. This is what my voice sounds like.</lang></voice>
<voice name="Marlene"><lang xml:lang="de-DE">Hi, my name is Marlene. This is what my voice sounds like.</lang></voice>
<voice name="Vicki"><lang xml:lang="de-DE">Hi, my name is Vicki. This is what my voice sounds like.</lang></voice>

<!-- en-GB locale voices -->
<voice name="Amy"><lang xml:lang="en-GB">Hi, my name is Amy. This is what my voice sounds like.</lang></voice>
<voice name="Brian"><lang xml:lang="en-GB">Hi, my name is Brian. This is what my voice sounds like.</lang></voice>
<voice name="Emma"><lang xml:lang="en-GB">Hi, my name is Emma. This is what my voice sounds like.</lang></voice>

<!-- en-IN locale voice -->
<voice name="Aditi"><lang xml:lang="en-IN">Hi, my name is Aditi. This is what my voice sounds like.</lang></voice>
<voice name="Raveena"><lang xml:lang="en-IN">Hi, my name is Raveena. This is what my voice sounds like.</lang></voice>

<!-- es-ES locale voices -->
<voice name="Conchita"><lang xml:lang="es-ES">Hi, my name is Conchita. This is what my voice sounds like.</lang></voice>
<voice name="Enrique"><lang xml:lang="es-ES">Hi, my name is Enrique. This is what my voice sounds like.</lang></voice>

<!-- it-IT locale voices -->
<voice name="Carla"><lang xml:lang="it-IT">Hi, my name is Carla. This is what my voice sounds like.</lang></voice>
<voice name="Giorgio"><lang xml:lang="it-IT">Hi, my name is Giorgio. This is what my voice sounds like.</lang></voice>

<!-- ja-JP locale voices -->
<voice name="Mizuki"><lang xml:lang="ja-JP">Hi, my name is Mizuki. This is what my voice sounds like.</lang></voice>
<voice name="Takumi"><lang xml:lang="ja-JP">Hi, my name is Takumi. This is what my voice sounds like.</lang></voice>

<!-- fr-FR locale voices -->
<voice name="Celine"><lang xml:lang="fr-FR">Hi, my name is Celine. This is what my voice sounds like.</lang></voice>
<voice name="Lea"><lang xml:lang="fr-FR">Hi, my name is Lea. This is what my voice sounds like.</lang></voice>
<voice name="Mathieu"><lang xml:lang="fr-FR">Hi, my name is Mathieu. This is what my voice sounds like.</lang></voice>
NOTE: The pronunciation for many of these voices will be hilarious.
Conclusion
I hope you learned a lot about some of the most useful Alexa SSML elements and will integrate them into your Skills. If you find any other useful elements, feel free to leave them in the comments below.
For the past few years, Microsoft has been making serious moves in the world of open source software. The most significant project for developers is VS Code (Visual Studio Code), a lightweight code editor with a very active extensions marketplace. For us Alexa Skill developers, the ASK Toolkit extension turns VS Code into a fully-fledged development environment. In this post, I will be reviewing the extension and giving my input on its usefulness.
You will need to have Git, VS Code, and the ASK-CLI installed before installing the ASK Toolkit extension. Once this is done, you can install the extension either in VS Code itself or via the VS Code marketplace.
Exploring
NOTE: For the purposes of this tutorial, we will be covering version 1.0.2 and only Node.js and ASK-CLI information. Python users will most likely have similar support.
Command Palette
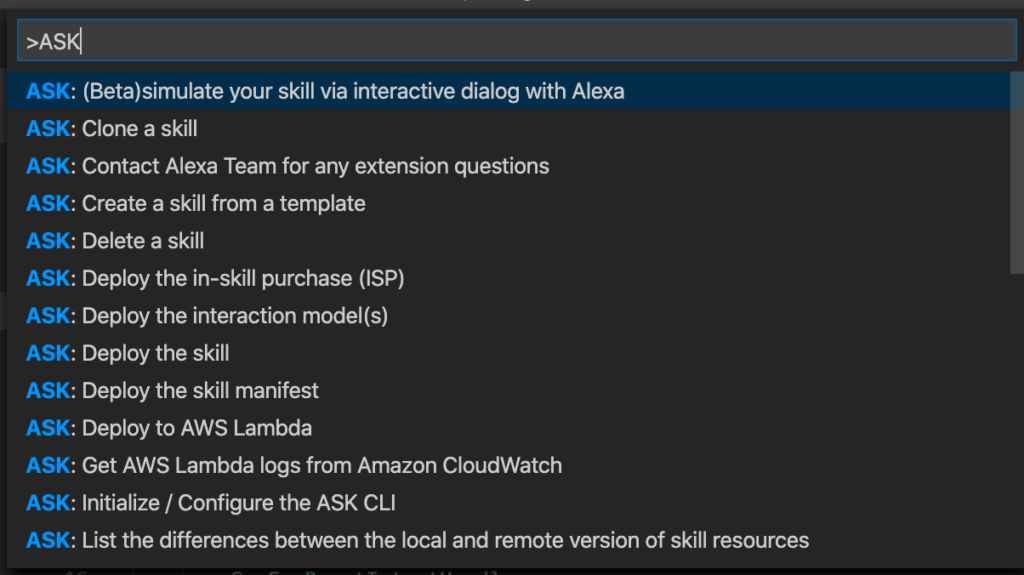
You can see a list of commands available to you by invoking the Command Palette (CMD+SHIFT+P on Mac OS X) and typing the prefix “ASK”.
There is also the ability to interact with the lower-level commands by selecting the “ASK: More commands ( low-level commands )” to find ISP (In-Skill Purchasing) commands, beta testing, simulation, account linking and much more.
Ask you can see, the Command Palette streamlines a lot. The majority of these commands are wrappers around the command line API that help select from known available options available from skill.json and configs found in the project’s /models/ directory (i.e. en-US.json).
For my purposes, I find a lot of these commands mask usage of the ASK-CLIs power. You should really learn these commands and be careful of their usage, as some cannot be reversed. For instance, learn about the ask dialog command here!
In addition, ASK-CLI commands will be updated and APIs will change. As of this article’s publication, it is recommended to use ASK-CLI version 1.7.14. The current ASK-CLI available is 1.7.20.
It’s very rare that I find myself deleting skills or updating models from the command line (the Alexa Developer Console is too good of a GUI to ignore). However, the commands available may be useful for advanced Skill Builders.
The only one that I found myself using was askSDKIntentHandler, which generates the ubiquitous IntentHandler object with two methods, canHandle(handlerInput) and handle(handlerInput).
It is also important to know that the ask-sdk-core comes with convenience methods for retrieving request type (Alexa.getRequestType(handlerInput.requestEnvelope)) and intent name (Alexa.getIntentName(handlerInput.requestEnvelope)). So, your mileage may vary…
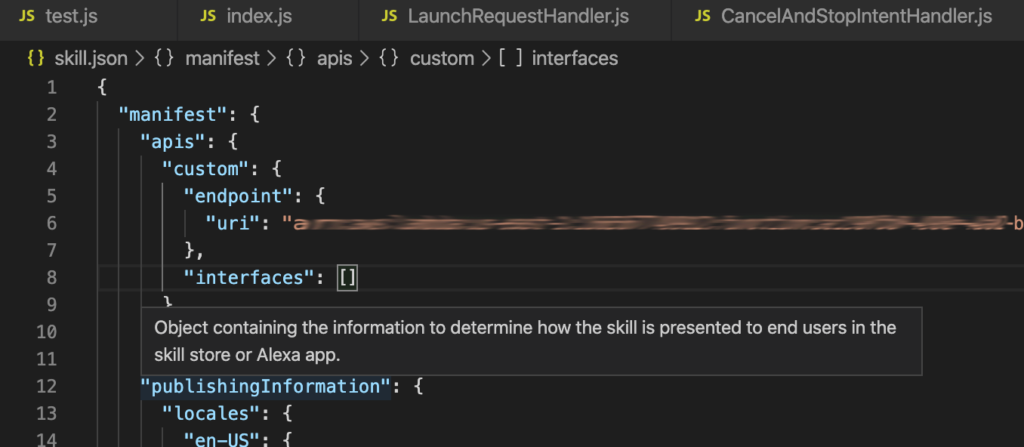
Hover Documentation
There is also a nice feature that allows you to hover over you JSON objects and get information about what each property means.
Troubleshooting VS Code Extension
If you have installed the plugin and get an error, “ASK Command Line Interface (ASK CLI) is not installed. The toolkit requires ASK CLI to execute the commands”, you may be scratching your head why this is happening. Here’s what you can do to help resolve this:
Open an external Terminal and run ask --version. This makes sure that you have the ASK CLI installed.
Run node --version.
Run whoami to get the user
Open the Terminal in VS Code and run the previous three commands. They should all match.
You might also be having issues with NVM. NVM allows you to switch Node.js versions, but it also changes which npm packages are installed globally. This is a very common problem you run into as a Node.js developer working locally.
Simply execute nvm use <whatever version VS Code is set up to> and then npm install -g ask-cli. Restart VS Code and see if this resolves your issue.
Conclusion
I’m glad that you’ve made it this far in this review. VS Code is one of the greatest free code editors out there. It has taken the software world by storm, offering a platform for extensions like the ASK Toolkit to increase developer productivity. Although I don’t use VS Code or the ASK Toolkit, I hope that you have learned a lot about this ASK VS Code extension.
Good morning, fellow Alexa Skill Builders! This year has been a groundbreaking year for the Alexa platform. New APIs, region and language support, and devices were released this year, opening up Amazon voice control to a whole new landscape.
Here at Alexa Skills Tutorials, we are always on the lookout for code samples and repositories that can help fellow developers find inspiration from. Listed below are a small collection of GitHub accounts and repositories that you may find useful or interesting. Enjoy!
DabbleLab – a great resource for beginner and advanced Alexa video tutorials. Their GitHub account has a lot of templates for those of us keeping up with new APIs and features.
Packt – Packt Publishing has released a few books and courses that can help the beginner explore the API and browse code samples.
Alexa Cookbook – an official repository for Alexa Skills given in a cookbook format. Each recipe can help demonstrate some of the more advanced features that the Alexa platform offers along with some helpful guidance.
Alexa London Travel – this Alexa Skill was developed in C#, which is an interesting take on developing using a language other than JavaScript (Node.js), Python, or Java.
alexaDateConverter – this Github repo looks promising for those of us who deal with dates in Alexa Skill development.
alexa-labs – this Github organization has a lot of interesting applications for Alexa, including robotics control, hackathon materials, Twitch follow-along code, and much more!
Know any other notable Github repos? Feel free to share them here! We will add them to a resource page in the near future!
The Alexa team recently announced that they will be publishing more tutorials for developing skills. As most of us advanced Skill Builders have learned, there is a dearth of tutorials on the Internet once you get past the initial beginner tutorials. One such topic that has cost me quite a lot of time finding information on is locally debugging Alexa Skills.
Local debugging has a number of benefits for Alexa Developers. First off, you don’t want to be doing a dance between the tabs in the Alexa Developer Console. When I first started creating Alexa Skills, it was easy enough to simply have the Build, Code, and Test sections opened in different browser tabs. Make a change to the model in the Build tab (i.e. add an Intent), add the Intent Handler in the Code tab, hit Deploy, then debug your skill with the Test tab using manual text input. This gets old fast, as you spend a lot of time refreshing and shifting between browser tabs.
Second, you need quicker feedback on what is broken in your skill. I will admit that the integrated CloudWatch logs for the Alexa-hosted Skills is really nice. A simple console.log(someData) will log data from your skill to CloudWatch.
However, flipping between your testing session and the CloudWatch logs can be tedious and cumbersome once your Skill has progressed. The session also seems to end quicker than expected. It would be a lot better if you could test your skill and iterate quicker.
Luckily, the Alexa team put out a video that addresses setting up local debugging for your Skill. Check out this straightforward video from Sattwik Pati:
The general gist of this tutorial video is to change your endpoint for your skill from the hosted endpoint to a Ngrok endpoint. Then you run a script and you should be able to test your skill locally on your own computer in your own development environment.
Sattwik Pati also put out a blog post a few months ago on the same topic. You should take a look at this if you find tutorial articles easier to follow.
In the video, Sattwik also uses the ASK CLI dialog command to interact with his local skill. If you want to learn more about this, check out our latest article on using the ASK CLI dialog command.
Hello fellow Alexa Skill Builders! In today’s tutorial, I will show you how to use the ASK CLI dialog command to run some automation against your skill code. We will be able to set up scripts to test our code with prepared user dialogs using Replay files. Let’s get started!
For the purposes of this tutorial, create a skill either using the ask new command on your local machine then use ask deploy to deploy it. Otherwise, use the Alexa Developer Console to create a skill and then use ask clone to clone the repository to your local machine to access the files containing your Lambda code and skill configuration.
Using the ask new command, selecting Node.js option, then using the Hello World template to kick off this tutorial!
What is the ASK CLI Dialog Command?
The ASK CLI is a great companion for testing your skills. It contains a variety of commands that we can execute on a command line that can do all sorts of things, like create and deploy a skill, validate it, and interact with and Alexa API endpoints. For the purposes of this tutorial, we are going to focus on the ask dialog command.
The ask dialog command opens a conversational-style prompt where you can interact with your deployed (this is important) skill via text similar to the Test tab in the Alexa Developer Console. No audio is played, but you can see the text that Alexa would send to the user.
There are many parameters that you can use with the ask dialog command that make it extremely useful.
A simple dialog with Alexa
Let’s start talking to our skill! Open a command prompt (I use Terminal on Mac OS X) and change directories into the skill directory: cd demo_skill.
Next, execute ask dialog. You should get an error:
steves-computer:demo_skill steve$ ask dialog
[Error]: Please specify device locale via any of the approaches below:
 - command line parameter "--locale"
 - environment variable "ASK_DEFAULT_DEVICE_LOCALE"
Alexa Skills can be developed and deployed into a variety of languages and locales, so we will need to specify one when using the ask dialog command.
Since I am based in the United States and using English as my language for the Alexa Skill, I will set my locale to en-US.
Re-run the command, this time with the locale parameter set: ask dialog --locale en-US
After a short delay, you should see something similar to this:
NOTE: you could also set the environment variable ASK_DEFAULT_DEVICE_LOCALE and set its value to en-US. This can be useful for simplifying commands or for use in scripts.
Now that our prompt is open, let’s start a dialog! Type open hello world and press Enter. You should be warmly greeted with the LaunchRequest speech output, Welcome, you can say Hello or Help. Which would you like to try?.
Next, ask for help by typing help and pressing Enter. You should receive your skill’s HelpIntent message. In my case, as I cloned the Hello World template, I received You can say hello to me! How can I help?.
The session is still open, so we can send Alexa hello as our command and receive back Hello World!. The session ends at this point in my skill, so no further interaction is possible.
Finally, we will use the special command !quit to exit the ASK CLI dialog prompt. You can also use the key combination CTRL+C to skill the session.
Let’s go through each of the parameters so we can better understand the possibilities.
NOTE: Replay files will contain much of these parameters, so you may not need to use these if you go down that route.
--skill-id, -s – (Optional) – The skill ID of your skill. This parameter should be in the format amzn1.ask.skill.12345678-1234-1234-123456789123. If not set and we are not using a Replay file (--replay or -r option), you will need to run the ask dialog command from the repository’s root directory.
This option is especially useful for running tests on servers where the skill code is not available (i.e. a Jenkins or TeamCity job).
--locale, -l – The locale that you wish to interact with during your dialog session. The value will be the hyphenated language and region where the code will be deployed to ( i.e. en-US, en-GB, en-CA, en-AU, en-IN, de-DE, ja-JP, etc.). Alternatively, you could set the ASK_DEFAULT_DEVICE_LOCALE environment variable.
This parameter will be specified in a Replay file, so you will not need to set it if you use one. Otherwise it is required.
--stage, -g – (Optional) – Specify which version of your deployed code that you want to create a dialog with. Valid values are live and development.
This parameter will come in handy when running regression tests against your production and development codebases.
--replay, -r – (Optional) – The file path to a JSON-formatted file that will contain text utterances you can use for automating dialogs.
NOTE: If you’re curious about ASK profiles, run ask init --list-profiles.
--debug – (Optional) – According to the Alexa docs, it “appends a debug message to the standard error.”
Add this parameter to your command and be ready to see VERY detailed output about your ask dialog session.
--output, -o – (Optional) – The file path of an output file that will log all utterances, skill responses, and the associated JSON elements to a file.
Similar to the --debug parameter, you will receive a lot of information about the skill session. This data may be useful if you’re trying to figure out a failure or bug in your skill or its external dependencies.
Getting help
You can also use the ask dialog --help command to see the latest updates for your version of ASK CLI. Here’s what the output looks like for version 1.7.17:
Usage: dialog [-s|--skill-id <skill-id>] [-l|--locale <locale>] [-r|--replay <file-path>] [-o|--output <file-name>] [-p|--profile <profile>] [--debug]

simulate your skill via interactive dialog with Alexa

Options:
  -s, --skill-id <skill-id>  skill-id for the skill
  -l, --locale <locale>      locale for the utterance text
  -o, --output <file-path>   log the interactive session into a file
  -r, --replay <file-path>   input file that contains a recorded session
  -g, --stage <stage>        stage for the skill
  -p, --profile <profile>    ask cli profile
  --debug                    ask cli debug mode
  -h, --help                 output usage information

  Special Commands:

    !record    record the user transcript
    !quit      quit interactive mode
Special commands
As you can see above in the ask dialog --help command’s output, there are two special commands that you can use in your dialog session with Alexa.
!quit, as demonstrated previously in this tutorial, will kill the session and return control back to your command prompt. Amazon Alexa docs say that you shouldn’t include this in your Replay files, but it is necessary if you want to make sure the session is killed. Check out this GitHub issue for more information
!record will take all of the user interactions thus far in the skill session and record them to a Replay file that you specify. Here’s an example of a skill session that is recorded to a JSON file:
Replay files
As you can see in the previous section, Replay files really aren’t that complicated. They contain 4 keys: skillId, locale, type, and userInput.
skillId is your targeted skill’s ID in the format similar to amzn1.ask.skill.12345678-1234-1234-123456789123. If you’re running this Replay file on a remote server without the lambda code, you will be able to interact with the skill.
locale is the region and language that you want to target, i.e. en-US. This is useful is you want to test across the various region-language pairs that Alexa offers.
type always has the value of text. I’m sure that the Amazon Alexa team has a lot of plans for the future of this, but right now it must be specified and set to text.
userInput is by far the most interesting part of the Replay file. It is a JSON array that contains a sequence of user utterances in text format that will simulate a skill session.
userInput
Your first command in the userInput array should be the invocation of the skill. If your skill session stays open, you can add more user utterances to navigate through your skill.
If, for instance, your skill determines your intent from one utterance and then closes the session, you can simply keep the userInput array simple like so:
{
  "skillId": "amzn1.ask.skill.12345678-1234-1234-123456789123",
  "locale": "en-US",
  "type": "text",
  "userInput": [
    "ask hello world to say hello"
  ]
}
This is exactly the same as manually doing this:
steves-computer:demo_skill steve$ ask dialog --locale en-US
  User  >  ask hello world to say hello
  Alexa >  Hello World!
  User  >  !quit
Using our Replay files
Using a Replay file is really simple. Earlier in this tutorial, I created a Replay file earlier by using the !record special command during the ask dialog prompt session. It output a file called happyPath.json.
Now, I will use this file to recreate the interaction I recorded previously using the ask dialog command’s --replay parameter. If you followed along to this point, execute ask dialog --replay happyPath.json and you should see something like this:
Once the command has completed iterating over all of the userInput utterances, control is restored back to the user. You can continue interacting with your skill (if the skill session is still open) or manually enter more commands.
However, returning control back to the user is problematic if we are using our Replay files anywhere other than on our own local machines.
Hanging scripts like this are the bane of automation developers, as you often have no idea why your scripts are failing until you remotely connect and see a hanging console session. Yikes!
Automation with Replay File Scripts
So, we previously saw that using replay files only seems to be useful on our local machines. I can see the intention of the Alexa ASK CLI developers who made this tool: get the skill to a desired state, then return control to the user for further testing. But, like I mentioned before, this can cause issues on a Jenkins server that doesn’t timeout correctly.
However, there is a hacky solution that we can use to close our solution: the !quit special command. Add this as the last element in our Replay file’s userInput array, like so:
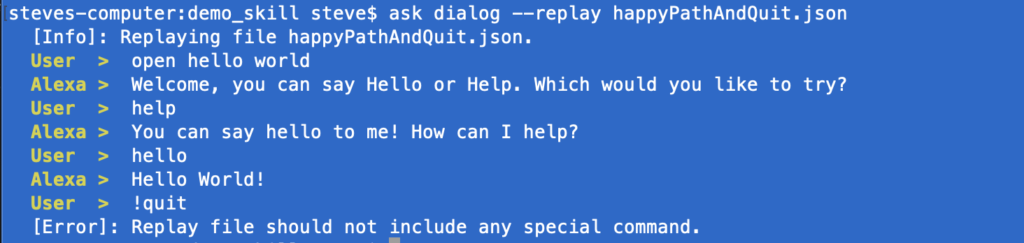
Re-execute the ask dialog command with this update: ask dialog --replay happyPathAndQuit.json.
Here’s what the output should look like:
While this solution is not ideal, it is a known issue that hopefully gets some traction as the Alexa developer community gains more traction.
Conclusion
Thanks for following along with this tutorial! The ASK CLI has a number of great features and functionality that can help make our development lives better. Using ask dialog opens up a whole new door of possibilities that will only get better as the Alexa team releases new updates.
Dabble Lab has published another great tutorial video showing how to use the ASK CLI with Alexa-hosted skills. You will learn how to create a skill from your local machine and deploy it to the remote Git repository that Alexa provides for its users. You will also learn how to deal with merge conflicts with edits made locally as well as in the hosted IDE (Integrated Development Environment) that is available in the Alexa Developer Console.
One interesting note, however, is that it looks like Amazon Alexa does not allow users to access the repository that it hosts for us. You can concatenate the host and path values that are inside the .ask/config file to create a URL where the hosted code lives.
However, once you are there, an authentication modal pops up. You would think that you could use the username and password parameters in the .ask/config file and then get access. I found that these credentials do not work as you would expect; instead, we receive a 403 status code from the server with some XML:
This usually means that we are missing some credentials or headers or that we cannot access this from a web browser.
On the Amazon Developer forums, a user posted a question back in March that still remains unanswered: https://forums.developer.amazon.com/questions/202024/alexa-hosted-sets-up-a-codecommit-repository.html. I will keep an eye on this thread and see if it ever gets answered. In general, the Alexa Developer forums have a lot of hanging questions that don’t get answered. Hopefully, the Amazon Alexa team gets around to this and helps us make our skills even better.
You may be asking why I would want to have access to the CodeCommit repository. The simple answer is that I would like to use a CI/CD (continuous integration/continuous deployment) server like Jenkins to increase the code quality and velocity of my projects. With Jenkins, you can create a pipeline or project that will run tests to ensure that your users never have to experience buggy code out in production.
Anyway, make sure to watch the video and learn more about the ASK CLI in regards to an Alexa-hosted skill. Dabble Lab has been putting out some great content, make sure to like and subscribe to their channel to stay up to date on the latest Alexa development tips, tricks, and tutorials.
The course offers over 6 full hours and 79 lessons that will surely help jumpstart your study plan for the exam. By the end of the course, you will understand how to build and test your Amazon Alexa Skills so that they’re ready for certification and publication.
I have previous used A Cloud Guru’s focused course material to pass the AWS Certified Solutions Architect exam and can attest to their approach. I find their courses to be straightforward and goal-oriented. You won’t find a lot of fluff content or needless memorization. Instead, their courses focus on helping you pass the exam and get certified.
If I had to choose between the several e-learning course providers that I used to study for my AWS exam, A Cloud Guru was the one that delivered results. It’s also a lot cheaper than competitors like Linux Academy, with better quality control than Udemy.
Great news for U.S.-based Alexa Skill Builders and developers! For the whole month of December 2019, AWS is now offering a voucher to take the Alexa Skill Builder exam for FREE! That’s a $300 value!
All that you have to do is publish or update an Alexa Skill that contains In-Skill Purchasing (ISP) and you get a voucher. For more information on getting started with In-Skill Purchasing, visit this link or watch this great video by Dabble Lab: